This help topic page assumes that you already have a Panorama X Server running, and that now you want to add a new client computer. if you don’t already have a server running, see Installing and Launching Panorama Server.
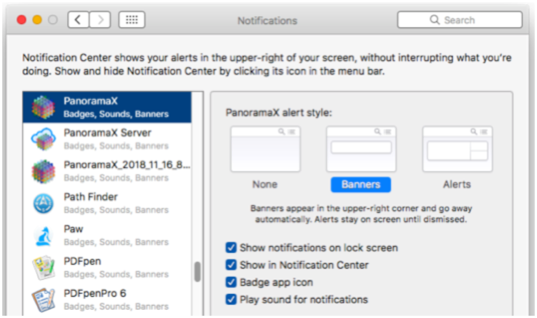
If you haven’t done so already, we recommend that you enable Panorama X notifications. Panorama uses notifications to keep you informed about the status of client/server operations, so if notifications aren’t enabled you will miss out on these updates. Notifications are controlled with Apple’s System Preferences application, consult Apple’s support documents if you are not familiar with their operation.
Client on the Same Network as the Server
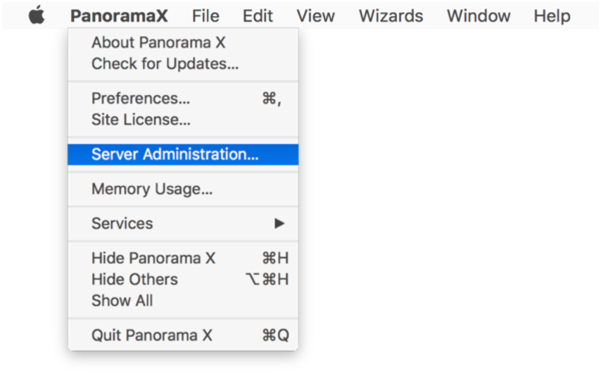
If the client is on the same network as the server, there should be no configuration necessary – the new client computer will automatically locate the server (using Apple’s Bonjour technology). To verify that the client sees the server, choose the Server Administration from the Panorama menu.
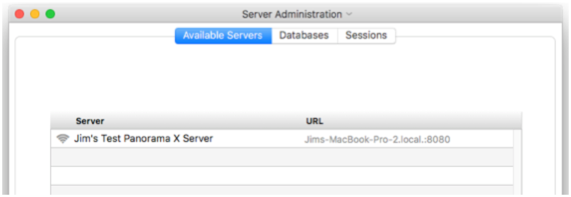
The Available Servers panel will display all Panorama X servers on your local network. (The wifi symbol indicates that this is a server on the local network that was automatically discovered via Bonjour.)
If a server is running on your local network, but does not appear in the Available Servers panel, check your System Settings/Privacy & Security/Local Network settings and make sure that PanoramaX is permitted to find and communicate with devices on your local network.
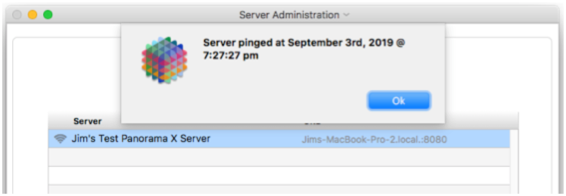
The fact that a server shows up in the Available Servers window indicates that Bonjour is working, but does not prove that the client can actually communicate with the server. To test the actual connection, click on the wifi icon next to the server name, then choose Ping Server from the popup menu.
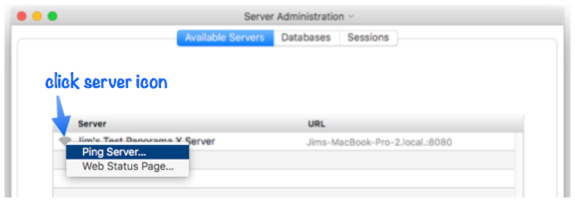
If the connection is working, an alert will appear indicating that the server has responded.
Notice that you really haven’t done any actual configuration — you’ve simply tested Panorama’s automatic default configuration. In fact, for local database sharing you usually don’t have to do any configuration at all. You really only need to open the Available Servers panel if there is a problem.
Debugging Local Server Connection Problems
If the server does not show up at all in the Available Servers panel, double check that both computers are connected to the same local network (the same router). If the client computer is not on the same local network as the server computer you’ll have to use remote sharing to connect to the server (see the next section).
Configuring to a Remote Server
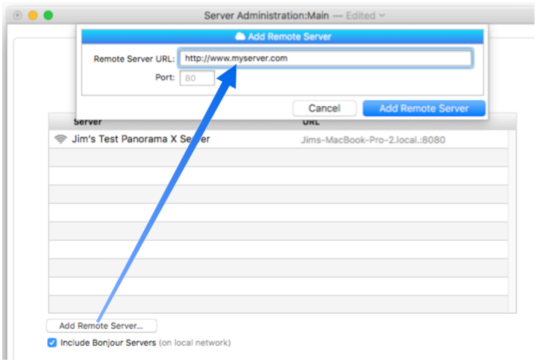
If the server is not on the local network, you’ll have to manually configure the connection. This is done by pressing the Add Remote Server button in the Available Servers panel. A dialog sheet will appear where you can type in the url for the server you want to connect to (and if necessary, the port number).
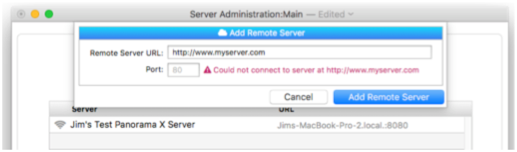
When you press the Add Remote Server button in this dialog, the connection to the server will be tested. Any problem will be displayed so that you can correct it.
If everything checks out, the remote server is added to the list, and can now be connected to just like a local server.
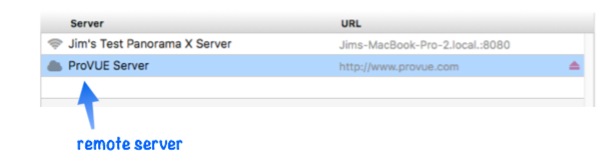
Note: The remote server is now permanently added to the list (unless you remove it, see Server Administration Wizard). It will remain visible in the list even if there is a connection problem, or even if server itself stops running. To check whether a remote server is actually running and available, double click on the cloud icon to “ping” the server, as described earlier on this page.
Using a Link to Configure a Remote Server
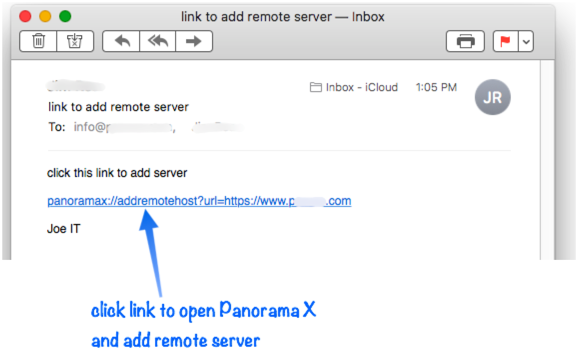
An even simpler method for configuring a remote server is to use a link sent to you by the person administering the server. For example they could send you the link in an email, via a text message, via Slack or embed it in a company web page. Then you simply click on the link to automatically configure your copy of Panorama to connect to the remote server. Here is an example of a link sent thru email and received in Apple Mail:
Here is an example of receiving a link thru Slack:
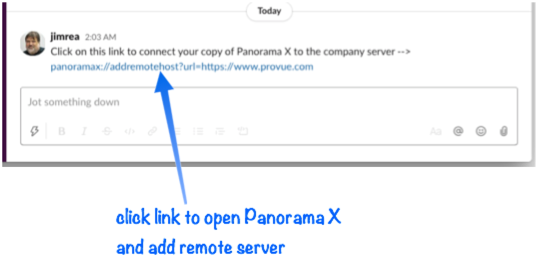
No matter how you receive it, when you click on the link Panorama X will come forward (you may be asked to approve this), and then you will see a notification that the server has been added to your system (you must have notifications enabled to see this).

If you want to confirm this you can open the Server Administration Wizard from the PanoramaX menu. You can also open this wizard by clicking on the notification.
Depending on the program used to send you the link, it may not show up as a clickable link. In this example the link is showing up in Gmail as plain text. (At the time this was written, Gmail unfortunately always shows these links as plain text.)
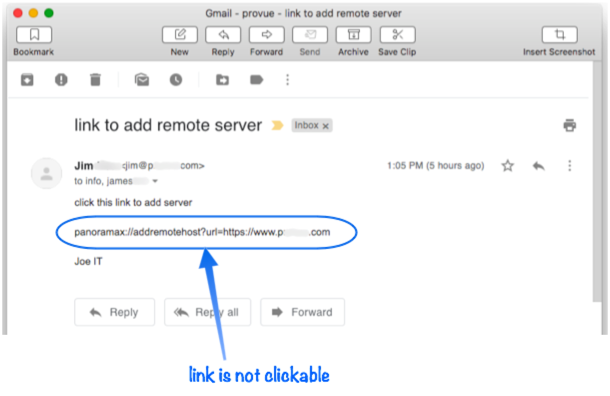
If you encounter this situation, simply select and copy the link to the clipboard, then paste the link into your web browser URL bar and press the Return key to activate the link.

Generating a Remote Server Link
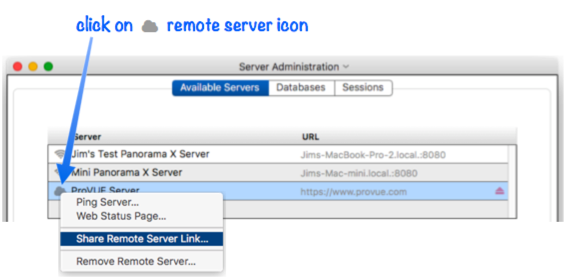
If you are an administrator and need to share a remote server link with one of your users, start by opening the Server Administration Wizard from the PanoramaX menu. Then click on the icon for the server you want to share, and choose Share Remote Server Link… from the popup menu (this option will only appear for remote servers, it is not needed for local servers, which connect automatically).
The clipboard now contains the special URL to send to your user, you can simply paste this into an email, text message, Slack, etc. If you have a company web site, you may want to put the link on a private web page on your site. Paste the link into your HTML code like this:
<a href="panoramax://addremotehost?url=http://yourserver.com>Add Remote Server</a>
See Restricting Access to the Current Account in Restricting Server Access to learn how to protect your server from unauthorized access even if this link gets into the wrong hands.
Using a Preference Link to Configure Remote Servers
If you already have one computer that is set up to access one or more remote servers, you can use the Sharing Preferences dialog to transfer that configuration to other computers. Simply make sure to check the Client option when you create the shared preference link. See Deploying Panorama in an Organization to learn more about this option.
Downloading Shared Databases to the New Client Computer
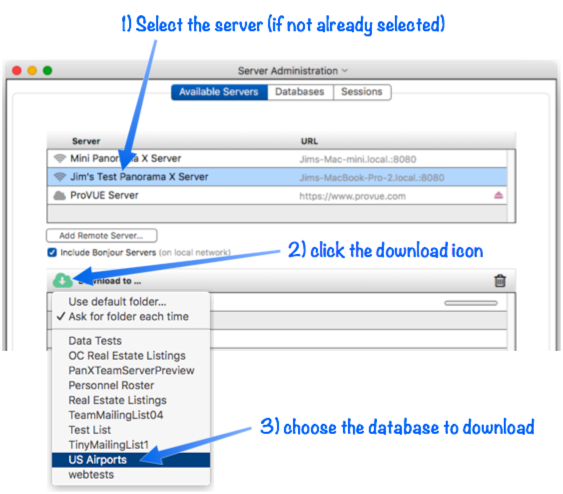
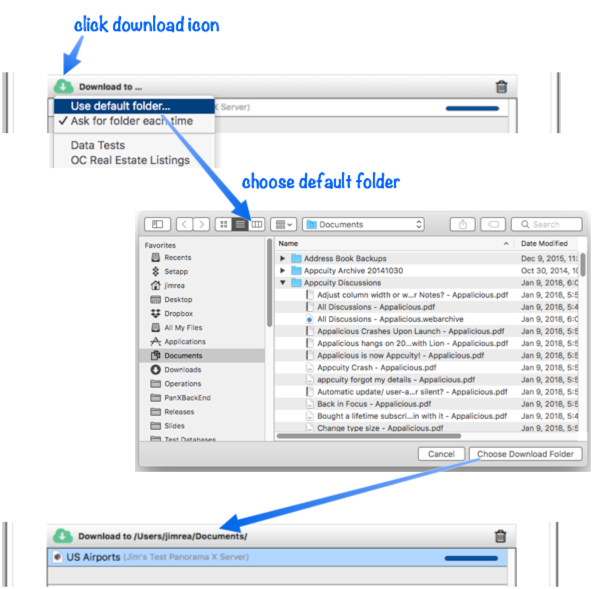
Once you’ve established the connection with the Panorama X server, you’ll probably need to download one or more databases from the server to the new client. Start by selecting the server (if there is more than one available), and then turn your attention to the Download Manager in the bottom half of the Available Servers panel. Click the Download icon (cloud), then choose the database you want to download from the server. (Note: If the list is empty, you may not be authorized to download databases on your own. Check with the server’s administrator to find out what alternate arrangements have been made to allow you access to shared databases.)
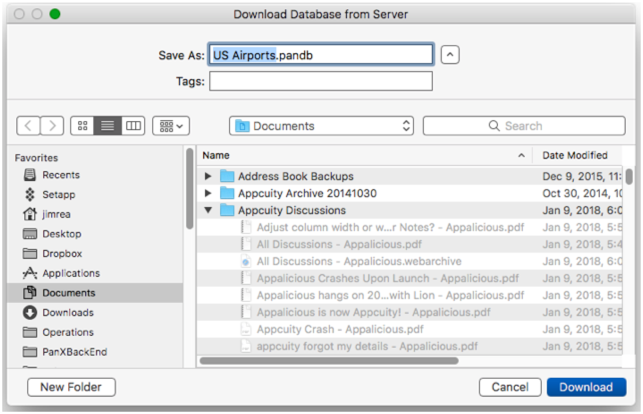
Once you’ve chosen the database, Panorama will ask you where you want to download the database. Locate the folder you want to use and press the Download button. (If you’re planning to download several databases to the same folder, we’ll show you in a moment how to skip this step.)
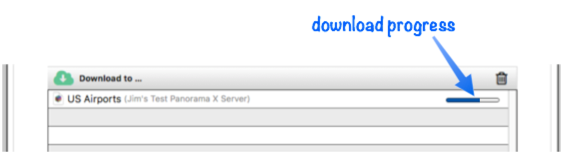
Now Panorama will begin downloading the database from the server. Depending on the size of the database and the speed of the connection between your computer and the server, this may be fast or it could take a while. Panorama will display the progress as the download proceeds. (You don’t have to wait for the download to finish to perform other tasks, you can even start another download before the first one finishes.)
When the download is complete, Panorama will notify you (if you have notifications enabled in your System Preferences). The database is ready to use, you can simply double click it in the Finder to open it, or use the File>Open File dialog. It now works like any other Panorama database on your computer, except that when you open it, it also opens a connection to the server.
As a shortcut, you can also open the newly downloaded database by clicking on its icon in the Download Manager list, then choosing Open Database from the pop up menu.
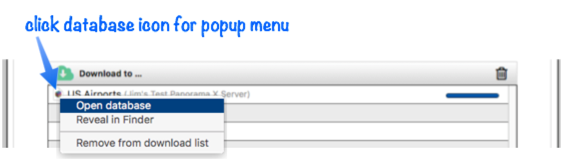
In addition to opening the database you can also reveal the database in a Finder window, and you can remove the database from the Download Manager list. Removing it from the list doesn’t remove it from the disk, you can still open it all of the other normal ways (Finder, Open File, Find & Open, Open Recent, etc.)
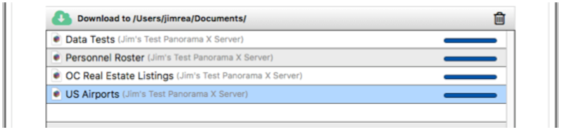
If you want to download multiple databases without having Panorama ask you for the location every time, you can set up a default folder for downloads by choosing Use default folder from the download popup menu. When you’re done, the title area of the Download Manager will show the selected location, as shown in this diagram.
With a default location set up, you can very quickly download a bunch of databases in a hurry. Remember, you can queue up multiple downloads at once.
You can change the default location at any time, and you can also go back to having Panorama ask you for the location each time. Of course you can always move any database later, Panorama doesn’t care. In fact, even if you move a database you can still open it by clicking on its icon in the Download Manager.
Warning: The database should be downloaded to a folder on the local hard drive for this computer. It should never be placed in any kind of shared folder, for example inside a DropBox or iCloud Drive folder, or a folder on a file server. Placing a database in a shared location will interfere with Panorama’s synchronization process. Panorama databases should only be placed in locations that are accessible only to the local computer.
Panorama normally will keep the list of downloaded databases until you quit Panorama. You can also clear the list at any time by pressing the trash can icon. Remember, removing a database from the Download Manager list doesn’t affect your ability to use the database or to open it any other way.
Using a Link to Download a Database
An even simpler method for downloading a database is to use a link sent to you by the person administering the server. For example they could send you the link in an email, via a text message, via Slack or embed it in a company web page. Then you simply click on the link to automatically initiate the download. Using a shared link also allows someone to download a database even if they don’t have authorization to view the list of databases on the server. In that case, they can only download databases for which they have the link. (If you’re a system administrator, see Restricting Access to the Current Account in Restricting Server Access to learn how to prevent users from seeing the list of databases on your server.)
Here is an example of a link sent thru email and received in Apple Mail. When this link is clicked, Panorama X will come forward (you may be asked to approve this), the Server Administration Wizard will open, and the download will commence.
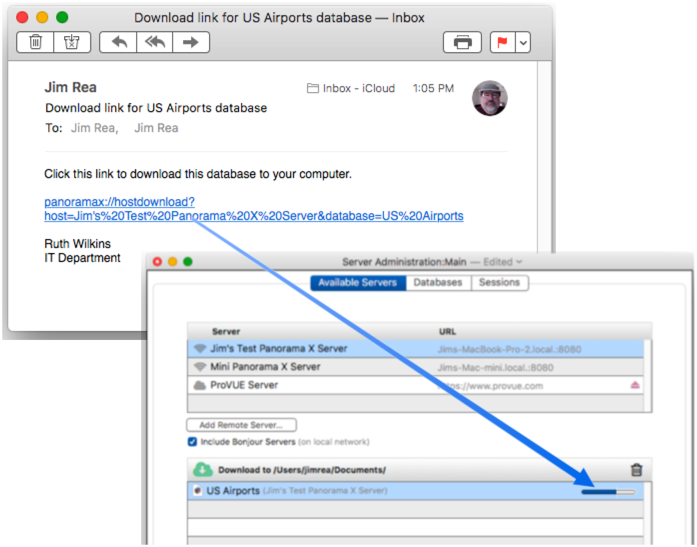
Once the download is complete, you can click on its icon in the Download Manager list for a menu of options, including opening the database, revealing it in the Finder, and removing it from the list.
See the previous section above for a full description of these options.
Depending on the program used to send you the link, it may not show up as a clickable link. In this example, the link is showing up in Gmail as plain text. (At the time this was written, Gmail unfortunately always shows these links as plain text.)
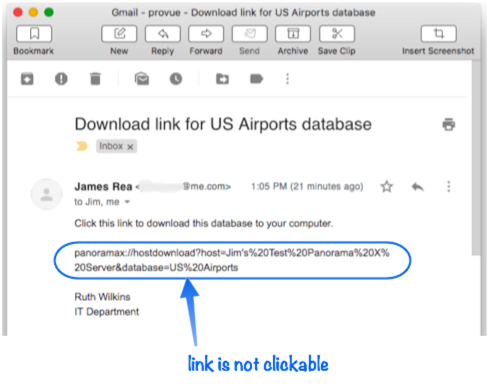
If you encounter this situation, simply select and copy the link to the clipboard, then paste the link into your web browser URL bar and press the Return key to activate the link.

Generating a Download Link
If you are an administrator and need to share a download link with one of your users, start by opening the Server Administration Wizard from the PanoramaX menu. Choose the server (if there is more than one) and then switch to the Databases panel. (Tip: You can double click on the server name to quickly select it and jump to the Databases panel.) Then click on the gear icon for the database you want to share, and choose Share Download Link… from the popup menu.
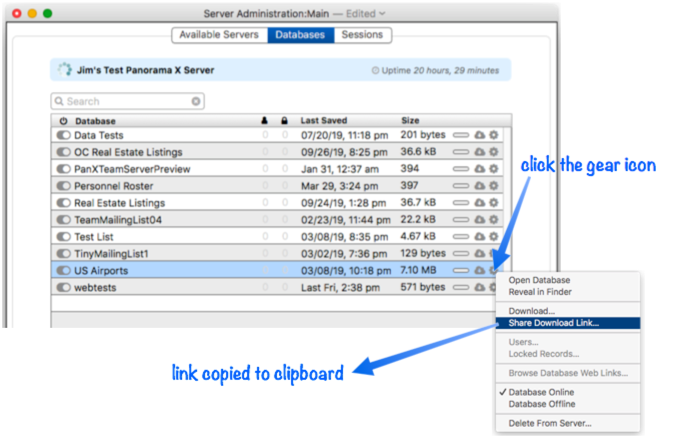
The clipboard now contains the special URL to send to your user, you can simply paste this into an email, text message, Slack, etc. If you have a company web site, you may want to put the link on a private web page on your site. Paste the link into your HTML code like this:
<a href="panoramax://hostdownload?host=Company%20Server&database=Inventory>Download Inventory</a>
See Restricting Access to the Current Account in Restricting Server Access to learn how to protect your server from unauthorized access even if a download link gets into the wrong hands.
See Also
- Advanced Server Settings -- Panorama X Server settings for advanced users.
- Client/Server Debug Instrumentation -- using instrumentation with Panorama X server and clients.
- Installing and Launching Panorama Server -- instructions for getting Panorama Server up and running, as well as best practices for configuring system settings on a server computer.
- Logging Server Activity -- recording server activities for later analysis.
- Restricting Server Access -- limiting Panorama X Server access to authorized users.
- Server Administration Wizard -- this wizard is used to monitor the operation of Panorama servers (both local and remote servers can be monitored), including monitoring server status, checking database status and downloading databases, and monitoring the status of user sessions.
- Using an External Web Server -- instructions for using Panorama Server in conjunction with an external web server (for example Apache, Nginx, etc.).
History
| Version | Status | Notes |
| 10.2 | New | New in this version. |