The Server Administration wizard can be used to monitor a Panorama X Server from any computer on the network, or any computer on the internet if the server is configured to allow it. This wizard allows you to monitor and manage shared databases and logged on users on the server.
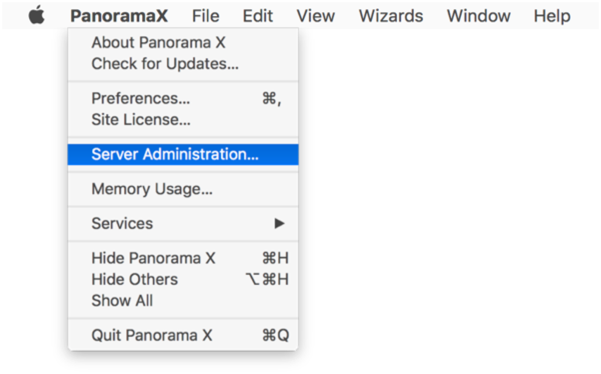
To open the Server Administration wizard, choose it from the Panorama menu.
The wizard has three panels: Available Servers, Databases and Sessions. When first opened, it shows the Available Servers panel.

Available Servers Panel
This panel includes two components: a list of available servers, and a Download Manager in the bottom portion of the panel. By default the list of available servers includes any Panorama X servers that are on the same local network as your computer (connected to the same router and/or wifi network). When a Panorama X server is started up anywhere on your local network, it will immediately appear in this panel.
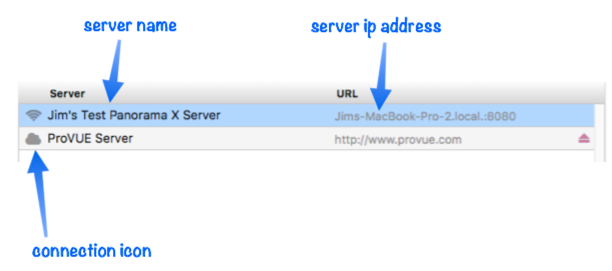
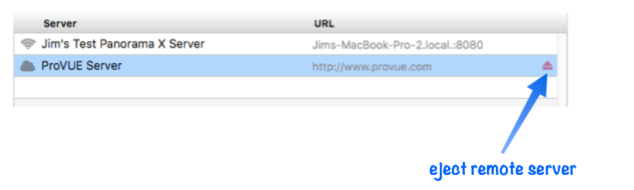
Each line of the available servers list includes a connection icon, the server name, and the server’s IP address.
The Connection Icon
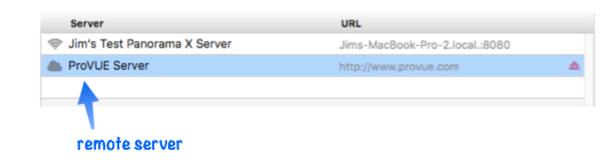
The connection icon indicates whether the server is on your local network (a wifi icon) or is remote (a cloud icon). In the illustration above, Jim’s Test Panorama X Server and Mini Panorama X Server are on the local network, while ProVUE Server is remote. (Connecting to a remote server is explained below.)
Clicking on the connection icon brings up a popup menu of server related operations.
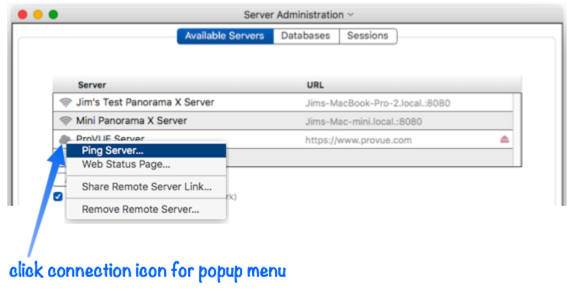
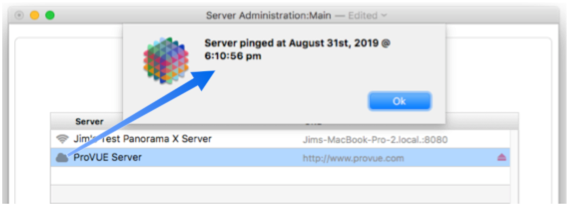
The Ping Server command tests the connection between this computer and the server. If everything is normal, you’ll see a message displaying the current date and time on the server computer (this may be different than the time on your computer if the server is remote).
If there is a problem with the connection, you’ll see an error message instead of the date and time.
The Web Status Page command opens the status page for this server in Safari.
The Share Remote Server Link command copies a link to the clipboard that can be shared with another user to to assist them with establishing a connection to this server. This command is only available for remote servers. See Using a Link to Configure a Remote Server in Setting up a Computer as a Panorama X Client to learn how to use a shared remote server link.
When you click on a remote server, the Remove Remote Server command allows you to remove this server from the list (see below).
Adding a Remote Server
Local servers appear automatically in the available servers list, but if a server is remote it must be added manually by pressing the Add Remote Server button. (Another way to add a remote server is to use a link generated with the Share Remote Server Link option described in the previous section. See Using a Link to Configure a Remote Server in Setting up a Computer as a Panorama X Client to learn how to use a shared remote server link.) When you press the Add Remote Server button, a dialog sheet will appear where you can type in the url for the server you want to connect to (and if necessary, the port number).
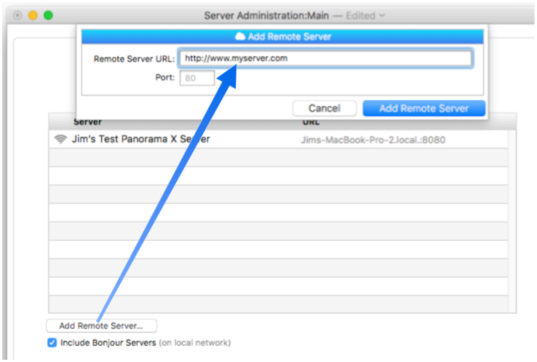
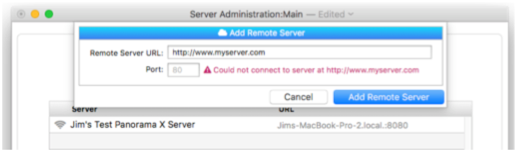
When you press the Add Remote Server button in this dialog, the connection to the server will be tested. Any problem will be displayed so that you can correct it.
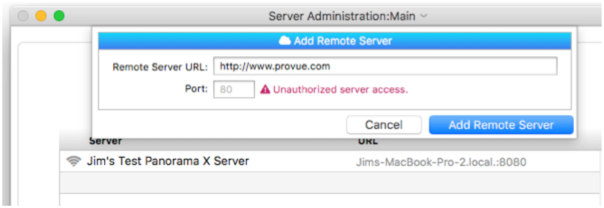
Panorama also checks to make sure that you are authorized to access this server. If not, an error message will appear. (See Restricting Server Access to learn why you might not be authorized to access a server.)
If everything checks out, the remote server is added to the list.
Note: The remote server is now permanently added to the list (unless you remove it, see below). It will remain visible in the list even if there is a connection problem, or even if server itself stops running. To check whether a remote server is actually running and available, use the ping command as described above.
Note: You can also add a remote server programmatically using the addremotehost statement.
Removing a Remote Server
To remove a remote server from the list, press the eject button.
Panorama will ask you to confirm that you really want to remove the server from the list.
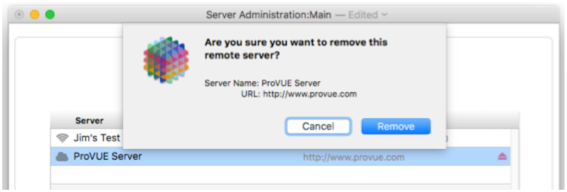
Once the server is removed from the list, you will no longer be able to access any databases on that server (unless you re-add it).
Note: In addition to the eject button, you can also remove a server by clicking on the connection icon and choosing Remove Remote Server from the pop up menu.
Note: You can also remove a remote server programmatically using the removeremotehost statement.
Using the Download Manager
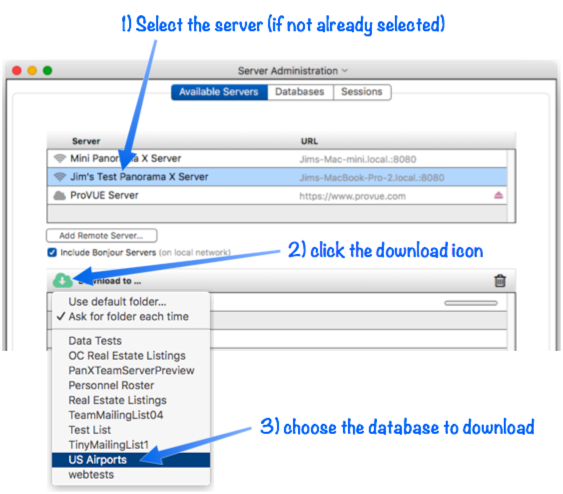
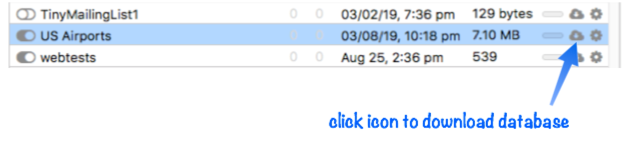
Once you’ve established the connection with the Panorama X server, you’ll probably need to download one or more databases from the server to the new client. Start by selecting the server (if there is more than one available), and then turn your attention to the Download Manager in the bottom half of the Available Servers panel. Click the Download icon (cloud), then choose the database you want to download from the server. (Note: If the list is empty, you may not be authorized to download databases on your own. Check with the server’s administrator to find out what alternate arrangements have been made to allow you access to shared databases.)
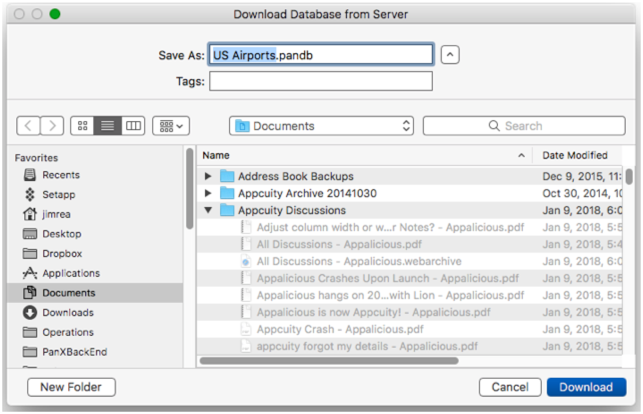
Once you’ve chosen the database, Panorama will ask you where you want to download the database. Locate the folder you want to use and press the Download button. (If you’re planning to download several databases to the same folder, we’ll show you in a moment how to skip this step.)
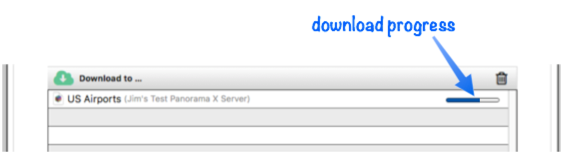
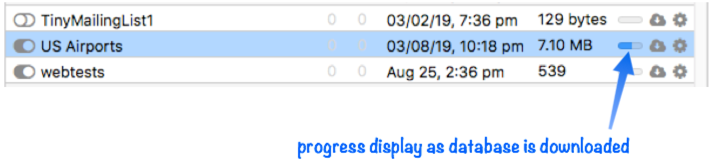
Now Panorama will begin downloading the database from the server. Depending on the size of the database and the speed of the connection between your computer and the server, this may be fast or it could take a while. Panorama will display the progress as the download proceeds. (You don’t have to wait for the download to finish to perform other tasks, you can even start another download before the first one finishes.)
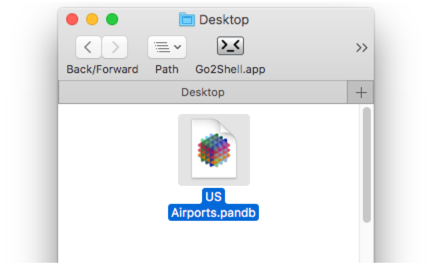
When the download is complete, Panorama will notify you (if you have notifications enabled in your System Preferences). The database is ready to use, you can simply double click it in the Finder to open it, or use the File>Open File dialog. It now works like any other Panorama database on your computer, except that when you open it, it also opens a connection to the server.
As a shortcut, you can also open the newly downloaded database by clicking on its icon in the Download Manager list, then choosing Open Database from the pop up menu.
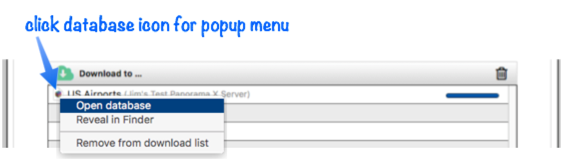
In addition to opening the database you can also reveal the database in a Finder window, and you can remove the database from the Download Manager list. Removing it from the list doesn’t remove it from the disk, you can still open it all of the other normal ways (Finder, Open File, Find & Open, Open Recent, etc.)
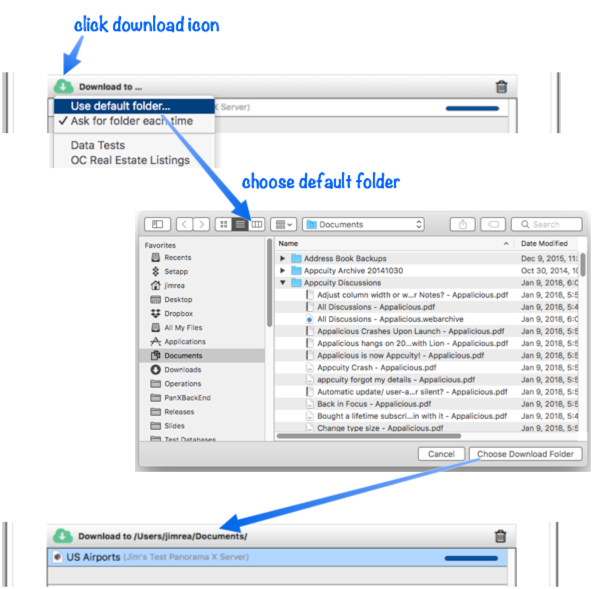
If you want to download multiple databases without having Panorama ask you for the location every time, you can set up a default folder for downloads by choosing Use default folder from the download popup menu. When you’re done the title area of the Download Manager will show the selected location, as shown in this diagram.
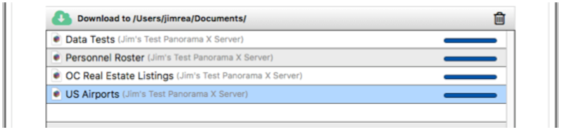
With a default location set up, you can very quickly download a bunch of databases in a hurry. Remember, you can queue up multiple downloads at once.
You can change the default location at any time, and you can also go back to having Panorama ask you for the location each time. Of course you can always move any database later, Panorama doesn’t care. In fact, even if you move a database you can still open it by clicking on its icon in the Download Manager.
Warning: The database should be downloaded to a folder on the local hard drive for this computer. It should never be placed in any kind of shared folder, for example inside a DropBox or iCloud Drive folder, or a folder on a file server. Placing a database in a shared location will interfere with Panorama’s synchronization process. Panorama databases should only be placed in locations that are accessible only to the local computer.
Panorama normally will keep the list of downloaded databases until you quit Panorama. You can also clear the list at any time by pressing the trash can icon. Remember, removing a database from the Download Manager list doesn’t affect your ability to use the database or to open it any other way.
Using a Link to Download a Database
An even simpler method for downloading a database is to use a link sent to you by the person administering the server. For example they could send you the link in an email, via a text message, via Slack or embed it in a company web page. Then you simply click on the link to automatically initiate the download. Using a shared link also allows someone to download a database even if they don’t have authorization to view the list of databases on the server. In that case, they can only download databases for which they have the link. (If you’re a system administrator, see Restricting Access to the Current Account in Restricting Server Access to learn how to prevent users from seeing the list of databases on your server.)
Here is an example of a link sent thru email and received in Apple Mail. When this link is clicked, Panorama X will come forward (you may be asked to approve this), the Server Administration Wizard will open, and the download will commence.
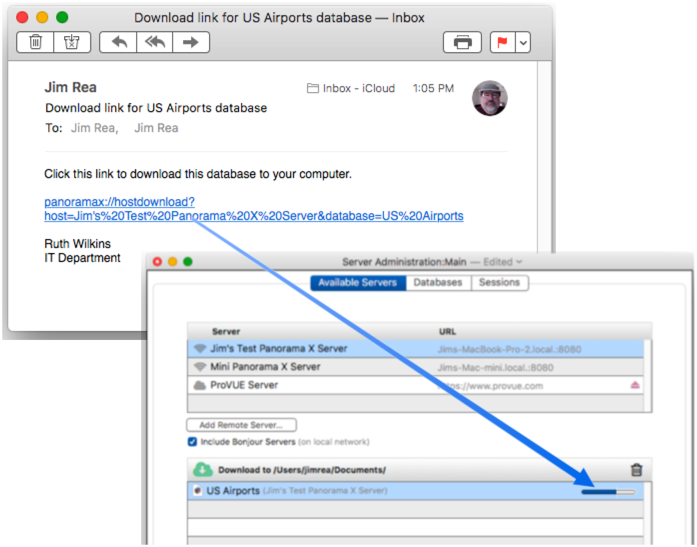
Once the download is complete, you can click on its icon in the Download Manager list for a menu of options, including opening the database, revealing it in the Finder, and removing it from the list.
See the previous section above for a full description of these options.
Depending on the program used to send you the link, it may not show up as a clickable link. In this example the link is showing up in Gmail as plain text. (At the time this was written, Gmail unfortunately always shows these links as plain text.)
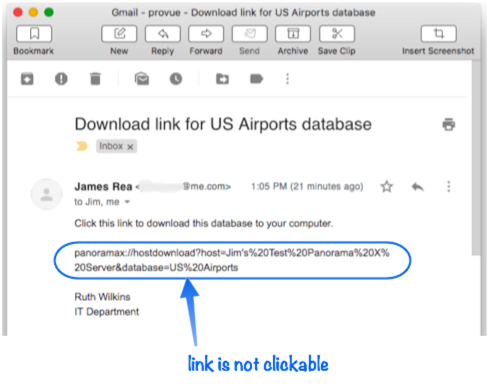
If you encounter this situation, simply select and copy the link to the clipboard, then paste the link into your web browser URL bar and press the Return key to activate the link.

Databases Panel
This panel displays the databases that have been uploaded to the selected server. (Tip: You can jump directly to the Databases Panel by double clicking on any line in the Available Servers panel.)
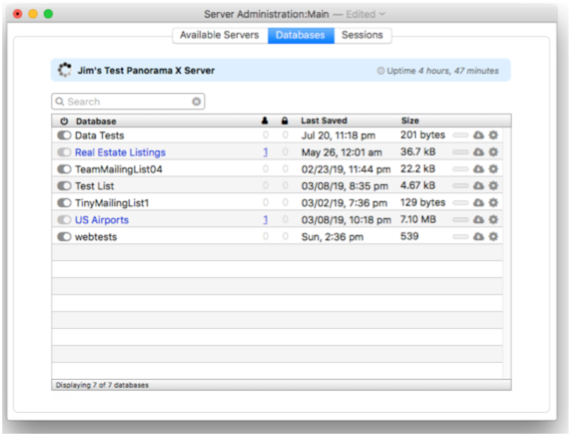
The main component of this panel is the list of databases. Note: If you aren’t authorized to administer this server, you won’t see the list, you’ll just see a message that you are not authorized. See Restricting Server Access to learn why you might not be authorized.
Assuming you are authorized, there are 8 items of information for each database.
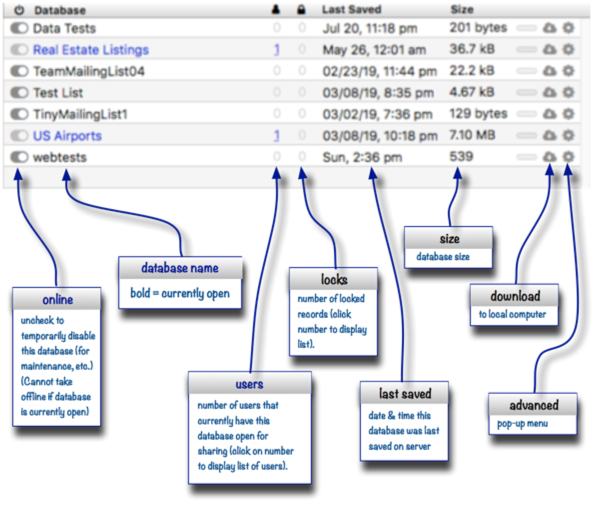
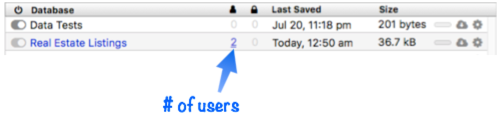
If a database is currently open on one or more client computers, the database name will appear in blue. In the illustration above the Real Estate Listings and US Airports databases are already in use. You can also tell whether a database is currently in use by looking at the users column, which lists the number of users that currently have the database open.
The database names in the list are the names on the server. A database can have a different name on the server than it does on a client computer, as specified by the Server Database Name option in the Database Options>Server dialog.
Temporarily Disabling a Database
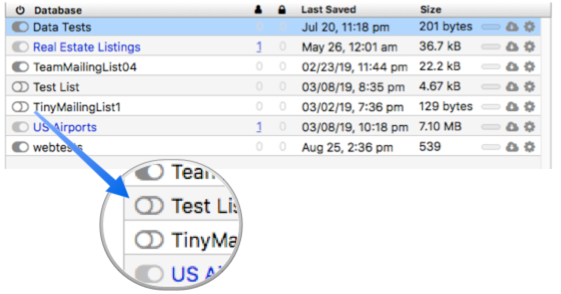
If you want to temporarily disable a database without actually removing it from the server, you can click on the toggle switch to the left of the database name. In this example two databases have been taken offline: Test List and TInyMailingList1. Since these databases are now offline, they cannot be opened by any client computers.
If one or more client computers already has a database open, that database cannot be taken offline. In the illustration above, the Real Estate Listings and US Airports databases are already in use, so the toggle switch icon is dimmed.
Active Database Users
When a database is currently open on one or more client computers, the database name is displayed in blue. You can also tell whether a database is currently in use by looking at the users column, which lists the number of users that currently have the database open.
If the number of users is greater than zero, clicking on the number displays a dialog sheet that lists all the users that currently have this database open. In this case there are two users currently working with the Real Estate Listings database.
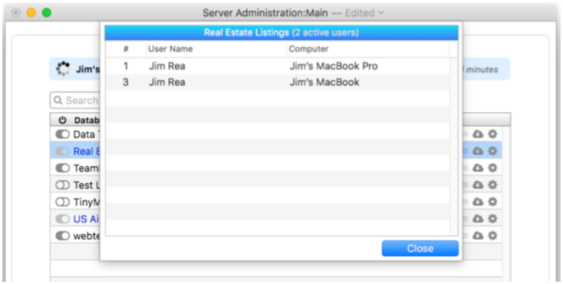
For each user the dialog lists the server session number, the name of the user, and the name of the computer.
Locked Records
When any user edits a record within a database, that record is locked. The list shows the number of records locked within each database.
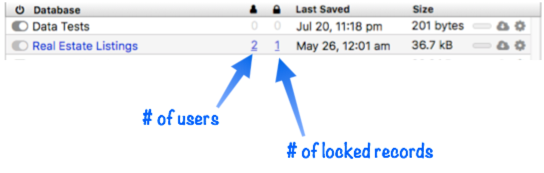
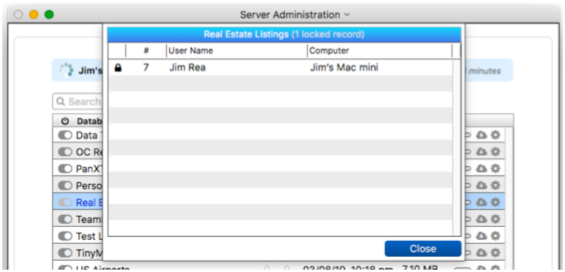
If the number of locked records is greater than zero, clicking on the number displays a dialog sheet that lists all the users that currently have a record locked — in this example, just one.
If a client crashes or loses the network connection, you may need to unlock a record that has been left “dangling” so that other users can edit the record. To do this, click on the lock icon for that record.
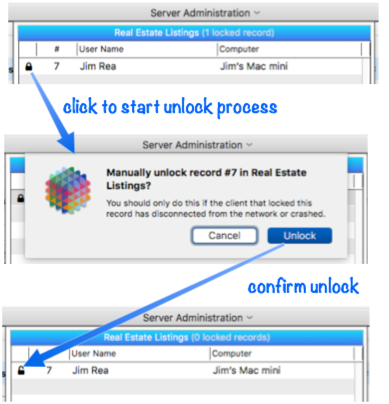
Before actually unlocking the record, Panorama will warn you not to do this unless the computer that locked the record is no longer connected to the server. If the other computer is editing the record and is still connected, unlocking the record this way will prevent the changes being made by the other computer from being saved to the server. So treat this like a fire extinguisher – only break glass in case of emergency.
Refreshing the Status Display
The status information can of course change at any time as other users work with the databases. To specify how often the display should update with new information, click on the server uptime indicator.
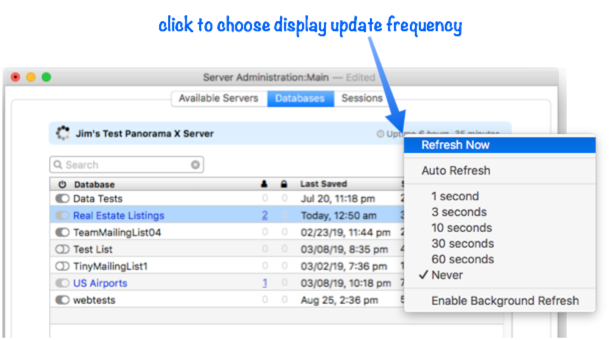
The first option in this popup menu, Refresh Now, immediately refreshes all of the status information for all databases.
The rest of the popup menu specifies automatic refreshing. You can specify refresh as often as once per second down to once per minute. Or you can specify Never to turn off automatic refreshing (in which case you can simply use Refresh Now to update as needed).
You may be tempted to always leave automatic refresh at once per second. If you do that, keep in mind that this will incur a slight extra load on your network and server. This setting means that your computer will be contacting the server once per second to get the latest server status. For normal operation, you probably don’t need such frequent status updates.
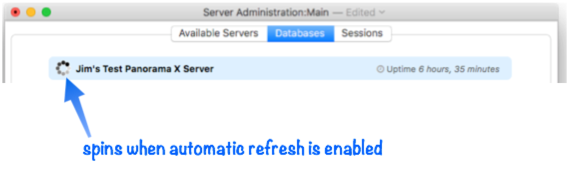
To tell at a glance whether automatic refresh is enabled, look at the spin icon to the left of the server name. This icon will spin if auto refresh is enabled. If set to Never, the icon will stop spinning.
Panorama normally pauses automatic status updates when the Server Administration window isn’t the topmost window. If you want automatic updates to continue even when the Server Administration window is in the background, check the Enable Background Refresh option. Take care with this option, however, as it can sometimes interfere with whatever operation you are performing in the foreground.
When the Server Administration window is closed, automatic refresh stops no matter what setting you’ve chosen. So if you don’t need to watch the status for a while, you may want to close the window (or, if the Enable Background Refresh option is turned off, you can simply bring another window to the front to pause refresh).
Downloading a Database from the Server
Panorama X can’t open databases on the server directly, instead, you must download them to your local computer and then open them from the local hard drive. You can do this with the Download Manager described earlier on this page (in the Available Servers panel), and you can also download from the Database panel by clicking the Download icon in the database list.
Panorama will display a dialog asking for the name and location on the local computer where you want to download the file. Then press the Download button to start the download operation. The Server Administration window will display the progress of the download as it proceeds.
When the download is complete, Panorama will notify you (if you have notifications enabled in your System Preferences). The database is ready to use.
Warning: The database should be downloaded to a folder on the local hard drive for this computer. It should never be placed in any kind of shared folder, for example inside a DropBox or iCloud folder, or a folder on a file server. Placing a database in a shared location will interfere with Panorama’s synchronization process. Panorama databases should only be placed in locations that are accessible only to the local computer.
Note: You can also download a database from a server programmatically using the hostdownload statement.
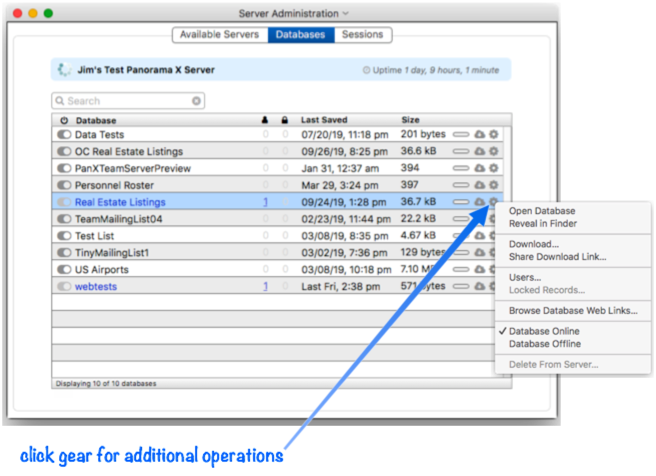
Operations Popup Menu
Click the gear icon to display a popup menu with additional operations that can be performed on the database. (Many of these options can also be performed on other columns in the list.) The exact contents of this menu depend on the current status of the database, but it will look something like this:
Open Database
If this database exists on this computer, you can simply choose Open to open the database right from the Server Administration window. If there is more than one copy of this database on your local computer, this command will open the copy that was most recently opened.
Note: If the database has never been opened on this computer, and wasn’t downloaded using the Server Administration window, the Open option will be disabled. For example, this will happen if the database was transferred via email or AirDrop. In that case you must open the database manually the first time so that the Server Administration window knows where it is.
Reveal in Finder
If this database exists on this computer, you can use this command to reveal it in the Finder. If there is more than one copy of this database on your local computer, this command will reveal the copy that was most recently opened.
Note: If this database has never been opened on this computer, and wasn’t downloaded using the Server Administration window, the Reveal in Finder option will be disabled. For example, this will happen if the database was transferred via email or AirDrop. Once the database has been opened once with Panorama, the Reveal in Finder command will be available.
Download Database
This option downloads the database from the server to the local computer. It works exactly the same as clicking on the cloud download icon.
Share Download Link
This operation allows you to share a download link with one of your users. To share a link, click on the gear icon for the database you want to share, and choose Share Download Link… from the popup menu.
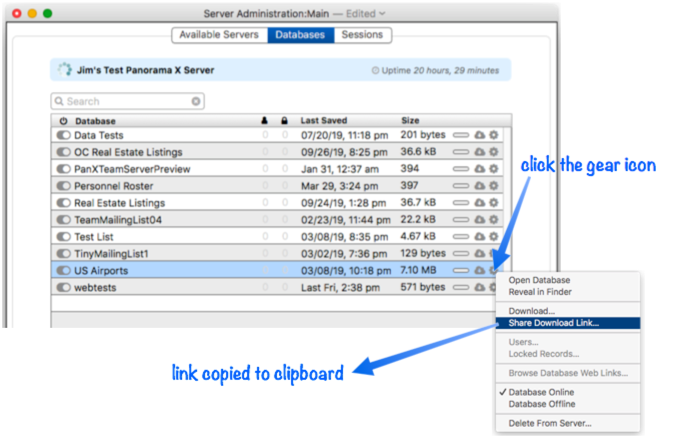
The clipboard now contains the special URL to send to your user, you can simply paste this into an email, text message, Slack, etc. If you have a company web site, you may want to put the link on a private web page on your site. Paste the link into your HTML code like this:
<a href="panoramax://hostdownload?host=Company%20Server&database=Inventory>Download Inventory</a>
See Restricting Access to the Current Account in Restricting Server Access to learn how to protect your server from unauthorized access even if a download link gets into the wrong hands.
Display Current Users
This command displays a list of the users that currently have this database open. This is exactly the same as clicking on the number of users.
Display Locked Records
This command displays a list of the users that are currently editing a record in this database. This is exactly the same as clicking on the lock count.
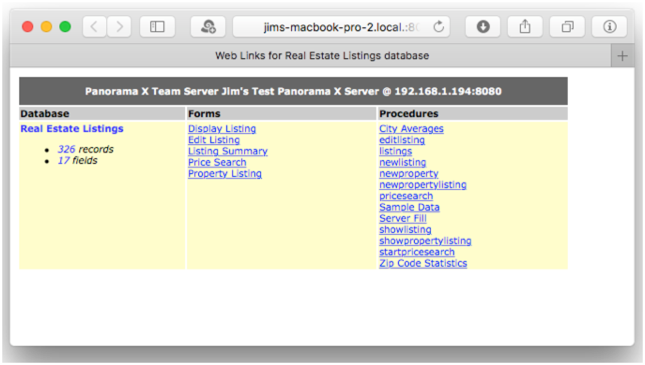
Browse Database Web Links
If the database is configured for web database publishing, you can use this option to display all of the web links (forms and procedures) for this database in your web browser.
See Testing a Web Database for more information on this command.
Database Online/Offline
This pair of commands allows you to temporarily take the database offline without completely deleting it from the server. This is exactly the same as clicking on the toggle switch on the left side of the list (see Temporarily Disabling a Database above).
Delete from Server
This command completely deletes this database from the server. Since this command is permanent and cannot be reversed or undone, Panorama will ask you to confirm before it actually performs the deletion.

Note: If one or more users currently is using the database, this command will be disabled. You cannot delete a database when it is in use.
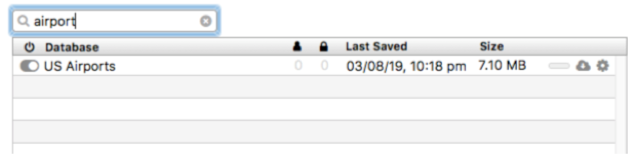
Searching the Database List
If your server has a long list of databases, it may be difficult to find the one you want to work on. In that case, you can simply use the search box to isolate the databases you are interested in.
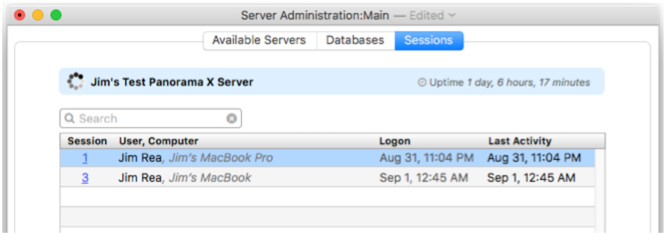
Active Session Panel
This section of the wizard lists all of the currently active sharing “sessions” taking place on the server. When a user first opens a shared database on a client computer, their copy of Panorama automatically connects to the server and establishes a “session.” Each session has a unique number, and all communications between the client and the server are tagged with the session number. If the user opens additional shared databases on the same server, the same session number is used. The session remains active until the user closes all shared databases on this server. (If the user later opens a shared database, again a new session number will be assigned.) The active session list displays a list of all of the users that currently have one or more databases open on this computer. In this example there are two active users of this server.
Listing Open Databases
To see a list of shared databases a user currently has open, click on the session ID number.
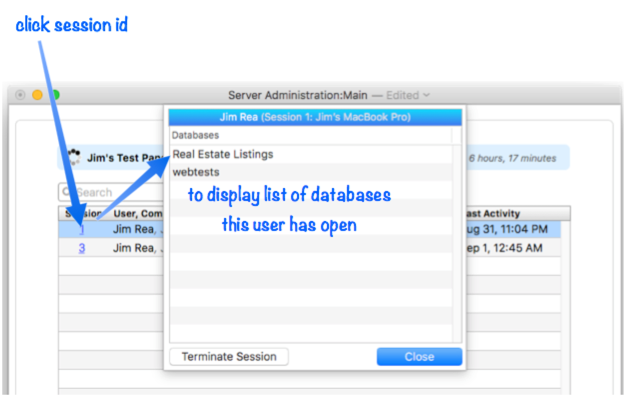
Forcing a Session to Close
If a network connection is broken or a client loses power or crashes while sharing a database, that client’s session will remain open on the server indefinitely. In this case, you may want to force the session to close (usually you don’t need to do this manually because the Panorama Server will do it automatically if the same client re-connects). To do so, open the list of databases and press the Terminate Session button. Before you take this drastic step you should carefully check to make sure that the session is really kaput.
See Also
- Advanced Server Settings -- Panorama X Server settings for advanced users.
- Client/Server Debug Instrumentation -- using instrumentation with Panorama X server and clients.
- Installing and Launching Panorama Server -- instructions for getting Panorama Server up and running, as well as best practices for configuring system settings on a server computer.
- Logging Server Activity -- recording server activities for later analysis.
- Restricting Server Access -- limiting Panorama X Server access to authorized users.
- Setting up a Computer as a Panorama X Client -- instructions for setting up a new client computer so that it can access a Panorama X server.
- Using an External Web Server -- instructions for using Panorama Server in conjunction with an external web server (for example Apache, Nginx, etc.).
History
| Version | Status | Notes |
| 10.2 | New | New in this version. |