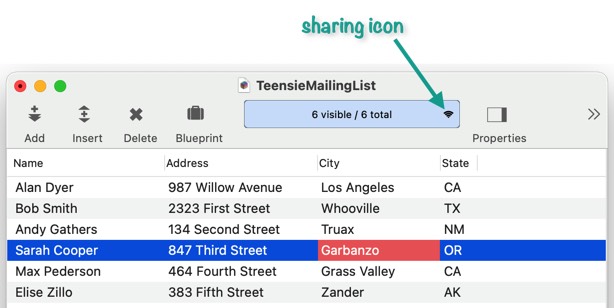
When a database is configured to operate in conjunction with Panorama X Server, a special icon appears in the record count section of the toolbar. This icon indicates the status of local copy of the database in relation to the server.
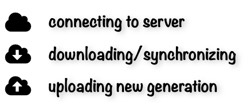
This chart shows the four most common icons you will encounter.

You may also briefly see variations of the cloud icon to indicate that Panorama is in the process of connecting to the server, or that it is download from or uploading to the server.
Error Indication (Red)
The sharing icon is normally black. However, if an error is encountered, the icon will turn red.
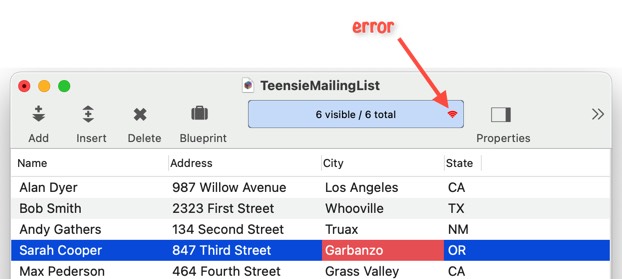
You can find out more information about the problem that caused the error by clicking on the icon and choosing Check Server Connection from the popup menu (see below).
Note: Normally the icon will only turn red after some operation is attempted (for example editing a record). However, you can configure Panorama to periodically check the connection even if you aren’t doing anything. See Working with Sharing Disruptions to learn how to set this up.
The Sharing Context Menu (Popup Menu)
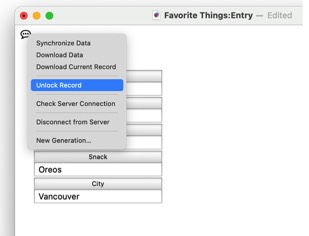
When you click on the sharing icon, a popup menu appears. This menu allows you to perform various server related operations.
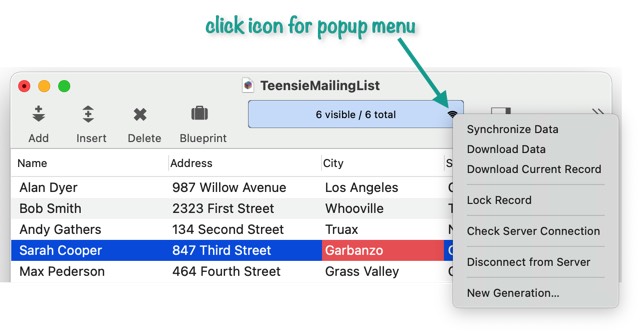
These operations are also available in the File and Records menus, but this popup menu provides a convenient one-stop shop for tasks related to database sharing.
The individual operations are described below:
Synchronize Data – updates the local copy of the database with latest changes made by other users. See Shared Database Synchronization to learn more.
Download Data – updates the local copy of the database by downloading all of the data from the server. See Regular Synchronization vs. Downloading Data on the Shared Database Synchronization to learn about the differences between synchronizing and downloading.
Download Current Record – updates the local copy of the current record with any recent changes made by other users. See Manually Downloading a Record on the Record Locking and Editing Shared Data page.
Lock Record – lock the current record (only available if this record is currently unlocked). You can also lock the record simply by starting to edit it. See Record Locking and Editing Shared Data to learn more.
Unlock Record – unlock the current record (only available if this record is already locked). You can also unlock the record by clicking on another record. See Record Locking and Editing Shared Data to learn more.
Check Server Connection – contact the server to verify that there is a valid connection from this database to the server. If the connection is working, you’ll simply see a notification that the connection is verified. If there is a problem, an alert will appear describing the problem and offering possible next steps. See Working with Sharing Disruptions to learn more.
Check Synchronization – checks with the server to verify that recent changes have been synchronized to this computer. This command prompts you for the number of recent changes to check. The default is 25, choosing a larger number may take longer. If there are any records on the local computer that aren’t up-to-date, a dialog will appear listing the out-of-sync records. (This doesn’t necessarily indicate a problem, it may simply mean that you need to synchronize or download the latest data from the server.)
Disconnect from Server – drop the connection from this database to the server (for example if the administrator needs to perform a new generation). See Temporarily Disconnecting a Shared Database from the Server to learn more.
Connect to Server – establishes the connection from this database to the server. This normally happens automatically when the database is opened, but this option can be used if that failed to happen, or if you temporarily disconnected. See Temporarily Disconnecting a Shared Database from the Server to learn more.
New Generation – open the Database Options dialog to the New Generation panel. See the Changing the Design of a Shared Database to learn more.
Displaying the Banner Icon in a Form
The banner icon is normally displayed in the toolbar, but what if you’ve hidden the toolbar? In that case, you may want to display the icon within the body of a form. To do that, create a Text Display object and use the formula catcherror("",_bannerIcon). You’ll also need to enable the Rich Text option, as shown below.
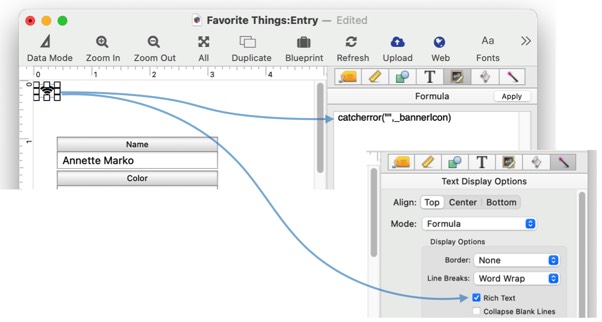
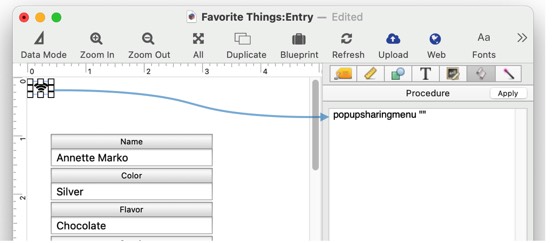
If you want to be able to click on the icon, put the popupsharingmenu statement in the code of the Text Display object. This statement must have a parameter of "" to make the menu appear.
You can place the icon anywhere you want in the form. It will work exactly the same as it does in the tool bar banner.
See Also
- Automatic Record Numbering in a Shared Database -- generating unique numbers across multiple users.
- popupsharingmenu -- pops up a menu for the toolbar sharing icon.
- Record Locking and Editing Shared Data -- coordinating data entry across multiple simultaneous users.
- setbannericon -- sets the icon on the right side of the toolbar banner.
- Shared Database Synchronization -- data synchronization across multiple users.
- Working with Sharing Disruptions -- dealing with network & power outages, disconnections, and other anomalies.
- Working With Summary Records in a Shared Database -- summary records are not shared between users.
History
| Version | Status | Notes |
| 10.2 | New | New in this version. |