The join statement joins data from another database into the current database.
Parameters
This statement has one parameter:sourcedatabase – is the name of the database to be joined with the current database. This database must be open. (Note: See the text below for alternative uses of this parameter, as well as the option of multiple parameters.
Description
This statement joins data from another database (called the Source Database) into the current database. The source database must be open before the join statement is used (see opendatabase and Auxiliary Databases). The data is joined by matching a key in the current database with a key in the source database. The keys can be fields, or can be a more complicated formula. These keys define the relationship between the two databases (this operation is sometimes called a relational join).
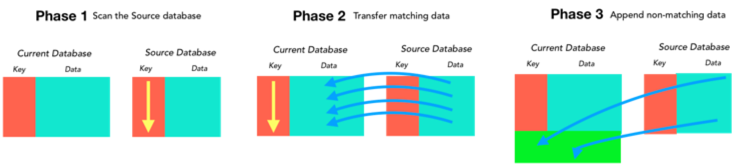
The join statement operates in two phases. In the first phase, it scans the source database and builds a list of all key values in that database. In the second phase, it scans the current database and checks for matches with the list of key values built in the first phase. When it finds a match, the data associated with that key in the source database is copied to the corresponding record in the current database. At the end, there is an optional third phase which appends the data associated with any leftover keys to the end of the current database. If you are familiar with SQL, this is similar to an Outer Join.
Performing a Join using a Relation Template
The easiest way to use the join statement is to set up a relational template in advance with the File>Database Options>Relations panel. Here’s an overview of this panel.
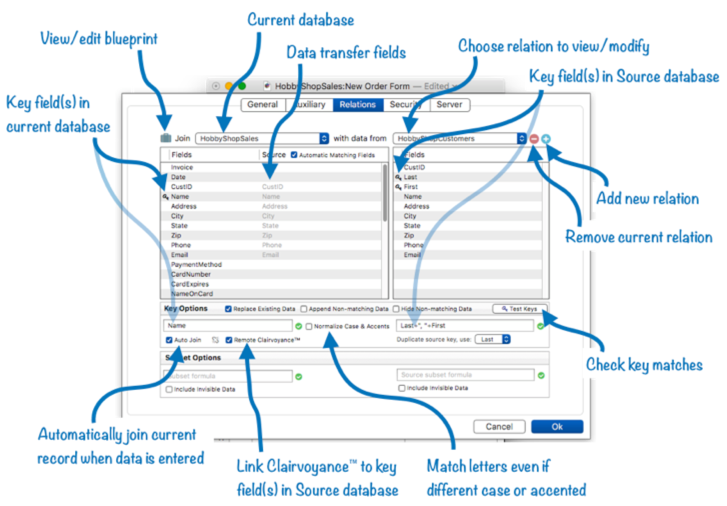
See Relational Database Management to learn all the details of using this panel.
If you’ve set up and saved a relation using this panel, you can use the join statement with only one parameter – the name of the database. This code will join the current database with the HobbyShopCustomers database using the key fields and other options specified in the File>Database Options>Relations panel.
join "HobbyShopCustomers"
Sometimes the pre-saved template is almost what you want, but not quite. In that case, you can append the options described below to this statement to “tweak” how the join works. This example performs the same join as before, but only on the subset of records in California in both databases (the subset option is described in more detail further down on this page.)
join "HobbyShopCustomers",
    "subset",{State="CA"},
    "source subset",{State="CA")}
The extra options can also be specified in a dictionary, like this:
let extraJoinOptions = initializedictionary(
    "subset",{State="CA"},
    "source subset",{State="CA")})
join "HobbyShopCustomers",extraJoinOptions
The rest of this page describes all of the options that are available to configure a join operation. Remember, these options can be configured in the File>Database Options>Relations panel (as described in Relational Database Management), or they can be included as an explicit parameter in the join statement itself. For clairity, all of the examples below will explicity include the parameters directly in the join statement.
Join Options
Joining two databases is a complicated operation. At a minimum, you must specify these basic criteria:
- What is the source database?
- What are the keys in both databases?
- What information will be transferred and into what fields?
You can also specify additional options such as how to handle missing or duplicate key values (more on this later), and you can restrict the join to only a subset of the data in either or both databases.
Each join option is specified as a name,value pair, for example "Database","Vendors" or "Key","OrderID". You can specify these options as a list of parameters, like this:
join "database","Vendors","key","OrderID"
or you can combine all of the options into a dictionary, as shown here.
join initializedictionary(
    "database","Vendors",
    "key","OrderID")
At first glance, using a dictionary may seem more complicated, and it is, but it has the advantage that you can prepare the dictionary in advance in a variable, and potentially reuse it in multiple locations in your code (including with the joinonerecord statement).
Whichever method you use, the option names are case insensitive and ignore spaces, so all three of these three lines will work exactly the same.
"source key","VendorID"
"Source Key","VendorID"
"SOURCEKEY","VendorID"
If you want to temporarily disable an option, you can “comment it out” by prefixing it with two / characters, like this:
"// source key","VendorID"
This is especially useful when you have multiple options specified on a single line.
Source Database
To specify the database that will be joined into the current database, use the Database option, as shown in the examples above. This option is required. The specified source database must already be open (see opendatabase and Auxiliary Databases).
The join statement cannot join a database with itself. This means that the source database cannot be empty, and cannot be the current database. An error will occur if you attemp to join a database with itself.
Keys
The join statement has two options for setting up keys, Key and SourceKey. Use the Key option to specify how each record in the current database is identified. For example, suppose the current database is a product list database that contains a field named VendorID, and you want to join that with information from a Vendors database.
join "database","Vendors","key","VendorID"
If the Vendors database also has a VendorID field, we’re done. The join will proceed by matching data based on the VendorID field in each database.
If the two databases don’t have an identically named key field, you’ll need to add a SourceKey option to specify how the key is calculated in the source database (in this case, the Key option specifies this for the current database). For example, suppose in the Vendors database the id is kept in a field named ID (instead of VendorID). Adding the * SourceKey* option will make this work.
join "database","Vendors","key","VendorID","sourcekey","ID"
So far these examples have used a single field as the key, but any formula can be used. Suppose the current database is an order tracking database with a Name field that contains full names like Bob Smith and Elizabeth Pride. This database could be joined with a customer list database that uses separate fields for first and last name, like this:
join "database","Customer List","key","Name","sourcekey",{First+" "+Last}
As you can see, each key is actually a formula. This formula must be quoted, which in the example above was done with curly braces ({ and }) so that quotes could be used inside the formula. See Constants to learn about the different ways text can be quoted.
What if the order tracking database also has separate first and last name fields? In that case, the Key option would also be a formula, like this:
join "database","Customer List",
    "key",{First+" "+Last},
    "sourcekey",{First+" "+Last}
The example above creates keys that are case sensitive, so that the name Bill Mazor in the order tracking database would not match BILL MAZOR in the customer list. The formula can be modified so that the keys will match regardless of upper or lower case.
join "database","Customer List",
    "key",{upper(First+" "+Last)},
    "sourcekey",{upper(First+" "+Last)}
If your data might contain accented characters, you could modify the formulas further so that these will be ignored.
join "database","Customer List",
    "key",{stripdiacriticals(upper(First+" "+Last))},
    "sourcekey",{stripdiacriticals(upper(First+" "+Last))}
With this modification, the name Dän will match Dan or Dán when performing the join.
Transferring Data
The ultimate goal of the join statement is to transfer matching data from the source database into the current database. But once the matches are found, which fields in the source database will be transferred into which fields in the current database?
If the two databases have fields with matching names, the join statement can figure that out and simply transfer all of the fields that match. In that situation, there’s nothing further you need to do, the join statement will figure out the fields for you.
If the two databases don’t have matching fields, the join statement must include a formula for each field in the current database that will receive matching data. This is done with a parameter specifying the receiving field name (in the current database) enclosed in chevron characters (« and »), followed by a parameter specifying the formula to calculate the data from the source database to be placed in this field. This formula must be quoted.
join "database","some database","key",{key formula},
    "«field name»",{data formula},
    "«field name»",{data formula},
    "«field name»",{data formula},
    ...
Important: Note that the chevrons around the field names are significant, and cannot be omitted. When specifying a destination field name in the join statement, the field name must always be surrounded by chevron characters (« and »), even if the field name doesn’t have any spaces or punctuation. The join statement uses the chevron characters to identify which parameters are field names, and which are regular parameters. For example "Key" is a regular parameter, but "«Key»" would indicate a destination field name (in the current database).
Let’s look at a specific example of how join works. Suppose the current database is an order tracking database, and you want to join phone numbers from a Customer List source database. However, for this example the two databases use different field names for phone number data: Phone in the order tracking database vs. Telephone in the customer list database. This example shows how to make the join work in this situation.
join "database","Customer List",
    "key",{First+" "+Last},
    "«Phone»",{Telephone}
In the example above the formula is just a field (Telephone), but any formula can be used. Here’s a revised example that uses the formatphone( function to make sure the phone number is formatted using US standard (aaa) nnn-nnnn format as it is transferred into the current database.
join "database","Customer List",
    "key",{First+" "+Last},
    "«Phone»",{formatphone(Telephone)}
Formulas can also be used to split or merge fields as they are transferred. Suppose the current database contains support incidents, with fields for Customer ID and Name. In addition, you also have a separate Customer List database that also has a Customer ID field and has separate fields for first and last names. To join the names from the customer list database into the support incident database, the full name must be assembled with a formula, like this.
join "database","Customer List",
    "key","CustomerID",
    "«Name»",{First+" "+Last}
If you want to use the join statement to bring names from the support incident database into the customer list database, two formulas are needed, using the firstword( and lastword( functions, like this:
join "database","Support Incidents",
    "key","CustomerID",
    "«First»",{firstword(Name)},
    "«Last»",{lastword(Name)}
If you have additional fields to transfer, include a formula for each field.
join "database","Support Incidents",
    "key","CustomerID",
    "«First»",{firstword(Name)},
    "«Last»",{lastword(Name)},
    "«Address»",{Address},
    "«City»",{City},
    "«State»",{State},
    "«Zip»",{Zip},
    "«Email»",{Email}
In this example, several fields have the same name in both databases, and are simply copied over “as-is”. If you want to transfer all fields with the same names in both databases, but also transfer some fields with formulas, use the MatchingFields option set to Yes. As shown in this example, this option allows you to omit having to explicitly enter a formula for each duplicate field.
join "database","Support Incidents",
    "key","CustomerID",
    "«First»",{firstword(Name)},
    "«Last»",{lastword(Name)},
    "MatchingFields","YES"
Like the previous example, this join will transfer the name, as well as the address, city, state, zip, email, and any other field with a duplicate name.
If you want to transfer most fields with duplicate names, but omit one or two, set up an empty formula for the fields you don’t want to transfer. This example transfers the name, address, city, state and zip, but does not transfer the email address (in other words, the Email field in the current database will not be touched).
join "database","Support Incidents",
    "key","CustomerID",
    "«First»",{firstword(Name)},
    "«Last»",{lastword(Name)},
    "MatchingFields","YES",
    "«Email»",{}
Note: If omitted, the MatchingFields option defaults to No, but if no field formulas are defined at all, it defaults to Yes.
Note: The order of the join statement parameters does not matter. The previous example could be rearranged like this, this code will work the same as the code above.
join "MatchingFields","YES",
    "key","CustomerID",
    "database","Support Incidents",
    "«First»",{firstword(Name)},
    "«Last»",{lastword(Name)},
    "«Email»",{}
Appending Non-Matched Data From the Source Database
The join statement normally just looks for matching with the existing data in the current database. If there is extra data in the source database that doesn’t match anything in the current database, it is usually ignored. If instead you’d like to append this extra data to the current database, set the Append option to Yes.
To illustrate this, suppose the current database is Customer List, and has fields for first and last name, address, city, state, zip and phone number. You also have an Orders database that has the same fields. This join example will update the contact information in the customer list with information from the Orders database. It will also add any new customers that are in the Orders database but haven’t yet been added to the Customer List database.
join "database","Orders",
    "key",{First+" "+Last},
    "append","yes"
Note: Since we are assuming that the field names in these two databases are the same, no field formulas need to be set up.
You might want to add new customers to the list but leave existing customers alone – perhaps the Customer List database already has the most up-to-date information. In that case, set the ReplaceExisting option to No. This example will leave all of the current data in the Customer List database alone, but adds any new customers that are in the Orders database but not already in the customer list.
join "database","Orders",
    "key",{First+" "+Last},
    "append","yes","replaceexisting","no"
Advanced Options
In addition to the primary options described above, you can also specify how join handles duplicate keys, control whether or not invisible records are included in the join, and limit the join to a subset of either or both databases.
Duplicate Keys in the Source Database
The first phase of the join operation is to scan the source database and build a list of keys, along with a pointer to the data associated with each key. But what if a key is duplicated? In other words, what if the same key is associated with more than one record in the source database? You can control the behavior of the join in this situation with the DuplicateSourceKey option. The options are to associate the key with the first matching record, the last matching record (this is the default), or to treat this situation as an error.
For example, consider our previous example of updating the current Customer List database with contact information from an “Orders” database (for this example we will suppose that both databases contain fields for first and last name, address, city, state, zip and phone number). Assuming that the Orders database is sorted chronologically, this example will update each customer’s contact information in the customer list with information from that customers most recent order.
join "database","Orders",
    "key",{First+" "+Last},
    "duplicate source key","last"
Note: Since last is the default option, the final line of this example isn’t really necessary.
Now let’s add a new field to our customer list database. We’ll call this field First Order and make it a Date field. Then we can use the join statement to update this field with the date of each customers first order.
join "database","Orders",
    "key",{First+" "+Last},
    "«First Order»",{Date},
    "duplicate source key","first"
In an example earlier on this page the join statement was used to update phone numbers in an order tracking database from a customer list database, based on the name. But what if there are two records in the customer list with the same name? Which phone number should be copied over? There’s really no way to know, so this should be treated as an error.
join "database","Customer List",
    "key",{First+" "+Last},
    "«Phone»",{Telephone},
    "duplicate source key","error"
if error
    alertsheet info("error")
    return
endif
To learn more about how to handle an error in your code, see Error Handling.
Including Invisible Records in the Join
The join statement normally ignores invisible records (records that aren’t selected) - they are skipped in both the current and source databases. If you want to include invisible records in the current database in the join, set the JoinInvisible option to Yes (please note that this could result in modifications to records that you can’t currently see.) If you want to include invisible records in the source database in the join, set the JoinSourceInvisible option to Yes. Here is an example that includes all records in both databases in the join, whether the records are currently visible or invisible.
join "database","Orders",
    "key",{First+" "+Last},
    "append","yes",
    "join invisible","yes",
    "join source invisible","yes"
Specifying a Subset
The join statement normally includes all visible records in the operation. To restrict the join to a subset of the data, use the Subset and SourceSubset options. Each of these options is used with a formula that specifies what data to include. This example updates the current database, assumed to be a customer list, with phone numbers from the Orders database. However, only orders that occured in the last 90 days will be included, any earlier orders will be ignored by the join statement.
join "database","Orders",
    "key",{First+" "+Last},
    "source subset",{Date>today()-90)}
This example updates only customers in California. In this case you could actually get the same effect by just using only the Subset option, or only the SourceSubset option. But using both at the same time is faster, because it reduces the intermediate data that the join statement needs to process.
join "database","Orders",
    "key",{First+" "+Last},
    "subset",{State="CA"},
    "source subset",{State="CA")}
Note: The subset options can be combined with the invisble options if you want to include invisible data in a subset.
Hide Non Matches in Current Database
The join statement normally doesn’t change the selected records in the current database. Whatever records were selected before the join will still be selected after the join. However, if you use the HideNonMatches option set to Yes, the join statement will deselect any records in the current database that don’t match any records in the source database. This is similar to SQL’s “inner join” operation.
Suppose the current database contains support incidents, with fields for Customer ID and contact information (name, address, etc.). In addition, you also have a separate Customer List database that also has the same fields. This example will join the names from the customer list database into the support incident database. It will also make invisible any support incidents from customers not in the customer list.
join "database","Customer List",
    "key","CustomerID",
    "hide nonmatches","yes"
If you then wanted to permanently remove these non-matching records, use the removeunselected statement.
If no records match, the result will be that all records in the current database will be selected (since Panorama doesn’t allow a database to have zero selected records). You can use the info(“empty”) function to check for this, as shown in this example code.
join "database","Customer List",
    "key","CustomerID",
    "hide nonmatches","yes"
if info("empty")
    beep
    message "All support incidents are from non-registered customers."
    return
endif
Simulating SQL Inner Join, Left Join, and Outer Join
The join statement can be configured to work similarly to sql join operations.
Inner Join – The result only includes records that match in both the current and source databases.
join “database”,“Source Database”, “key”,{Formula},“source key”,{Formula}, “hide nonmatches”,“yes”
Left Join – The result includes all records in the current database, plus all matching records in the source database. This is the default for the join statement.
join “database”,“Source Database”, “key”,{Formula},“source key”,{Formula}
Full Join – The result includes all records in both the current database and the source database.
join “database”,“Source Database”, “key”,{Formula},“source key”,{Formula}, “append”,“yes”
To do a right join, swap the current database and the source database and do a left join. In other words, make the source database the current database, and use the previously current database as the source database.
Undo Join
Like any other Panorama operation, you can add a startdatabasechange statement at the top of your procedure, like this.
startdatabasechange "allrecords","Undo Join"
join ...
Using Join with a Shared Database
If the current database is shared, you cannot use the join statement. Since the join statement usually modifies most if not all of the records in a database, it’s not compatible with multi-user operation. If you want to join the current database, follow the steps in Changing the Design of a Shared Database to create a new sharing generation. While the database is temporarily disconnected from the server you can perform the join operation. Once the join is complete, you can complete the sharing generation process to upload the joined data back to the server.
If you just want to use the join for analysis, and don’t need to permanently keep the changes made by the join, another approach is to make a single user database with the same fields. When you want to perform the join, import the shared database into the single user database (see Import Database), then perform the join on the single user database. Of course this can all be automated with a procedure.
Unlike the current database, no special techniques are needed to use a shared database as the source database for a join. You may, however, wish to synchronize the source database immediately before the join, to make sure that the local copy of the database has the most recent data possible.
See Also
- addrelatedrecord -- adds a new record to the related database corresponding to the current database.
- findrelated -- finds information that matches the current record in a related database.
- Import Database -- importing another database into the current database.
- Join Databases -- joining another database into the current database (relational join).
- joindialog -- opens the standard Join Database dialog.
- joinonerecord -- joins matching data from another database into the current record.
- Linking with Another Database -- techniques for relating multiple database files so that they work together.
- posttorelated -- posts data in the current record to the corresponding record in a related database.
- related( -- searches for a record in a related database that matches the current record in the current database based on a relational specification (based on one or more key fields or formulas in each database), then uses a formula to return other information from the same record. This is similar to the lookup( function, but instead of using an individual field for the key, a relation is used (see Relational Database Management).
- relatedarray( -- builds an Text Array by scanning a database and creating an array element for every record that matches a relational specification (based on one or more key fields or formulas). This is similar to the arraybuild( function, but instead of using an individual field for the key, a relation is used (see Relational Database Management).
- relatedrecordid( -- returns the record id of a record in a related database that matches the current record in the current database based on a relational specification.
- Relational Database Management -- linking together multiple databases based on common data.
- Relational Workshop -- tool that assists in composing relational lookup(, superlookup(, lookupall( and arraybuild( functions.
- selectrecordsrelatedto -- selects records in the current database that are related to any record in another database.
- selectrelated -- selects information that matches the current record in a related database.
History
| Version | Status | Notes |
| 10.2 | New | New in this version. |