Panorama allows multiple databases to be linked together (or (related) based on data common to each, called a Key. For example, suppose you own a hobby shop and you maintain a database of orders and a database of customer accounts. If both databases contain a Customer ID field, the two databases can be linked together using the ID fields as the key.
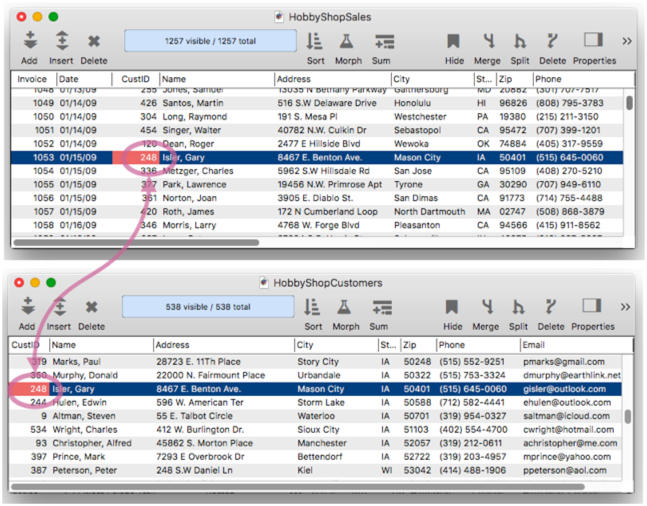
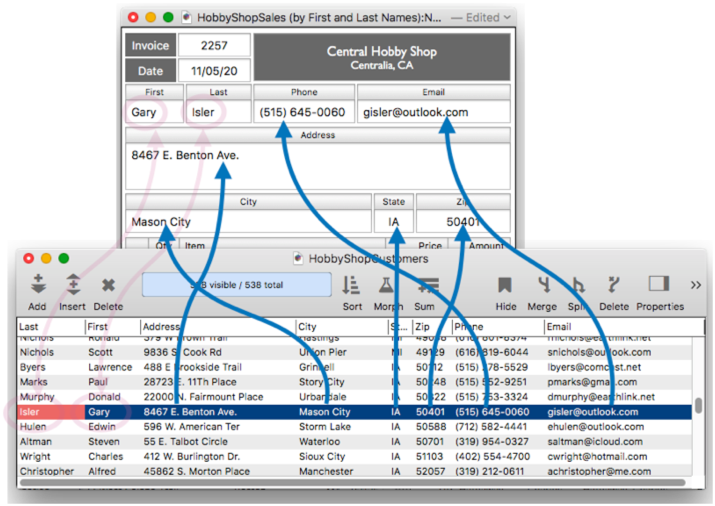
The diagram above shows a single field in each database used as the key, but a key can be specified with a formula – allowing a key to be constructed by compounding multiple fields, or even using a partial field fragment. This diagram shows how a single field in the sales database can be matched with multiple fields in the customer database.

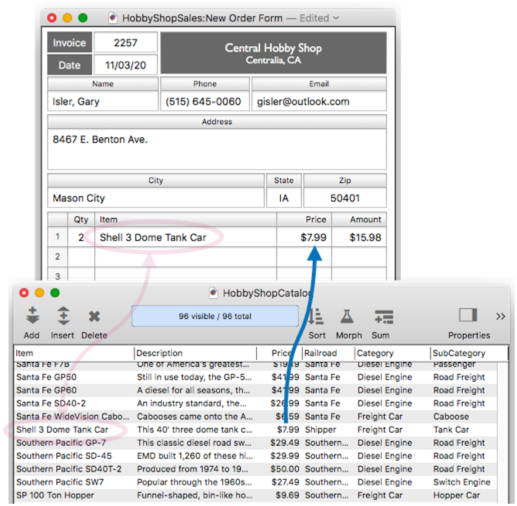
The key tells Panorama how to match up the records, but that’s only half the story. A complete relation specification includes the specifications for bringing data back from a matched record, as shown by the blue arrows in this diagram.
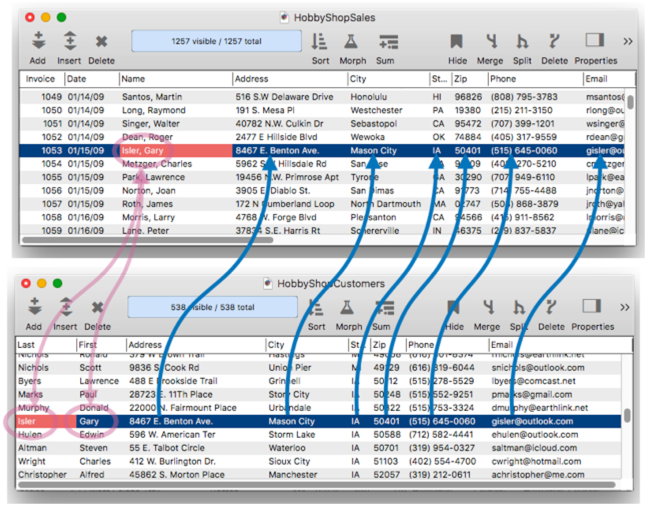
In the diagram above, the data fields happened to match exactly between the two databases. However, this isn’t required. The fields can have different names, or even different arrangements from one database to the other. Where the arrangment is different, a formula is used to transform the data.
Once a relation has been set up between two databases, it can be used to perform join operations between the database, either for a single record (typically during data entry), or inner or outer joins on some or all of the data. In addition, Panorama’s Clairvoyance™ feature can route thru a relation.
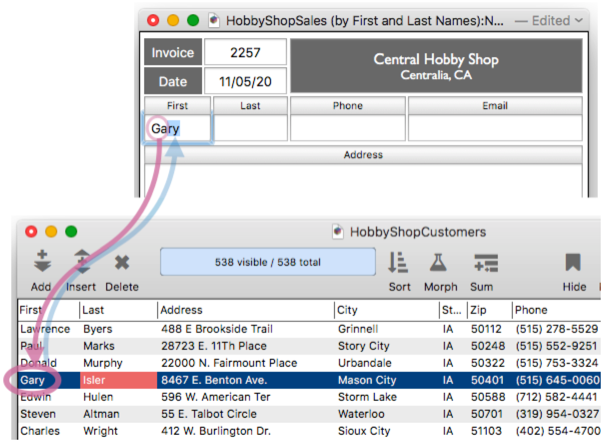
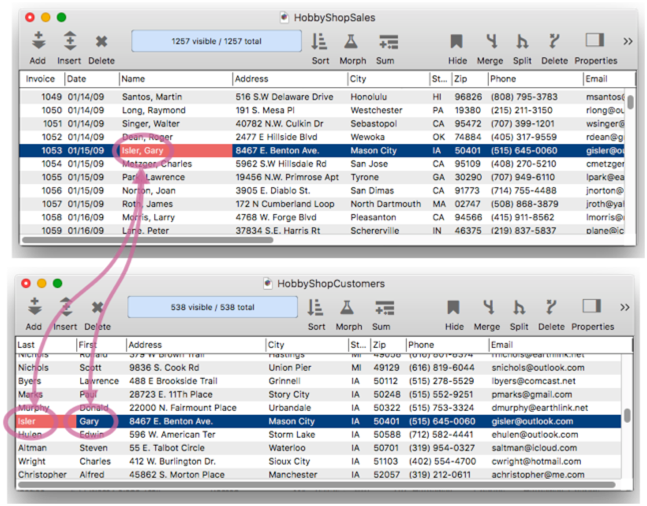
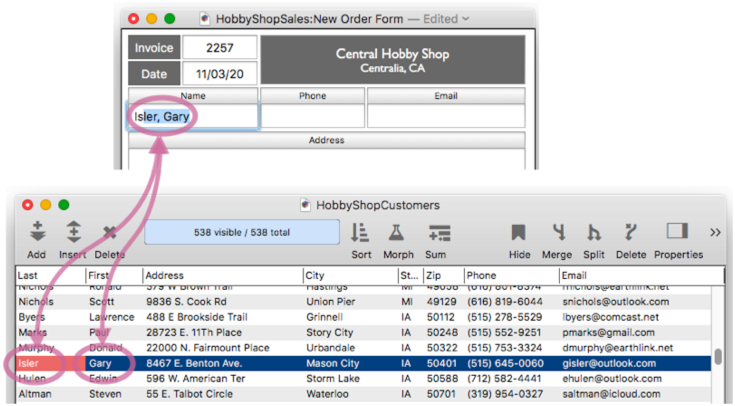
Before diving into how to set all this up, let’s take a quick tour of relations in action, again using our hobby shop example (but using a form instead of the data sheet). The contact information in the order form is linked to the customer database, so Clairvoyance™ kicks in across databases to auto-complete the name – even though the name is split into two separate fields in the customers database.
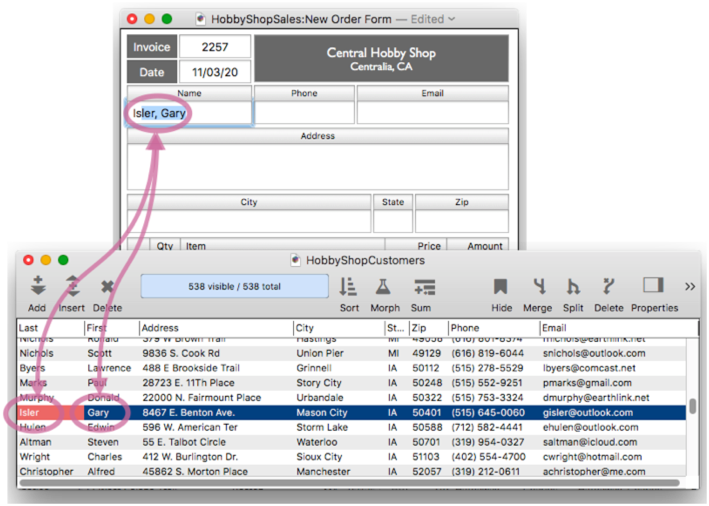
When the return or tab key is pressed, Panorama uses the pre-defined relation you have set up to populate all of the contact information in the new order. Note that this happens completely automatically – there is no coding needed, or even a formula (other than formulas set up in the relation definition).

This order form database is also relationally linked to a catalog (price list) database. When I start typing an item into the order, Clairvoyance™ auto-completes the entry for me from the catalog, even if this item has never been entered into an order before.
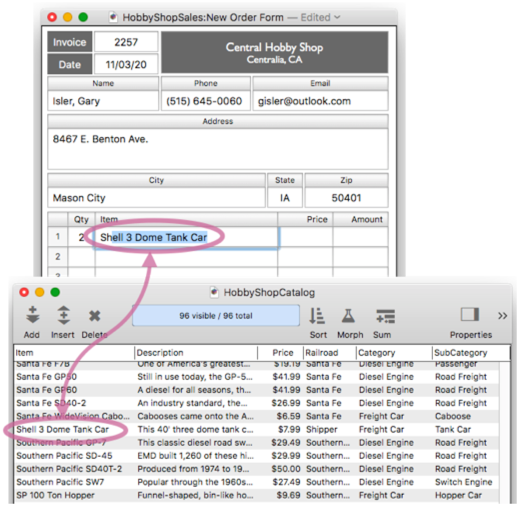
When the return or tab key is pressed, Panorama automatically populates the price and calculates all totals.
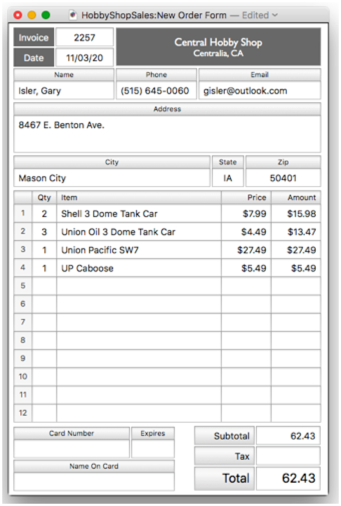
Simply rinse and repeat to complete the rest of the order.
Relational Databases Must Be Open in Memory
Before proceeding further, an important point is that Panorama requires that both databases involved in a relational link be open and in memory. If one of the databases is not open, the relational link will not work. In almost all cases you will want use the Database Options>Auxiliary panel to ensure that all the related databases open automatically. See Auxiliary Databases to learn how this panel works.
The Database Options > Relation Panel
To add or modify a relation to the current database, open the File>Database Options dialog and choose the Relations panel. Here’s an overview of this panel.
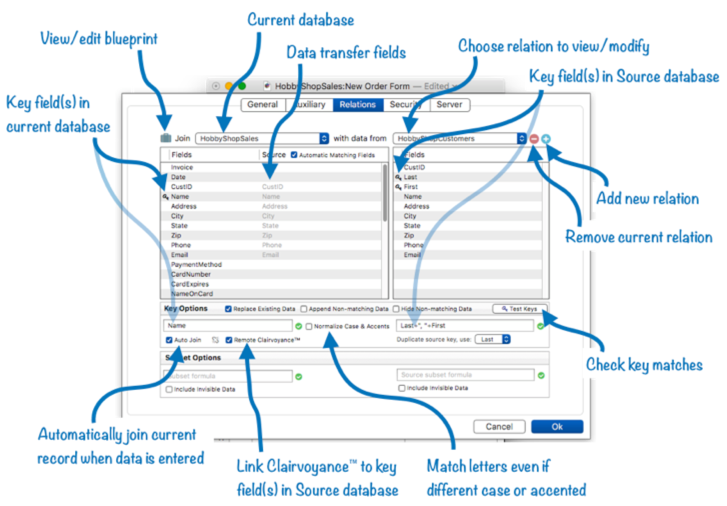
This panel may look complicated, but if the databases have exactly corresponding fields a relation can be set up in seconds with just a few clicks.
Creating a New Relation
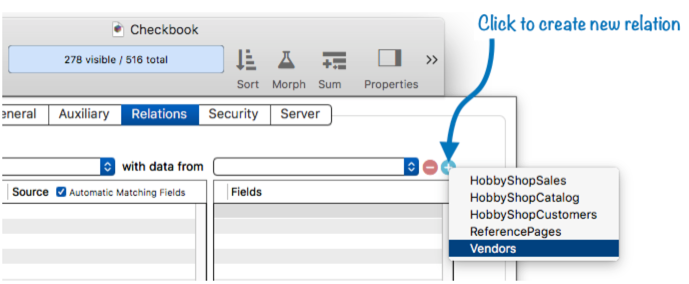
To create a new relation for the current database, click on the + icon in the upper right corner of the panel. This will display a pop-up menu listing all currently open databases that don’t already have a relation set up for this database. Pick a database from this menu to create a new relation.
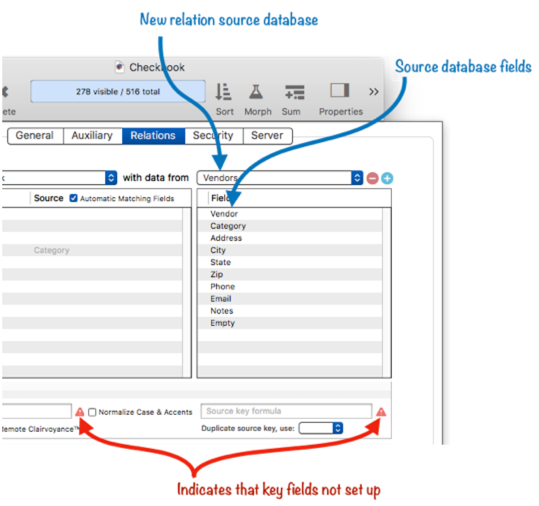
Panorama will create the new relation. The right side of the panel will show the name of the source database (the database this relation is linked with) and the list of fields for this database. It will also display two alert symbols, indicating that the key fields for this relation haven’t been specified. More on that in a moment.
Specifying Single Field Keys
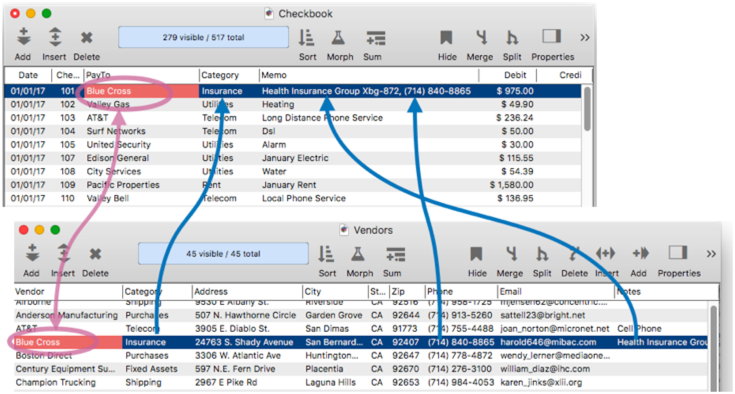
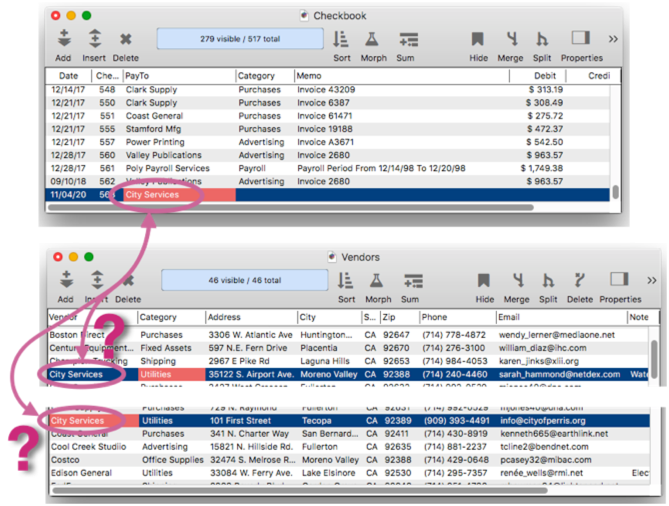
Usually the first step in setting up a relation is to specify the key field (or fields, or formula) in each database. The simplest case is if the key is a single field in each database. For example, consider this simple case where the PayTo field in the current database (Checkbook) matches the Vendor field in the source database (Vendors).

In the relation panel, simply click next to each of these fields to specify that they are key fields. A key icon will appear next to the field confirming your choice. If you change your mind, click again to remove the key.
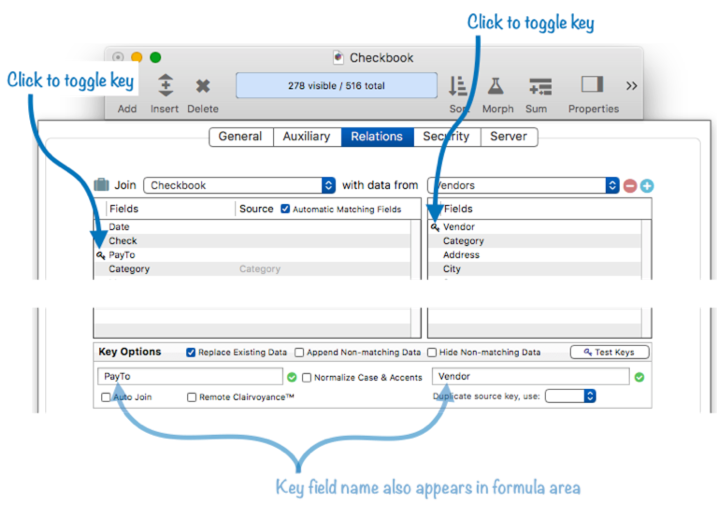
As shown in the illustration above, the selected key fields also appear in the formula areas at the bottom of the panel. You can also simply type in the key field name, or you can edit this. This becomes very useful when a key needs to be multiple fields, or a partial field, as will be described in a moment.
One other point to note – there is now a green checkmark next to each key formula. This means that each key contains a valid formula. You cannot use a relation unless you have two green checkmarks.
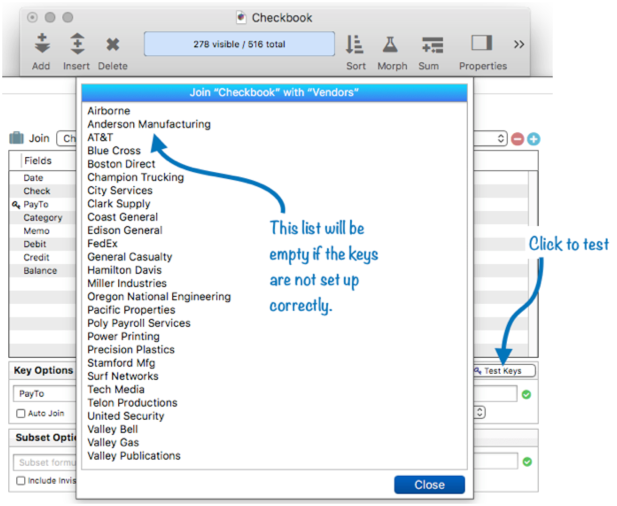
However, even if the key formulas are valid, the specified fields may not match. If you’re not sure, press the Test Keys button. This will perform a join between the databases, and display the matching data it finds. If the list looks correct, you’ll see a list of matching data. If you specified key fields that don’t match up, you’ll probably see an empty list. If that happens you’ll need to go back to the drawing board.
Ignoring Upper/Lower Case and Accent Variations
When looking for a key match between the two databases, Panorama normally requires an exact match. So for example the name Nina will not match nina, NINA or Nīna. If you want Panorama to be more lax and regard all these variations as matching, check the Normalize Case & Accents option.
Specifying Data Transfer Connections
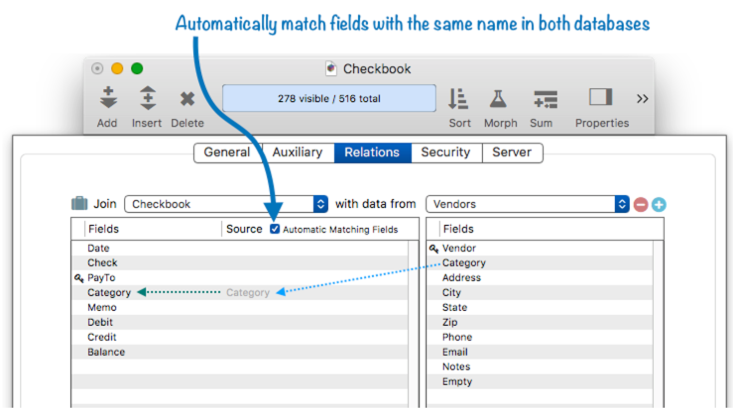
To perform a join operation, Panorama needs to know which fields in the source database connect with which fields in the current database. In this example it is really simple – there is just one field, and it is named Category in both databases.
This example is so simple that Panorama can figure it out for itself! If the Automatic Matching Fields option is checked (and it is checked by default), Panorama will automatically connect any field in the source database that corresponds to a field with the same name in the current database, in this case the Category field. The Category field appears dim in the Source fields list because it has been supplied automatically.
Manually Specifying a Data Transfer Connection – If the field names aren’t the same, you have to give Panorama a bit of help in making the connection. For example, perhaps data should be transferred from the Notes field in the Vendor database into the Memo field. The field names are different so this won’t happen automatically. To make this happen, drag the field name from the list of source database fields (on the right) into the list on the left, leaving it next to the field you want to transfer it into.
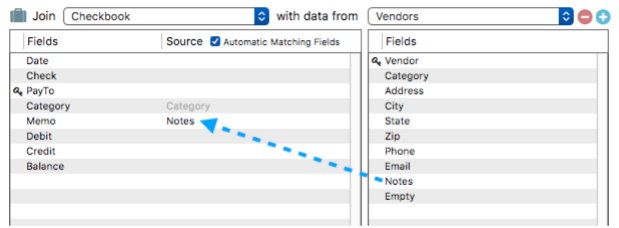
Now a join will perform two transfer operations
Category -> Category
Notes -> Memo
Notice that Notes is not dim, because it was not filled in automatically. If you uncheck the Automatic Matching Fields option, any dim fields in this list will disappear. You can leave these spots blank, or replace them manually by dragging fields over from the source database.
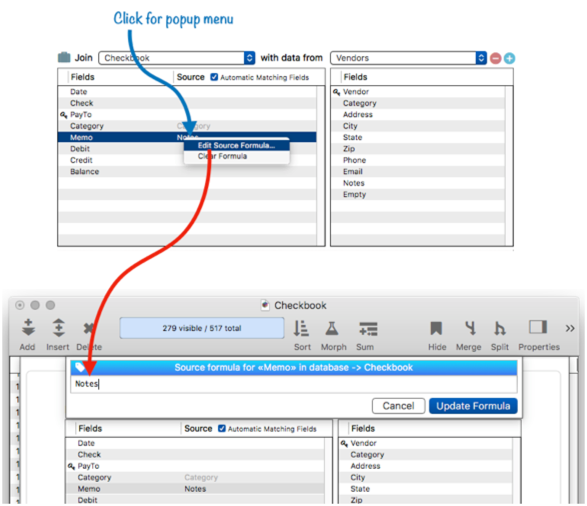
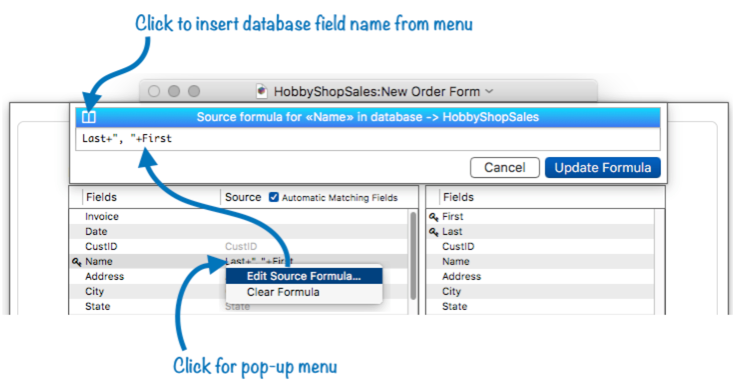
Using a Formula to Specify a Data Transfer Connection – You’re not limited to transferring one field in the source database into one field in the current database. By setting up a translation formula, you can transmogrify the data as it is transferred. To set up a formula, start by clicking on the spot in the data transfer list, and then choose Edit Source Formula from the popup menu. A dialog sheet opens allowing you to edit the formula.
Once the formula is set up as you want it, press the Update Formula button. This formula will bring both the Notes and Phone fields into the memo during a join, separated by a comma if both contain a value (see yoke().
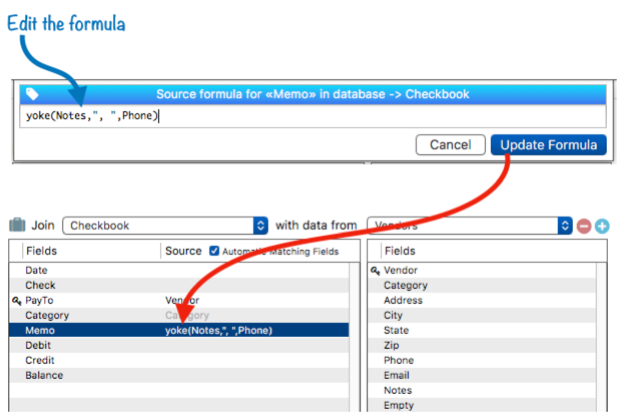
Here’s a graphical representation of how these connections have been set up.
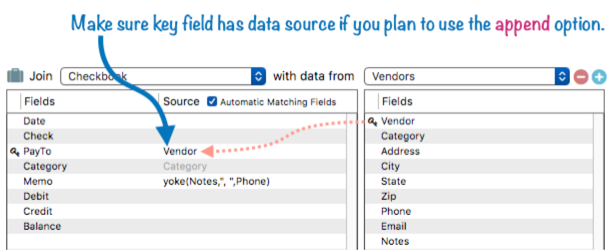
Data Transfer for Key Fields – For most relations you don’t need to set up data transfer for key fields – after all, by definition the key field already contains the data matching the source database. However, if you intend to use this relation with the join statement’s append option (used for appending non-matched data) then you must set up the source data transfer formula for the key field(s) in the current database, because when records are appended from the source database to the current database, the key field(s) needs to be transferred also into the new record. If the key fields are the same name in both databases this is automatically taken care of, but if not, you must manually drag the field across.
If you are using multiple keys, you may need to specify a formula here, as described in the previous section. Examples of this are shown in the Advanced Topics section farther down on this page.
Auto Join on Key Entry
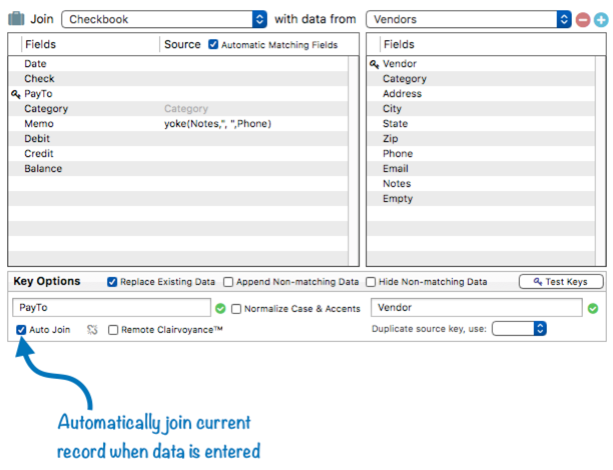
We’re almost ready to put this relation to work. The final step is to click the Auto Join box. This box tells Panorama to automatically join the current record whenever the data in the key field changes.
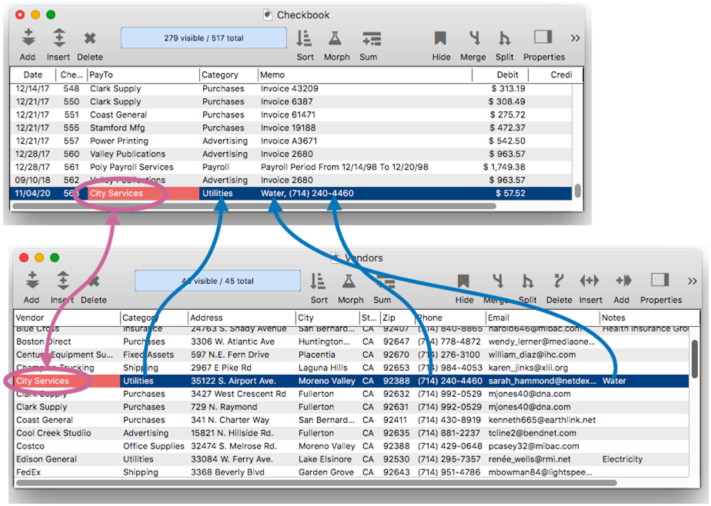
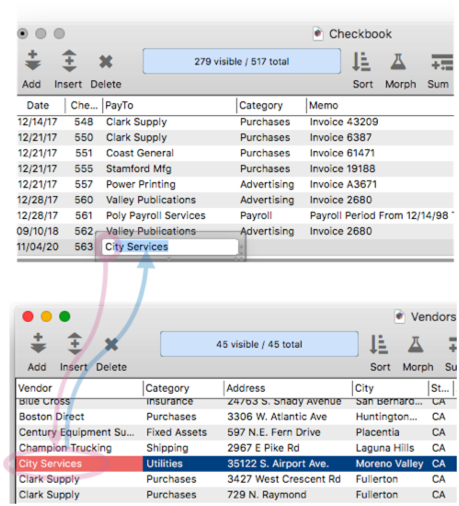
Then press the Ok button and the relational specification is now saved as a part of the database. To try it out, I’ll add a new record into the checkbook database, and type in a PayTo company. As shown in the illustration, the relation is waiting in the wings, ready to go.

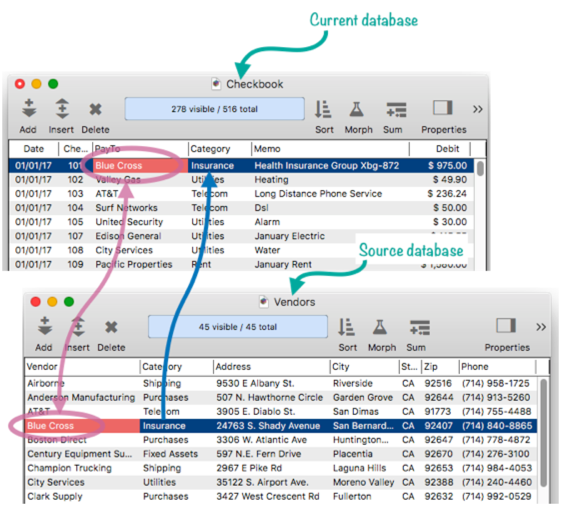
When I press the Enter or Tab key, the relation scans the Vendor database for a match, and if found, populates the specified fields with the data that belongs to the match.
What if there are multiple key matches? – So far we’ve been assuming that there is only one matching record in the source database. But of course it is possible that there will be two or more matches, as shown in this illustration.
When there’s more than one match like this, what should Panorama do? There are three options: match the first occurence (closest to the top), the last occurence (closest to the bottom), or generate an error. Use the pop-up menu to select the appropriate option.
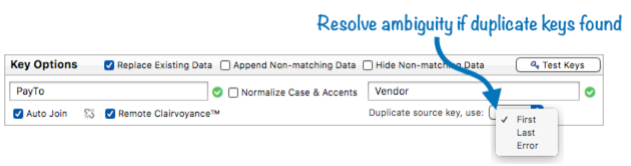
If you choose First or Last, keep in mind that the order will change depending on how the database is sorted.
What if there is no key match? – Another possibility is that there could be no match at all. Panorama’s default action in this case is to do nothing. If you need Panorama to take some action in this case, click the gray “broken link” icon next to the Auto Join checkbox. This opens a dialog sheet where you can enter code that Panorama will execute when there is no match.
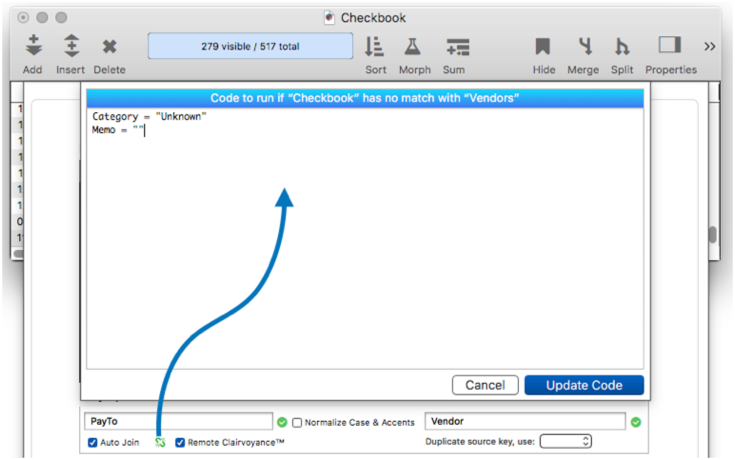
In this case the custom code has been written to set the Category and Memo fields to default values.

Another possibility would be to display a dialog or notification to the user to alert them that there was no match.
What if I need even more customization? – The Auto Join feature is very flexible, but if it doesn’t do what you want, you can leave this checkbox off and manually code the join action to take when doing data entry. See Automatic Field Code to learn how to write code that is performed after data entry, and joinonerecord to learn how the join code is written. This illustration shows how this is done (though this example is silly, because the same results could be achieved simply by checking the Auto Join checkbox.)
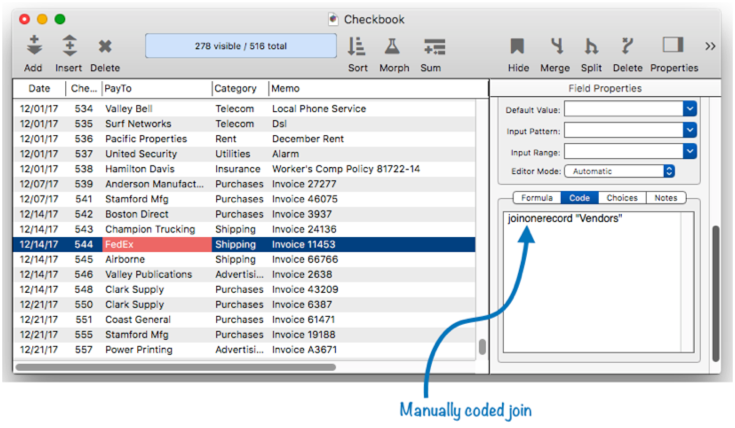
If you do manually code the join, be sure to leave the Auto Join option turned off, otherwise the join will be performed twice.
Clairvoyance on Key Entry
If you use the auto join feature, you will almost always also want to enable the Remote Clairvoyance™ option. This tells Panorama that when editing the key field in the current database, Clairvoyance should use the remote key field as the “source of truth” for auto-fill data, instead of the current field.
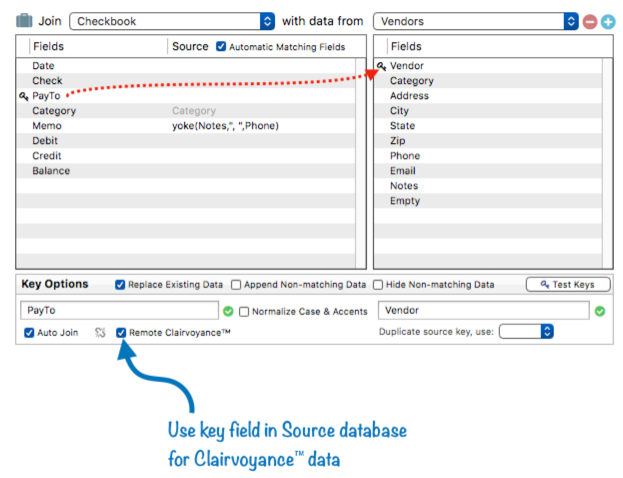
Now when I start typing into the PayTo field, Clairvoyance™ will auto-fill based on the information in the Vendor field in the Vendors database.
When the Enter or Tab key is pressed, auto-join will kick in to fill in the Category and Memo fields, as described in the previous section. (You can enable Remote Clairvoyance without also enabling Auto Join, but I can’t think of any situation where you would want to do that.)
Managing Multiple Relations
There’s no limit to the number of relations you can create. If a database needs another relation, just click the + icon to create it, as described above. Once a database has multiple relations you can use the pop-up menu to choose which one is active in the Database Options dialog.
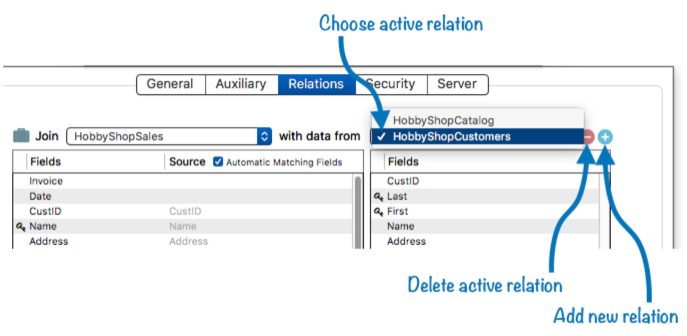
Deleting a Relation – To delete a relation, first make it active with the popup menu, then click on the subtraction (minus sign) icon. The relation isn’t actually deleted until you press the Ok button to close the dialog. Until then, you can always cancel if you change your mind.
Advanced Relation Configuration Topics
The rest of this page will cover advanced topics, including using multiple fields or even a formula as a key, relations based on database subsets, and blueprints.
Using Multiple Key Fields in One or Both Databases
In some cases, the common data between two databases may be in two or more fields, like this:
As long as the multiple fields are in the same order in both databases, you can set this up by simply enabling the key option for each of the fields.
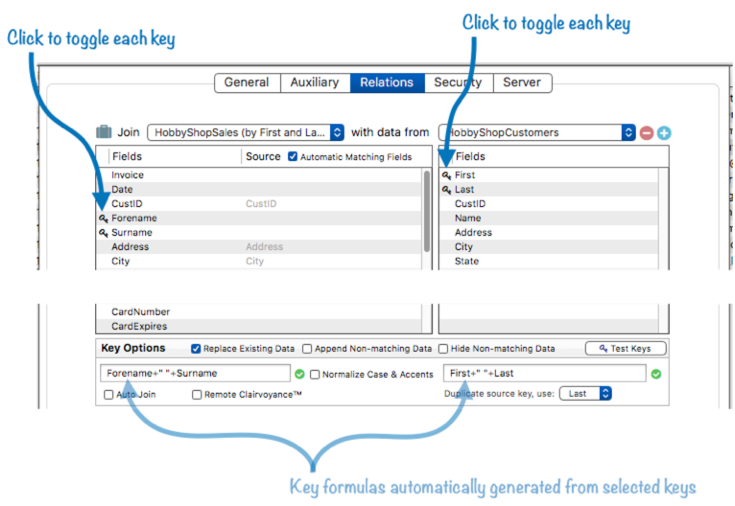
When you do this, you’ll see that Panorama automatically generates a formula from the keys you select. In a moment you’ll learn how to customize this formula for cases where the fields don’t exactly correspond, but as long as the fields are in the same order in both databases, you can use the auto-generated formula as-is.
Auto Join vs. Multiple Key Fields – When there is more than one key field in the current database, the relation won’t get a match until both keys are entered. In this example, there won’t be a match until both the forname and surname are entered (first and last name). Because of this, you may want to only enable auto-join for only one of these fields. To do this, first enable the Auto join checkbox. Then click on the asterisk (*) icon that appears, and toggle to enable or disable auto join for individual key fields.
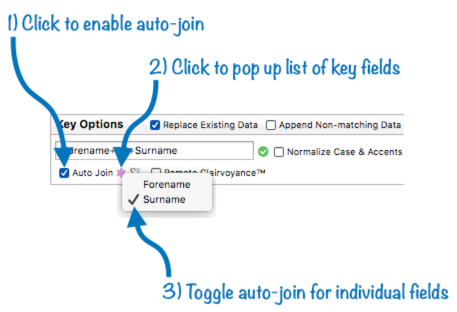
With the configuration shown in the illustration above, auto join will be triggered when the surname is entered, but not when the forename (first name) is entered.
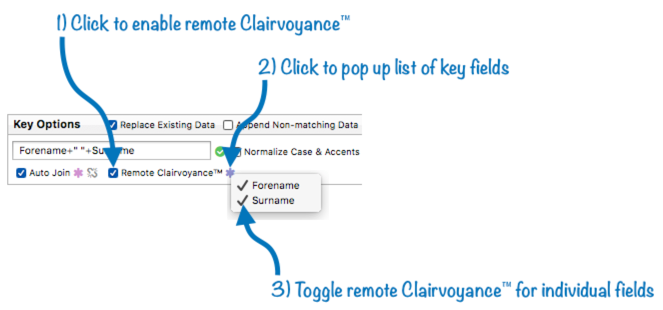
Remote Clairvoyance™ vs. Multiple Key Fields – Like auto join, remote Clairvoyance™ can be used with multiple key fields. As long as the fields are in the same order in both databases, you simply need to check the Remote Clairvoyance™ option. Usually you will want to enable this option for all of the key fields, but you can click on the star and toggle individual fields on or off as needed.
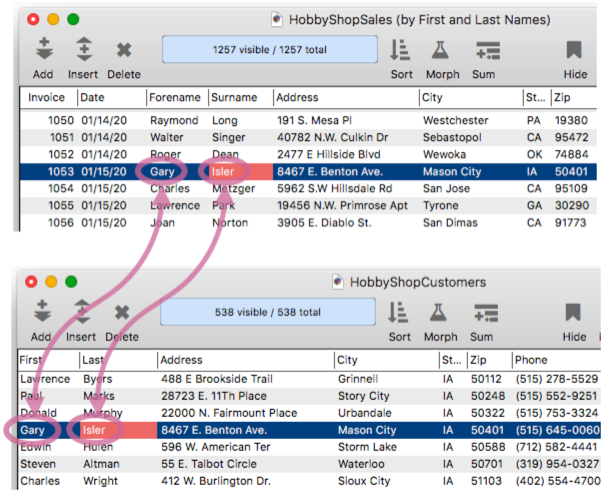
Let’s look at how multiple key fields actually work. As a name is typed in to the first name field, remote Clairvoyance™ scans the source database and auto-completes when a match is found.
Since auto join is not enabled for the forename field, nothing happens when the Enter or Tab key is pressed. Proceeding to the surname, remote Clairvoyance™ again works with the source database.

When the Return, Enter or Tab key is pressed, auto join kicks in to fill in all of the contact information.
Since the key is split into two fields, it’s entirely possible that remote Clairvoyance™ could auto-fill a person that doesn’t actually exist in the customer database. See What if there is no key match? earlier on this page to learn how auto join handles a key that doesn’t match.
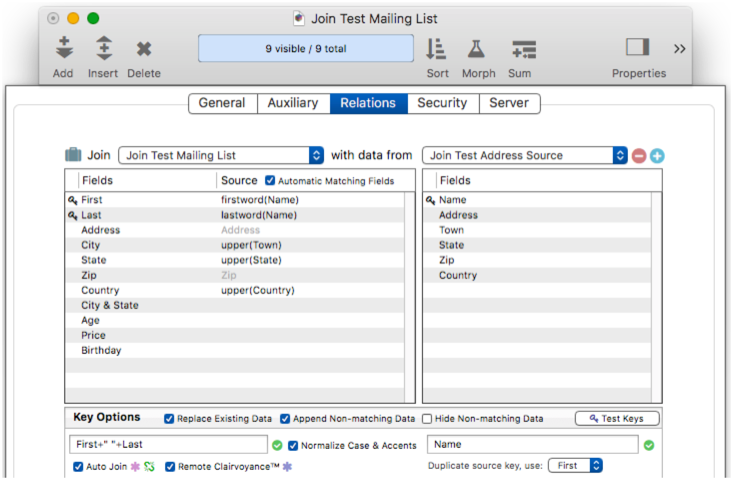
Using a Custom Key Formula in One or Both Databases
It’s a bit more work to set up, but a relation can work even if the two databases have different configurations for the common data used as the key. Here’s an example where a person’s name is used as the key, but one database combines the first and last names into a single field, while the second database has them split into two separate fields.
The first step in setting up a relation is to click to toggle on each of the key fields.
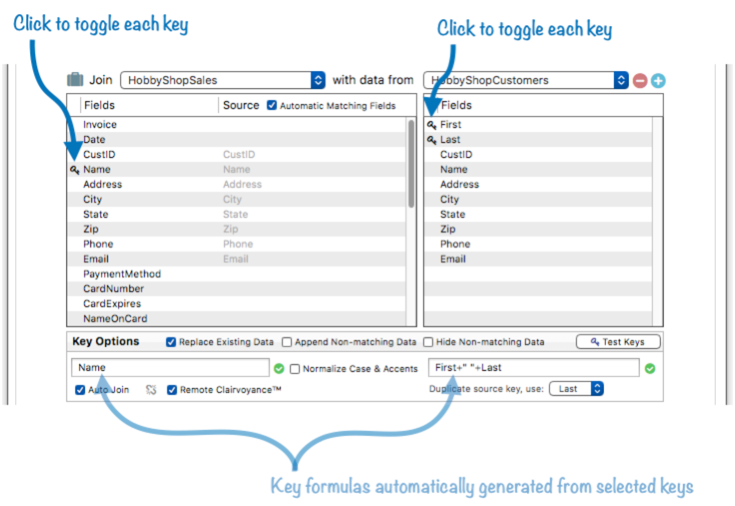
As you toggle the key fields, Panorama automatically generates formulas for each key, as shown in the diagram above. However, the calculations performed by these automatically generated formulas will not match in this instance.

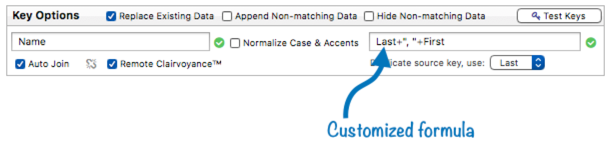
To make this work, the formulas must be manually adjusted. In this case, the key formula for the source database (on the right) needs to be rearranged to produce data in the correct format

This illustration shows the edited formula.
That’s it! This is all that is needed to make a link between databases with different configurations.
Note: If you’ve been following closely, you may now realize that Panorama always uses formulas to calculate the keys. However, you don’t usually have to worry about this, because Panorama automatically generates the formulas for you. You only need to be concerned with this if the arrangement of the key fields doesn’t exactly match between the databases.
Enabling Auto Join with a Custom Key Formula – There’s no special requirements for using auto-join with a custom key formula. However, if you intend to use this relation with the join statement’s append option (used for appending non-matched data) you must set up the source data transfer formula for the key field(s) in the current database. In this example the needed formula is the same as the source key formula, but that isn’t always the case. (Remember, to edit this formula you click on that row, then choose Edit Source Formula from the popup menu.)
Enabling Remote Clairvoyance™ with a Custom Key Formula – To use remote Clairvoyance™ with a custom key formula, you must set up the the source data transfer formula for the key field(s) in the current database, as described in the previous section. Clairvoyance will use this formula to get the data it needs to auto-complete your data entry.
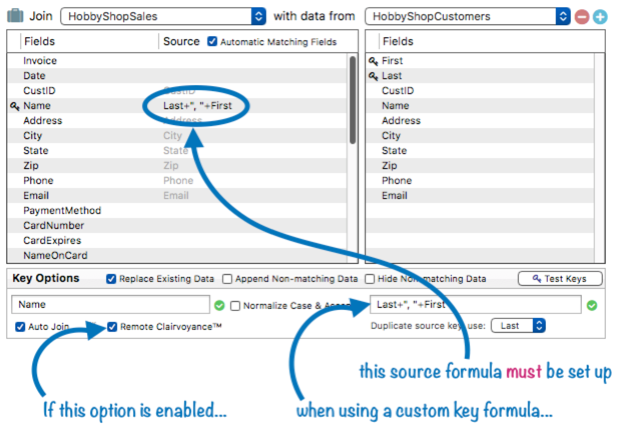
With this configuration, remote Clairvoyance™ will auto-complete your data entry even though the fields don’t match up.
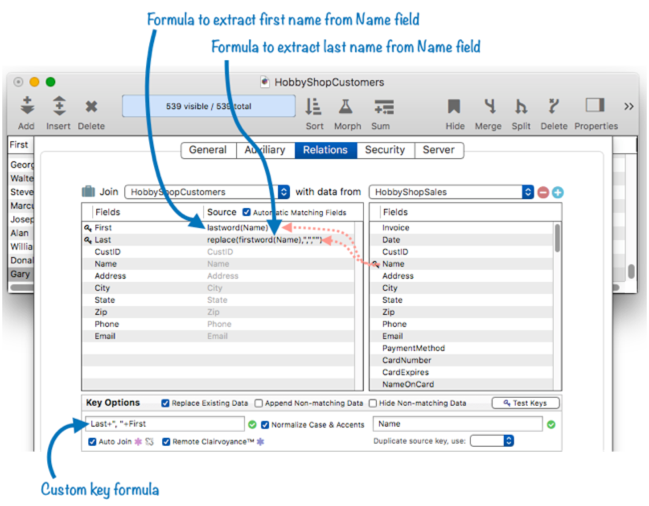
Split Key in the Current Database
The previous examples showed a key that was a single field in the current database, but split fields in the source database. The reverse is also possible. To illustrate this, we’ll switch the current and source databases from the previous example.
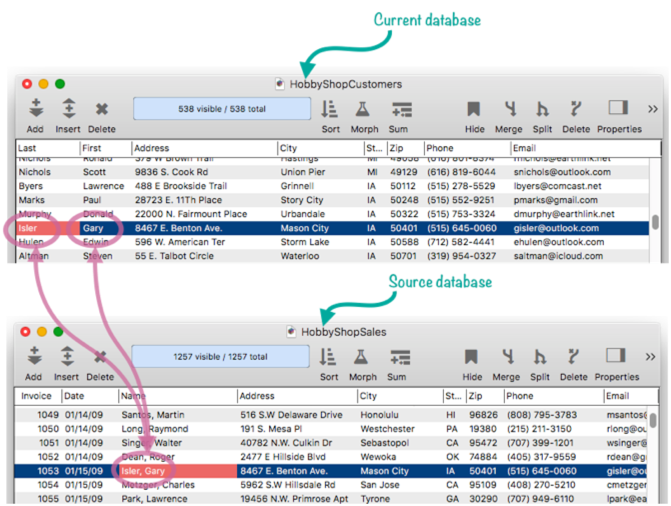
Here is the relation configuration needed to set up the connection. The source transfer formulas use the lastword( and firstword( functions to extract the first and last names, and the replace( function to eliminate the comma.
As the first name is entered, Clairvoyance will use the formula to know how to auto complete.
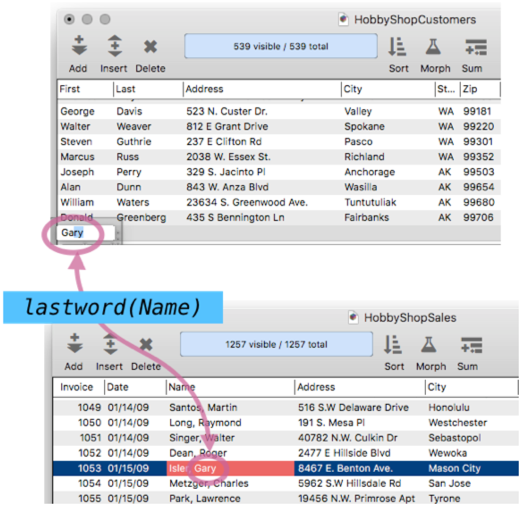
The last name works the same way.
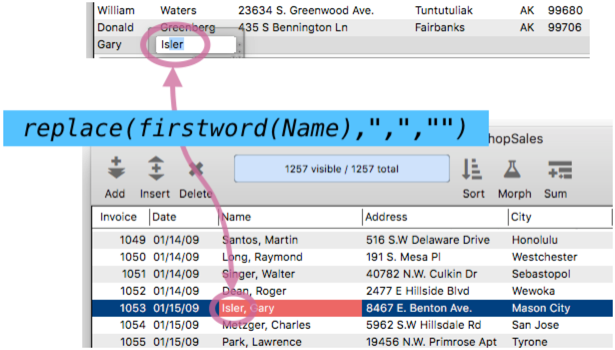
When the Enter key is pressed on the last name, auto-join works as you’ve seen before.

Using custom key formulas, you can set up a relation for any combination of key fields in the current and source databases.
Join Key Options
The panel contains three checkboxes that modify the default operation of a join statement used with this relation.
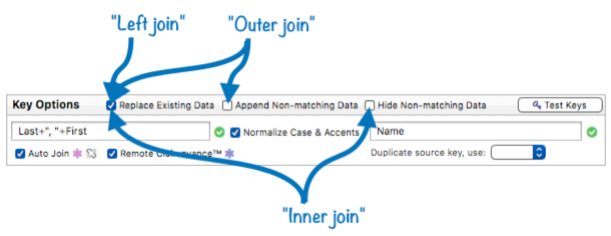
Replaces Existing Data – The join operation normally updates the existing data in the current database with any matching information it finds in the source database. If you don’t want the existing data to be updated, uncheck this option. In that case the join will only append new data at the end of the current database, so be sure to check that option. If both the Replaces Existing Data and Append Non-matching Data are un-checked the join operation won’t do anything at all. Checking only Replaces Existing Data is similar to SQL’s “left join” operation.
Append Non-matching Data – The join operation normally ignores any data in the source database that doesn’t match any of the existing data in the current database. If this option is checked, this non-matching data will be appended to the current database instead of being ignored. If you use this option, be sure to provide a data source for the key field(s), as described earlier on this page. If you don’t, the appended data won’t contain the key values. When both the Replaces Existing Data and Append Non-matching Data options are checked the operation is similar to SQL’s “outer join” operation.
Hide Non-matching Data – The join operation normally skips any records in the current datase that don’t have a corresponding match in the second database. If this option is enabled these records are not just skipped, they are made invisible. This is similar to SQL’s “inner join” operation.
See the join documentation for more detailed discussion of these options.
Join Subset Options
The options in the bottom section of the panel control whether the relation applies to all records in the two databases, or just a subset.

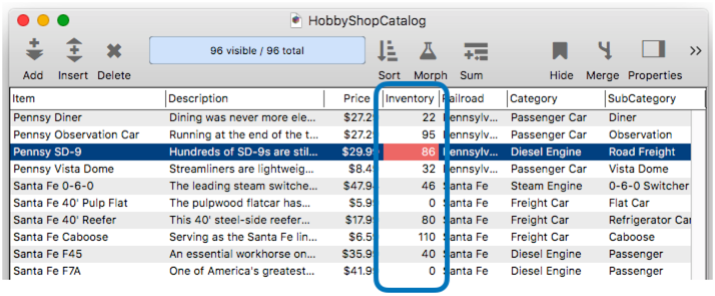
To illustrate this, an Inventory field has been added to the catalog database.
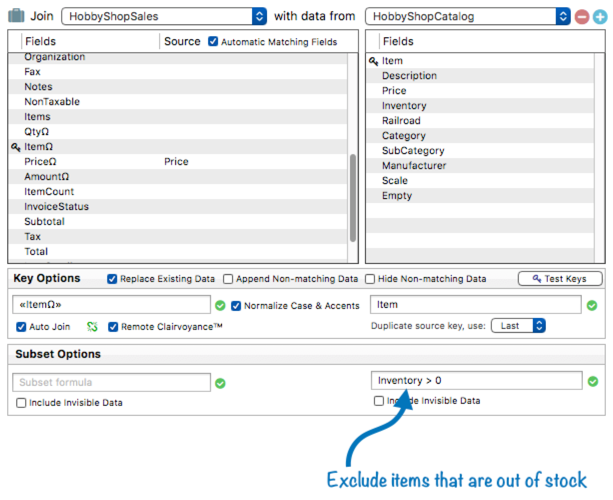
With a formula, items that are out of stock can be excluded from the relation.
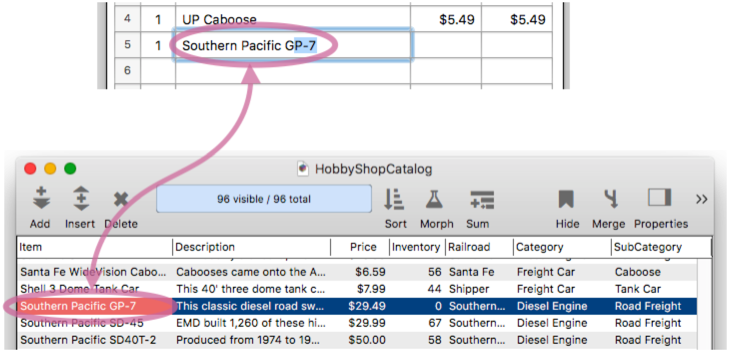
Keep in mind that the subset formula does not apply to remote Clairvoyance™. So even though Southern Pacific GP-7’s are out of stock, they will still auto-complete.
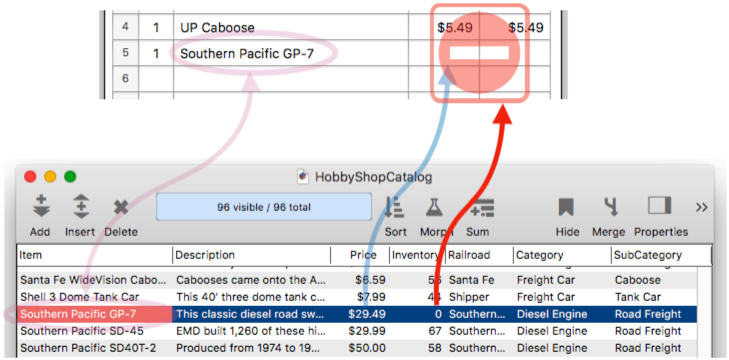
However, when the Enter or Tab key is pressed, the price is not transferred to the current database.
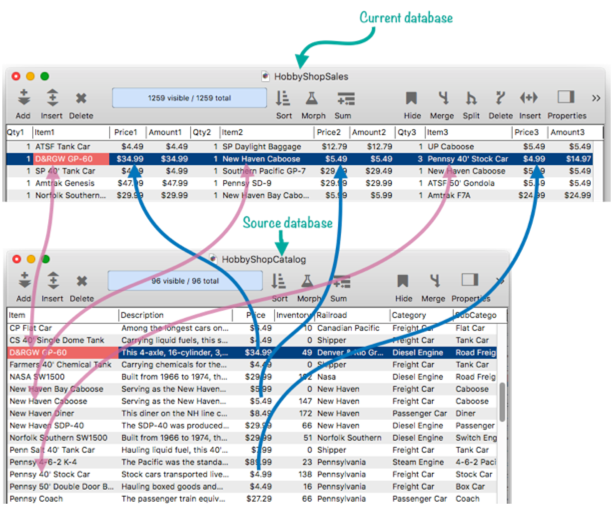
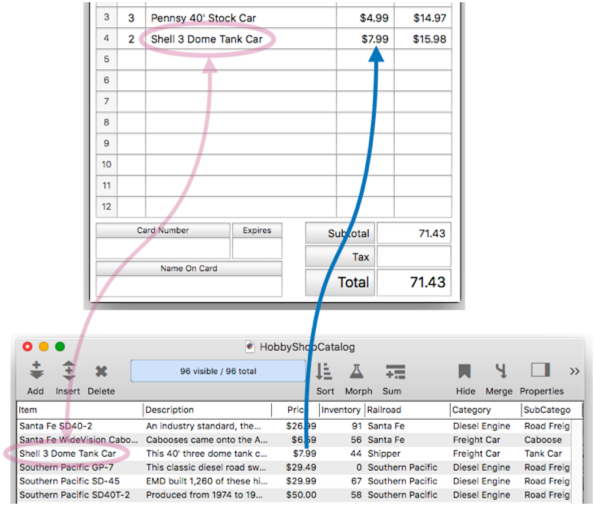
Database Relations Using Line Items Fields
Line items are used for repeating items within a record. Line Item Fields always end with a numeric suffix, for example Qty1, Qty2, Qty3, etc. Like ordinary fields, line item fields can be used in a database relation. In the current database, a line item field can be used as a key field or as a field that data is transferred into. (Line item fields cannot be used in a relational source database.) For regular fields, a relation is specified between an individual field in the current database and an individual field in the source database. In the case of line item fields, the relation is established between all line item fields in the current database with the same root and an individual field in the source database. For example, this illustration shows a relationship set up between the ItemΩ and PriceΩ fields in a sales database with the Item and Price fields in a catalog database. So Item1 is related to Item, but also Item2, Item3, etc.
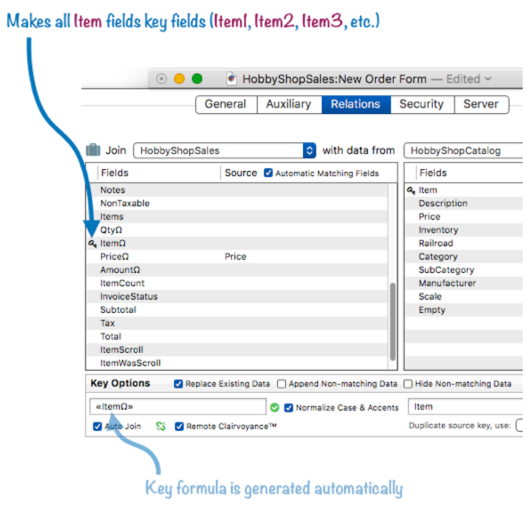
The Database Options>Relations panel doesn’t list individual line item fields. Instead, it lists the line item root names. When you make ItemΩ a key field, as shown below, you are actually make every Item field a key field: Item1, Item2, Item3, etc. Just a single click makes all of these into key fields.
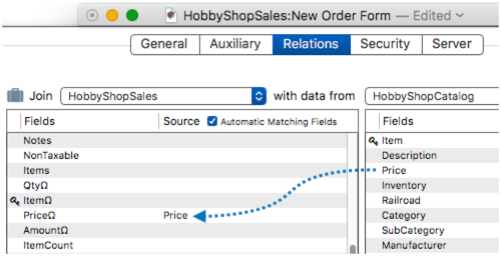
To configure data transfer from a source field to a line item field, simply drag the field over from the left.
This sales database has twelve sets of line item fields, but it only takes 3 clicks to link all of them to the catalog database. Two more clicks to enable Auto Join and Remote Clairvoyance™ and the relation is completely set up.
Let’s take a look at this relation in action. I’ll start typing into the Item4 field in the sales database. When I’ve typed in enough for a match, remote Clairvoyance™ kicks in and auto-completes the item for me.
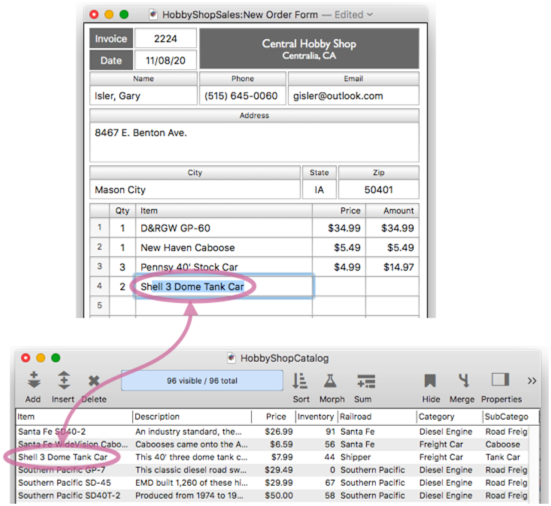
When I press the Enter or Tab key, Panorama automatically transfers the price into the invoice, and updates the subtotals and totals.
Since the relation works for all line item fields, the data entry can be continued for Item5, Item6, Item7 etc.
One thing to keep in mind is that a relation that uses line item fields only works if the currently active field is a line item field. That’s how Panorama knows which suffix number to use in the relation (1, 2, 3, etc.). For Auto Join during data entry this is perfect – the field you are typing into is always the current field, so everything works. But if you are using a join statement, you must be careful to make sure that the current field is on a line item field before performing the join (if not, the join won’t work). If the current field is Item1, then the relation will deal with only line item fields ending in 1. If you want line item fields in 2 to join also, you’ll have to move the current field and run the join again – once for each set of line item fields.
Relation Blueprint Dialog Sheet
The Blueprint dialog sheet allows you to view and modify the raw specifications of the currently active relation. The blueprint is essentially the “source code” for the relation. It contains the same information as the Relation panel, but in source code form. Click the briefcase icon to open this dialog.
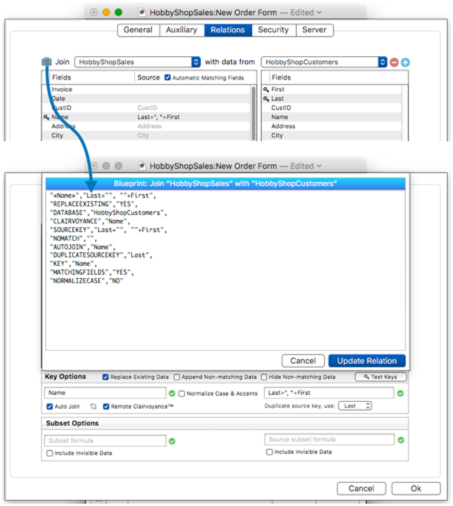
The blueprint gives you a handy summary of all of the relation settings. You can even change any of the settings in the blueprint – but be careful, there is no error checking, so it is possible to mess things up.
You can also take the blueprint code and paste it into a procedure – it is ready to go as the arguments for a join statement.
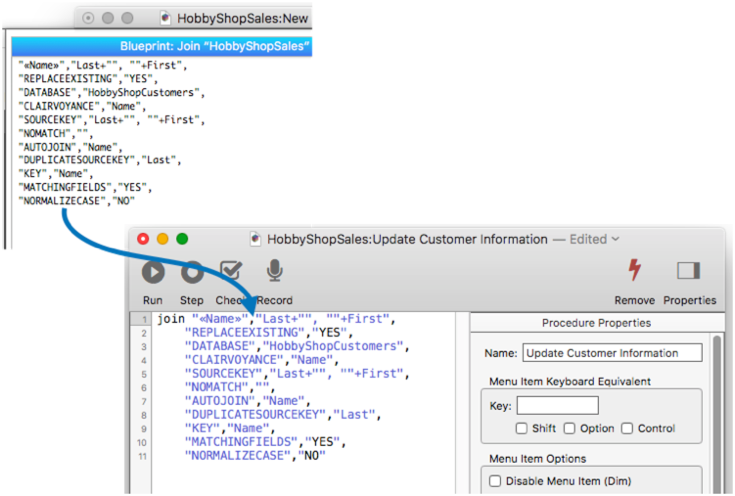
However, keep in mind that this isn’t necessary for relations you have set up and saved with the Database Options>Relations panel. In this case, all you need is the name of the database, and the join statement will pull in all of the saved settings.
join "HobbyShopCustomers"
See the join statement for more information about using this statement.
Adjusting a Relation after Renaming or Deleting Fields
If any field used in a relation is renamed or deleted, the relation will stop working. If you try to use it, you will encounter an error. If you encounter such an error, you’ll need to go back to the Relations panel to fix the problem.
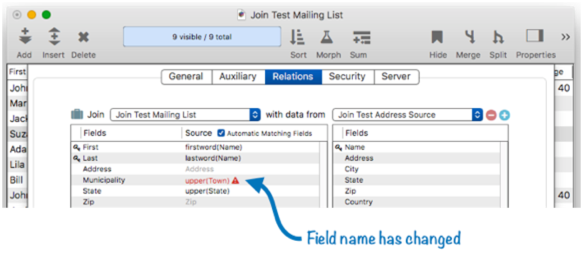
For example, consider this relation between two databases.
But what if the name of the City field in the current database is changed to Municipality, like this?
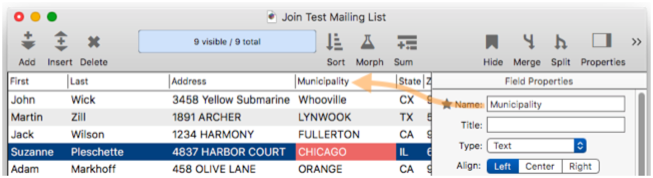
The relation still refers to the City field that doesn’t exist any more, so the relation is broken, and an error message appears above the list of fields.
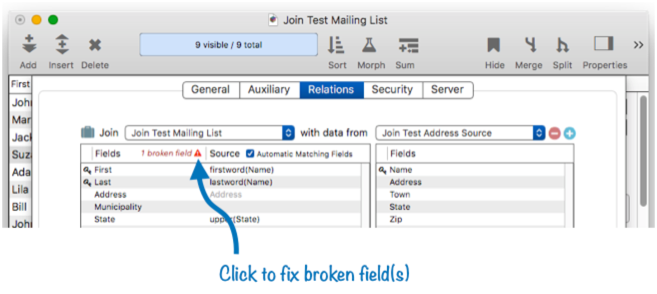
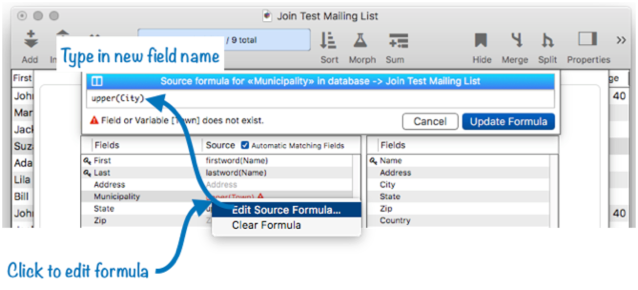
If you click on this error message, a dialog appears explaining the problem, and giving you three options to fix the problem.
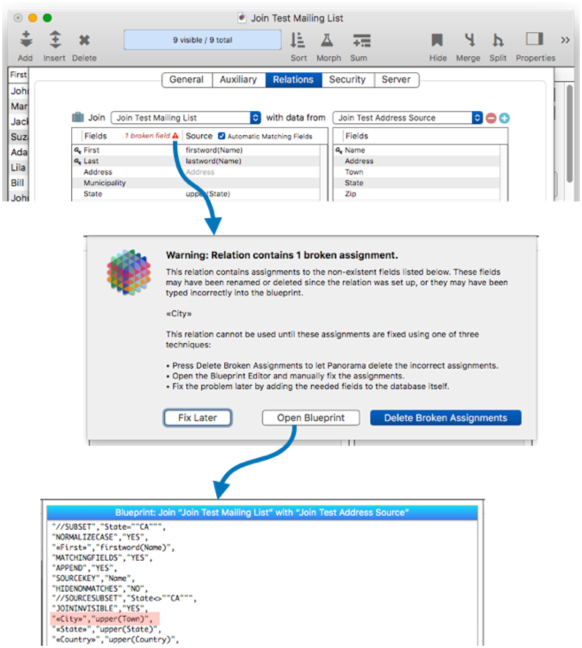
If you press the Fix Later button, Panorama does nothing. This gives you an opportunity to fix the problem by changing the database structure itself, in this case by renaming the Municipality field back to City.
If you press the Open Blueprint button, the blueprint appears. As shown above, you can now see the exact problem (however it won’t be highlighted in red, we did that for clarity here). You could edit the blueprint to fix the problem, for example by deleting the line from the blueprint, or editing it like this:
"«Municipality»","upper(Town)",
If you press the Delete Broken Assignments button, Panorama will delete the old fields from the relation. This is the same as opening the blueprint and deleting these lines yourself. I’ll go ahead and do that.
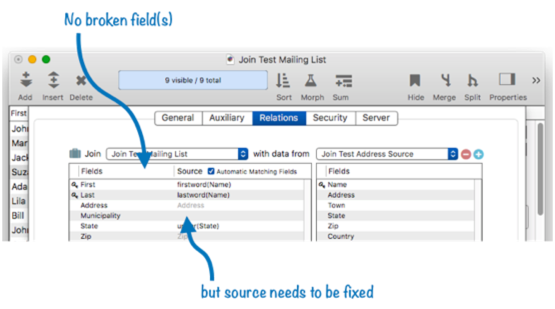
With the broken field removed, the error message goes away. However, we also removed the formula that transferred the data from the Town field in the second database. It might have been better to edit the blueprint to the make this change, but the fix is simple enough – just click on the blank source area and type in the formula again.
The relation is now fixed up and ready to go with the new field name.
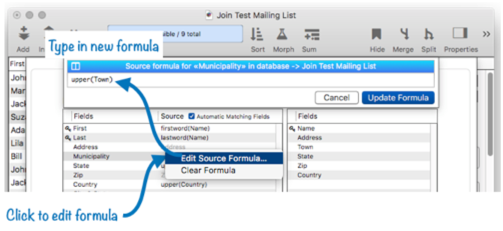
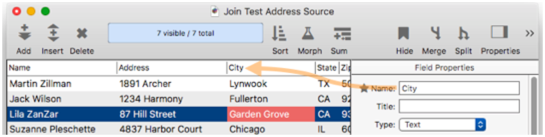
If a field is renamed or deleted in the source database the fix is a bit different. For example, suppose I rename the Town field in the source database to City.
When a source field has changed, the Relations panel shows the problem in the Source area of the panel.
To fix this problem, click on the line to edit the formula, changing it to reflect the new field name.
Once again, the relation is now fixed up and ready to go with the new field name.
See Also
- addrelatedrecord -- adds a new record to the related database corresponding to the current database.
- findrelated -- finds information that matches the current record in a related database.
- join -- joins data from another database into the current database.
- Join Databases -- joining another database into the current database (relational join).
- joinonerecord -- joins matching data from another database into the current record.
- Linking with Another Database -- techniques for relating multiple database files so that they work together.
- posttorelated -- posts data in the current record to the corresponding record in a related database.
- related( -- searches a database for a record in a related database that matches the current record in the current database based a relational specification (based on one or more key fields or formulas in each database), then uses a formula to return other information from the same record. This is similar to the lookup( function, but instead of using an individual field for the key, a relation is used (see Relational Database Management).
- relatedarray( -- builds an Text Array by scanning a database and creating an array element for every record that matches a relational specification (based on one or more key fields or formulas). This is similar to the arraybuild( function, but instead of using an individual field for the key, a relation is used (see Relational Database Management).
- relatedrecordid( -- returns the record id of a record in a related database that matches the current record in the current database based on a relational specification.
- Relational Workshop -- tool that assists in composing relational lookup(, superlookup(, lookupall( and arraybuild( functions.
- selectrecordsrelatedto -- selects records in the current database that are related to any record in another database.
- selectrelated -- selects information that matches the current record in a related database.
History
| Version | Status | Notes |
| 10.2 | New | New in this version. |