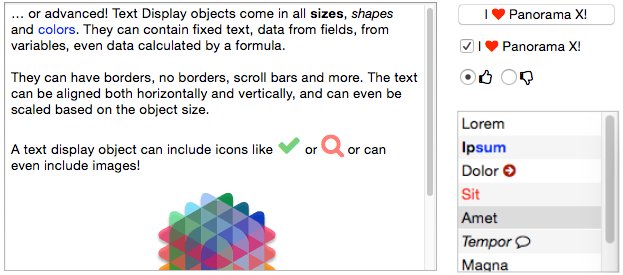
The Rich Text option allows text to be displayed with multiple styles, fonts, colors and alignments – you can even include images and icons. You can control the format of the displayed text using tags that are similar in concept to those used for formatting in HTML. The Rich Text option is available in Text Display Objects, Text List Objects, Push Button Objects and Data Button Objects. Here are some examples of objects with rich text.
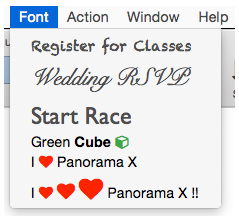
The Rich Text option can even be used in Custom Menus.
By the way, the icons in the examples above all come from Font Awesome Icons, which are built in to Panorama X.
In addition to the material below, there is also an intensive Panorama X video training session titled Text Objects which covers rich text in depth. Choose Panorama X Video Training from the Help menu to access the training sessions.
Rich Text Markup Language (RTML)
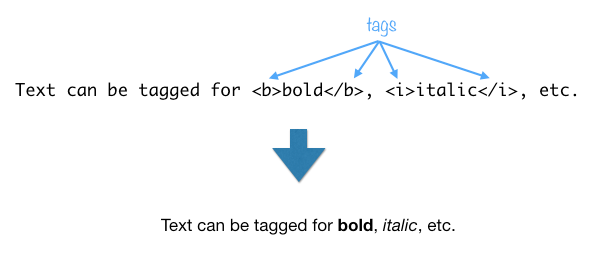
The basic idea of rich text is that you add tags to the text to control the style, in a manner that is very similar to HTML. Here is a simple example with bold and italic text.
RTML Quick Reference
There are about two dozen tags available, as listed in this table.
| Category | Tag | Description |
| Text | <b>…</b> |
Bold |
<i>…</i> |
Italic | |
<ul>…</ul> |
Underline | |
<doubleul>…</ul> |
Double Underline | |
<thickul>…</ul> |
Thick Underline | |
<strike:color>…</strike> |
Strikeout (color is optional) | |
<superscript>…</superscript> |
Superscript | |
<subscript>…</subscript> |
Subscript | |
<color:rrggbb>…</color> |
Color | |
<bgcolor:rrggbb>…</bgcolor> |
Background Color | |
<font:name:height>…</font> |
Font (height is optional) | |
<size:height>…</size> |
Font Height (in points) | |
<baseline:height> |
Baseline (in points) | |
| Shadow | <shadow>…</shadow> |
Text with shadow |
<shadowoffset:x:y> |
Shadow Offset (points) | |
<shadowblur:points> |
Shadow Blur Radius | |
| Artwork | <char:number> |
Unicode Character (dingbats & icons) |
<image:name> |
Image (name may include relative or full path) | |
| Layout | <tabs:tab1,tab2,tab3,…> |
Tab Stops |
<align:option> |
Horizontal Alignment (left/center/right/justified) | |
<leftmargin:value:indent> |
Left Margin (indent is optional) (points) | |
<rightmargin:value> |
Right Margin (points) | |
<paragraphspacing:before:after> |
Extra space before/after paragraphs (points) | |
<linespacing:after> |
Extra space after lines (points) | |
<lineheight:min:max:multiple> |
Line Height (points) | |
| Wrapping | <hyphenate:factor> |
Enable hyphenation |
<linebreak:mode> |
Wrap Mode (wordwrapping/charwrapping/clipping/ truncatingtail/truncatinghead/truncatingmiddle) | |
<tighten:factor> |
Enable compression | |
| Styles | <style>…</style> |
Revert to previous style |
<definestyle:name> |
Define named style | |
<style:name> |
Use named style | |
| Other | <tag:open:close> |
Tag Characters |
See below for detailed information about each of these tags.
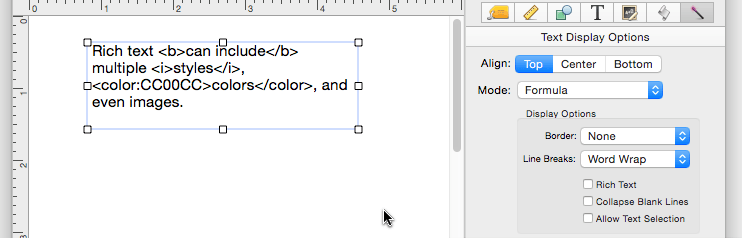
Enabling Rich Text in Graphic Objects
Graphic objects in a form normally display plain text. To enable rich text, check the Rich Text checkbox. (Of course you also have to put one or more tags into your text!) This example shows how to enable rich text in a Text Display Object.
Rich text can also be enabled in Text Lists, Push Buttons, and Data Buttons.
Note: When used in a Text Display Object, Rich Text is compatible with the Word Wrap and Don’t Wrap line break options (see previous section), but it does not work with any of the other line break options, including Character Wrap, Clip or any of the Truncate options.
Enabling Rich Text in Custom Menus
To enable rich text in a custom menu, set the font to "#RichText".
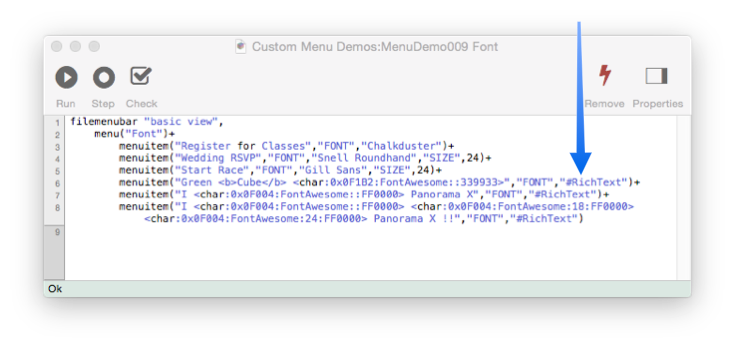
This code produces this custom menu which includes bold text (the word Cube) and various icons.
To learn more, see Custom Menus.
RTML vs. HTML
If you’re familiar with HTML you’ll find many aspects of RTML familiar, but there are significant differences.
Like HTML, RTML uses embedded tags to modify the appearance of the displayed text. By default, each tag starts with < and ends with >. However, RTML gives you the option to change these characters to make it easier to include the < and > characters in the body text.
Some RTML tags have one or more parameters. The parameters are separated from the tag name and each other with the : character. This example shows a tag with two parameters, alpha and beta:
<tag:alpha:beta>
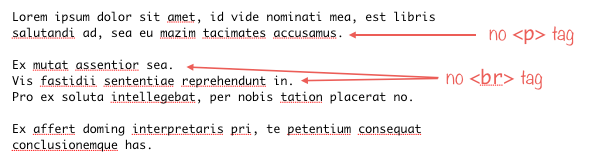
Unlike HTML, RTML doesn’t do any special whitespace processing. Whitespace characters (space, tab, carriage return, line feed) are passed thru “as-is”. To start a new line, use a carriage return character (there is no <br> or <p> tag). If your text includes two or more spaces in a row, they will be displayed in the final output rather than being coalesced into a single blank.
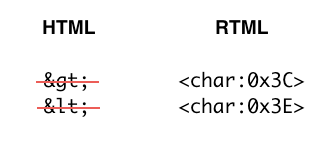
There are no character entities in RTML (>, <, etc.). There is a special <char> tag that allows you to insert any unicode character, and as mentioned above, you can also change the tag characters to make it easier to include < and > characters.
Technical Note: Basic RTML tags are the same as HTML, but many RTML tags are unique – for example tab stops, line & paragraph spacing, justification, text wrapping options etc. RTML includes almost all of the text attributes provided by Apple’s native text styling code (NSAttributedString). Basically, RTML is a version of Apple’s native text styling code that is readable and understandable by humans.
Embedding Data in Rich Text
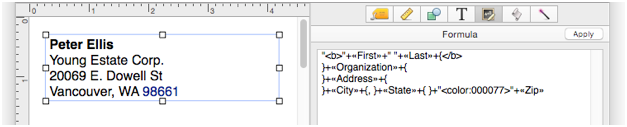
The examples on this page all show fixed text, but what if you want to include database data in the rich text? That’s not a problem, simply include the fields or variables in the formula. This example creates a mailing label, with the name displayed in bold text and the zip code in blue.
Here is another example that uses a Text Display object to create an entire letter with data merged into the text. It even includes a formula to automatically display today’s date.
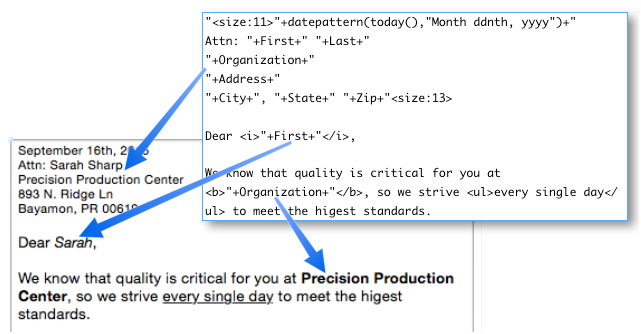
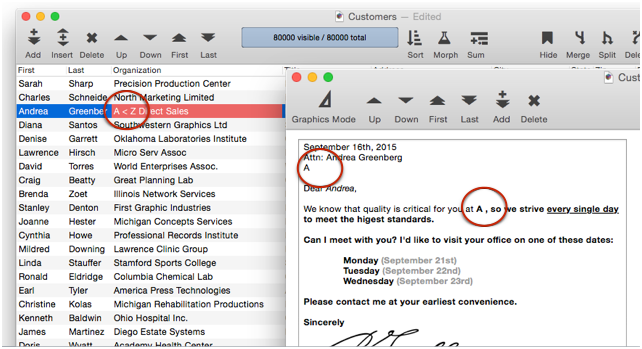
However, what if a field or variable being merged into the text contains a < character? Panorama will think this is the start of a rich text tag, and the merge won’t work correctly. In this example, the company name contains a < so the letter is messed up wherever that field is included.
To prevent the < character from confusing the RTML formatting, enclose the field or variable with the richtextdata( function. This modified example will work correctly even if the Address field contains a < character.
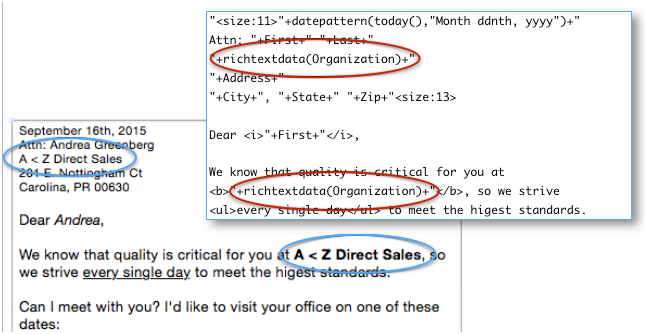
Any < characters inside the richtextdata( function will be passed thru, without being interpreted as an RTML tag. (Of course if the data actually contains RTML tags, you won’t want to use this function.)
Note: An alternate method for fixing this problem is to change the tag character, as described at the bottom of this page.
Bold and Italic
Use the <b> and <i> tags to generate bold or italic text, just like HTML.
"Text can be <b>bold</b> or <i>italic</i> or <b><i>both</i></b>."

Underlines
Use the <ul> tag for underlined text. Underlines can be double or thick, but they are always ended with </ul>.
"Text can be <ul>underlined</ul>, "+
    "<doubleul>double underlined</ul> or "+
    "<thickul>thick underlined</ul>."

Struck Out Text
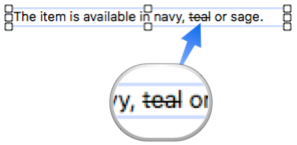
Use the <strikeout> tag for struck out text (can be shortened as <strike>).
"The item is available in navy, <strike>teal</strike> or sage."
The strikeout line is normally the same color as the text, but you can specify a different color, for example red.
"The item is available in navy, <strike:FF0000>teal</strike> or sage."

The strikeout color only applies to the text within that <strike>…</strike> tag pair, if you want to use that color again, you must set it again.
Superscripts and Subscripts
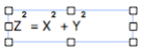
Use the <superscript> and <subscript> tags to create super and subscripts (these tags can be shortened to <super> and <sub>). This example shows superscripts:
"Z<superscript>2</superscript> =
    X<superscript>2</superscript> + Y<superscript>2</superscript>"
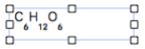
And this example of the chemical formula for glucose shows subscripts:
"C<sub>6</sub>H<sub>12</sub>O<sub>6</sub>"
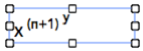
Super and subscripts can also be nested:
"X<super> (π+1) <super>y</super></super>"
Note: Some fonts don’t display multi-level super or subscripts correctly. If you encounter this problem, try another font. (One font that definitely has this problem is the default system font.)
Note: In addition to super and subscripts, you can also shift text vertically using the <baseline> tag, described further down on this page.
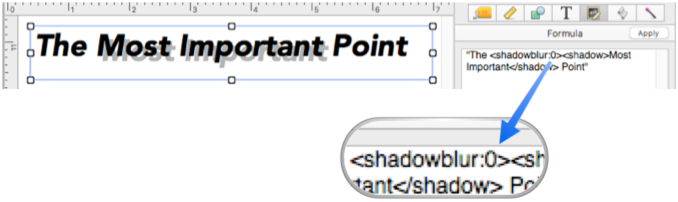
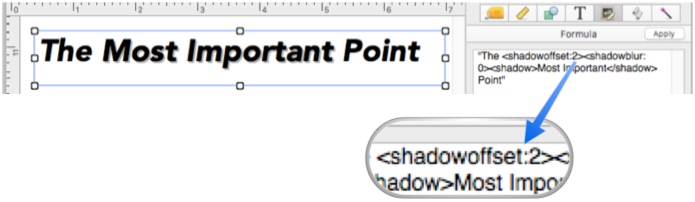
Drop Shadows
Another way to emphasize text is with a drop shadow, created with the <shadow> tag:
"The <shadow>Most Important</shadow> Point"

Use the <shadowblur> tag to make the shadow more or less blurry. Larger numbers are more blurry:

A blur of zero is completely sharp:
Use the <shadowoffset> tag to move the shadow closer or farther from the text. In this example, the shadow is very close to the text, only two points away.
You can also adjust the vertical and horizontal distance separately by adding two numbers separated by a colon:
<shadowoffset:horizontal:vertical>
By using negative numbers, you can even move the shadow up or to the left of the original text.
Color
The <color:rrggbb> tag has one parameter – the color specified using the standard HTML format for colors (2 hex digits each for red, green and blue). If the color parameter is missing it is set to black.
"Text can be <color:FF0000>red</color>, <color:00FF00>green</color>, "+
    "<color:0000FF>blue</color> or any other color."

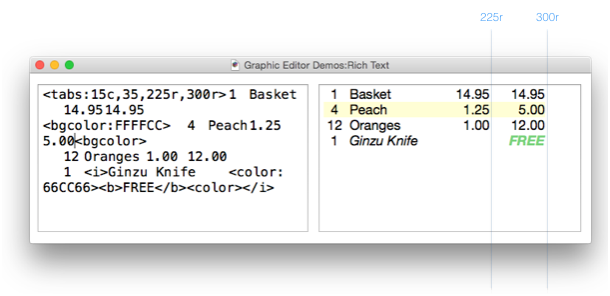
The background color is usually set to transparent, but you can change it with the <bgcolor:rrggbb> tag. If the color parameter is missing it is set to transparent.
"Here is some <bgcolor:FFFF00>yellow highlighted</bgcolor> text."

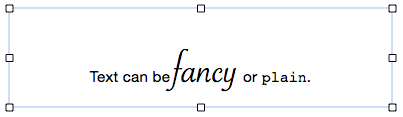
Font and Text Size
Use the <font:name:height> tag to change the font, and optionally the size, of the displayed text. (The size is specified in points.)
"Text can be <font:SavoyeLetPlain:48>fancy</font> or <font:Courier:15>plain</font>."
If you leave the size off it will remain the same.
"Different <font:TektonPro-Bold>fonts <font:Impact>in <font:Herculanum>the same size."

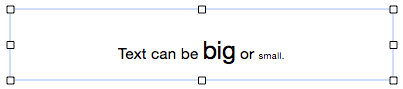
If you want to change the size but leave the font the same, use the <size:height> tag.
"Text can be <size:24>big</size> or <size:9>small."
Adjusting the Vertical Baseline
The <baseline:nn> tag allows you to shift text up or down vertically. Unlike super and subscripts, the size of the text isn’t modified (though you can use the <size> tag to do this). You must specify the amount the text should be shifted in points – positive values for shifting up and negative values for shifting down. As this example shows, a single line can contain text shifted multiple times.
"Some of this text is <baseline:8>shifted up<baseline:0>
    and some of it is <baseline:-6>shifted down."

This feature is very handy for vertically centering captions next to images or icons. For example, suppose you’ve set up a Text Display Object using the Font Awesome Icons wizard like this. Since the icon is taller than the text, the caption text is too low.

By adjusting the baseline, you can make the caption perfectly centered (it can take some experimentation to get the right adjustment value).
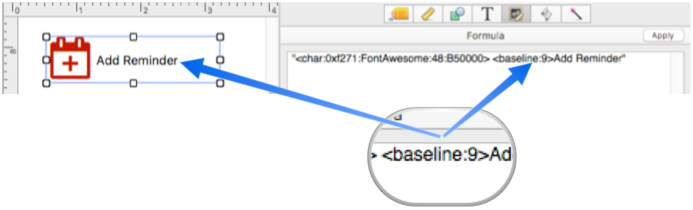
This is a handy method for making a nice looking visual button. See Font Awesome Icons to learn more about creating this kind of textual icon.
This same technique can be used to adjust a caption next to an image.
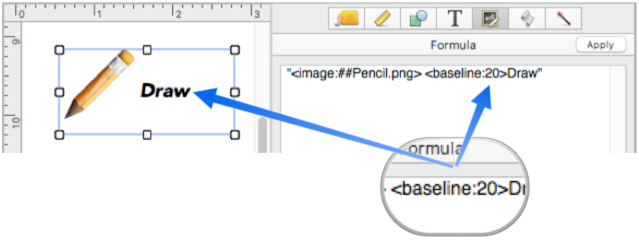
See below to learn more about inserting images into rich text.
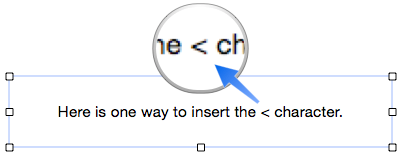
Displaying Unicode Characters
To display a unicode character by value, use the <char:value> tag. This example displays the < character.
"Here is one way to insert the <char:60> character."
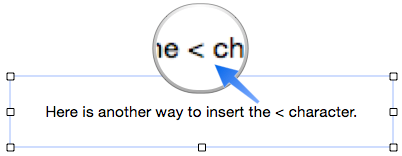
If you prefix the value with 0x, the number will be interpreted as a hexadecimal value. This example also displays the < character.
"Here is another way to insert the <char:0x3C> character."
You can also optionally specify the font, size and/or color for the displayed character. This example displays a big green check mark.
"<char:0xf00c:FontAwesome:36:66FF66>"

Unlike the <font> tag, the effect of any font or color settings in the <char> tag is temporary. Text after the <char> tag will resume with the font, size and color that were in use before the tag.
You can omit any of the optional parameters. For example, this example will display a red < character, using the current font and text size.
"Here is a red <char:x3C:::FF0000> character."

Note: Font Awesome is an open source icon font that includes over 500 icons. Font Awesome is included with Panorama, so you can easily use any of these icons in your designs. See the cheat sheet on the Font Awesome web site for a list of all available icons in this font.
Displaying Images
Use the <image:name> tag to display an image. The image will be displayed inline in the text (on the same line as other text, unless you’ve included carriage returns before and after the image). If the image is in the same folder as the database, you can simply include the name of the file containing the image (be sure to include the extension – .jpg, .png, etc.)
"Here is a flower: <image:flower.jpg>"
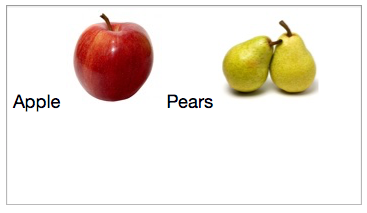
If the image is in a subfolder relative to the database, you can specify a relative path. This example assumes that there is a folder named fruit in the same folder as the database.
"Apple <image:fruit/apple-100.jpg> Pears <image:fruit/pear-100.jpg>"
If the image is anywhere else on the computer you must specify a complete path, like this:
"We had fun here: <image:~/Pictures/Vacation/Ferry Building 87.jpg>"

If the image is inside the Panorama application, or included in the system, you can prefix the image name with ## and Panorama will automatically locate it.
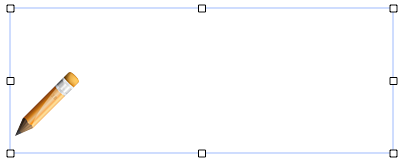
"<image:##Pencil.png>"
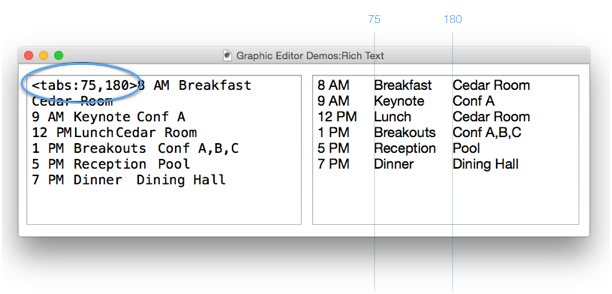
Tab Stops
If the text being displayed contains tab characters you can use the <tab:stops> tag to control where each tab is positioned. In its simplest form this tag simply contains a comma separated list of tab positions. Each position is specified in points from the left edge of the text. This example sets two tab stops, at 75 and 180 points (72 points to an inch). In this illustration the left side shows the RTML source, the right side shows the displayed rich text.
In addition to normal left justified tabs, you can also set up centered, right justified, or decimal justified tabs by appending the letter C, R, or D after the location. In this example the first tab stop is centered, but the second is normal.
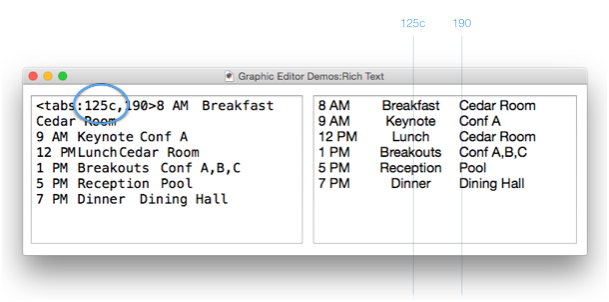
Decimal justified tabs are designed for numbers, and will line up the decimal points on the tab location.
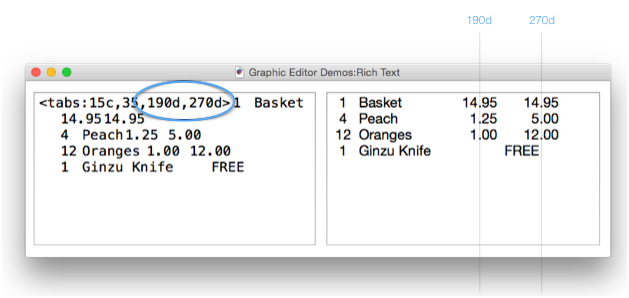
As you can see above, decimal tab stops don’t work too well when mixing numbers and text. Here’s the same data but with right aligned tab stops.
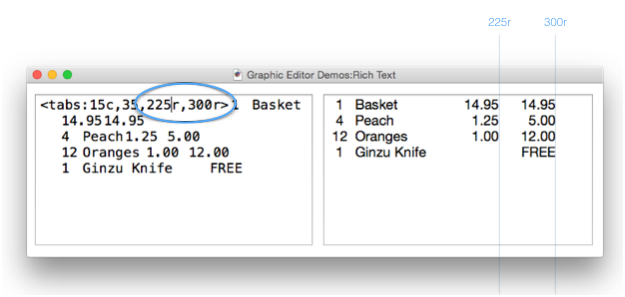
Don’t forget, you can mix in all of the other formatting tags into tabular data!
Of course normally the tabbed data wouldn’t be hard coded like these examples, but would be generated by arraybuild( or a similar function.
Alignment and Wrapping Options
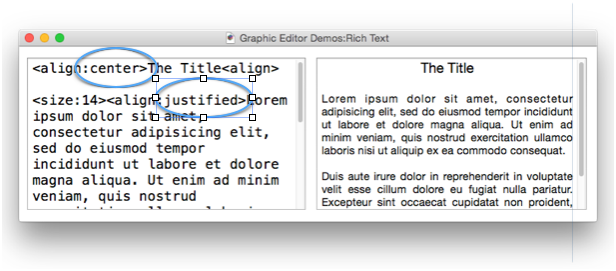
Text is normally displayed left justified. For other options, use the <align:option> tag. The available options are LEFT, RIGHT, CENTER and JUSTIFIED (actually only the first letter is required). The JUSTIFIED option will spread each line within a paragraph so that the text is both left and right justified (except for the last line in each paragraph).
"<align:center>Main Title"+cr()+cr()+
    "<align:justified>Body of main paragraph ... "
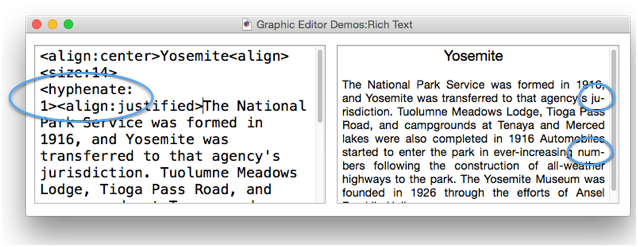
Use the <hyphenate:factor> tag if you would like automatic hypenation to occur. The factor is a number from 0 to 1, 0 is no hyphenation (the default), 1 is maximum aggression in hyphenation. Fractional values are allowed.
When a line of text is wider than the Text Display object, Panorama normally wraps the text into a paragraph at word boundaries. The <linebreak:mode> tag allows this behavior to be modified. The possible modes are:
wordwrapping – This is the normal mode. (It can be abbreviated as word, or simply by omitting the parameter.)
charwrapping – In this mode, the text will be wrapped at character boundaries instead of word boundaries. In other words, words may be split in the middle. (This mode can be abbreviated as char.)
clipping – In this and the following modes, the text does not wrap at all. If the text is too wide to fit, it is simply truncated. (This mode can be abbreviated as clip.)
truncatingtail – In this mode, if the text is too wide to fit, it is truncated on the right, but an ellipsis (…) will be displayed to indicate that there is additional text that is not being displayed. (This mode can be abbreviated as tail.)
truncatinghead – In this mode, if the text is too wide to fit, it is truncated on the left, but a leading ellipsis (…) will be displayed to indicate that there is additional text that is not being displayed. (This mode can be abbreviated as head.)
truncatingmiddle – In this mode, if the text is too wide to fit, it is truncated in the middle, with an ellipsis (…) displayed in the middle to indicate that there is additional text that is not being displayed. (This mode can be abbreviated as middle.)
When using the truncation options, the system will try to compress the text before truncating. If the text will fit if compressed by 5%, it will be displayed compressed instead of truncated. You can use the <tighten:factor> tag to modify this. If the factor is set to 0 the text will never be compressed, if the factor is 0.1 it could be compressed by up to 10%.
Paragraph Layout (including Margins)
To indent text, use the <leftmargin:margin> tag. The margin is specified in points – this example indents the following text by 1/3 inch (24 points).

The first line of each paragraph can be indented separately by adding a second parameter: <leftmargin:margin:indent>. The indent value is relative to the left margin. In this example the text is indented by 1/3 inch, but the first line of each paragraph is indented an additional 1/4 inch (18 points).
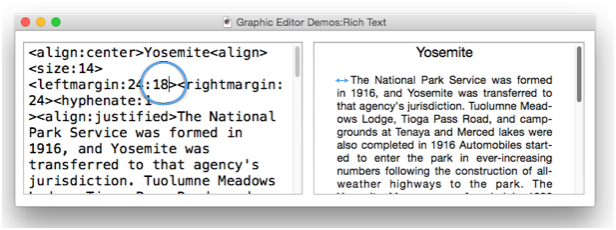
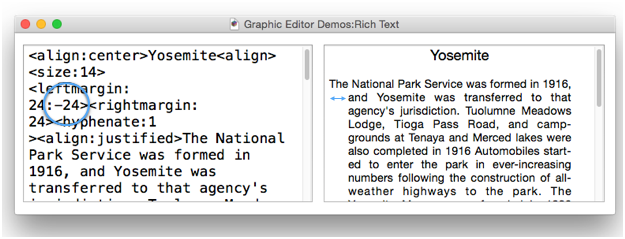
The indent can be negative if you want the first line to have less margin than the rest of the paragrah. In this example the first line of following paragraphs isn’t indented at all, even though the rest of the text is indented by 1/3 inch (24 points).
You can also use the <rightmargin:margin> tag to indent the right edge of the text. This example indents both the left and right margins by 1/4 inch.
"<leftmargin:18><rightmargin:18>Body of paragraph ... "
The <paragraphspacing:after:before> tag allows extra space to be added after or before each paragraph. This example adds an extra 1/4 inch (18 points) after each paragraph.
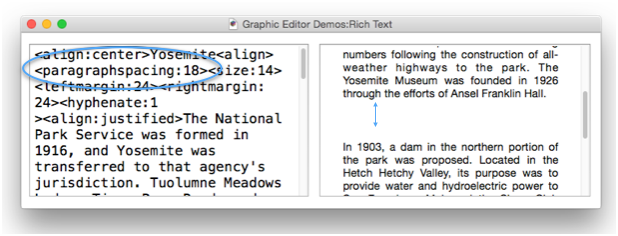
This example adds an extra 1/3 inch (24 points) before each paragraph.
"<paragraphspacing::24>Body of paragraph ... "
Of course you can also add extra space both before and after each paragraph.
Line Height and Spacing
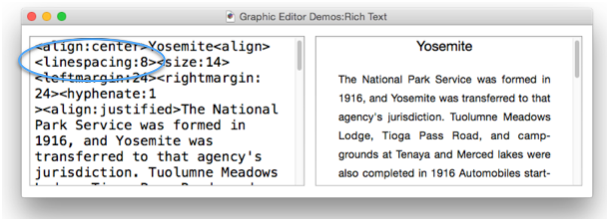
The <linespacing:space> tag allows extra space to be added below each line. This example adds 8 points after each line.
The <lineheight:min:max:multiple> tag has three parameters for controlling the line height. Normally the line height is automatically calculated based on the largest item in the line – for example a tall character or an image will increase the line height. The min value guarantees a minimum line height even if nothing on the line is that tall. In the example below, each line is guaranteed to be at least 1/2 inch tall, even if nothing in the line is that tall. (Since this is a minimum, the line could be taller than 1/2 inch if there is something tall in the line.)
"<lineheight:36>Body of paragraph ... "
The max parameter specifies the maximum height a line can be. If the line contains items that are taller than this, they will overlap other lines. This example guarantees that no line can be more than 1 inch high.
"<lineheight::72>Body of paragraph ... "
Of course you can specify both min and max values if necessary.
The multiple parameter takes the automatically calculated line height and multiplies it by the specified factor. This example uses a factor of 2 to display double spaced text.
"<lineheight:::2>Body of double spaced paragraph ... "
The factor can be a non-integer value, for example 1.5 for halfway between single and double spacing. If the factor is less than 1 the lines will overlap (however, 0 is treated as 1.0). You can also specify minimum and maximum values which can limit the calculated spacing.
Reverting to a Previous Style
In general, RTML tags affect the appearance of the text from that point onwards. However, if you want to go back to a previous style you can use the <style> and </style> tags. The </style> tag reverts the text appearance back to what it was at the time of the last <style> tag. Here is an example.
"This is black, <style><color:0000FF>this is blue,
    <color:FF0000>this is red, </style> and this is black again."
As you can see, the </style> tag un-does all style changes made since the last <style> tag. Note: You can nest multiple <style>..</style> tag pairs inside each other.
Named Styles
Using the <definestyle:name> tag you can save all current appearance options, then call them up again later with a <style:name> tag. This example defines three styles – Title, Body and Code, then uses two of these styles.
"<font:Futura:24><color:0000CC><align=center><leftmargin:0><definestyle:Title>"+
"<font:Gill Sans:13><color:000000><align=justify><leftmargin:0><definestyle:Body>"+
"<font:Courier:10><color:009999><align=left><leftmargin:36><definestyle:Code>"+
"<style:Title>July 2014 Results"+cr()+cr()+
"<style:Body>The results are in, and ..."+cr()+
"Conclusions we can draw from these values are that ...")
Tip: If you want to use the same styles in multiple objects, put the definition for these styles into a variable, like this (this code could be in an .Initialization procedure, or you could use a permanent variable):
 fileglobal myStyles
 myStyles=
    "<font:Futura:24><color:0000CC><align=center><leftmargin:0><definestyle:Title>"+
    "<font:Gill Sans:13><color:000000><align=justify><leftmargin:0><definestyle:Body>"+
    "<font:Courier:10><color:009999><align=left><leftmargin:36><definestyle:Code>"+
Then you can use these over and over again like this:
myStyles+"text to be displayed ..."
Note: Panorama automatically creates a style name object for you. This style contains all of the default appearance options for the Text Display object being displayed – the font, color, etc. as specified by the object inspector palette.
Changing the Tag Characters
RTML normally uses the < and > functions to identify tags. However, this may conflict with data you want to display. One way around this is to use the richtextdisplay( function, but you can also use the <tag:open:close> tag to change the tag characters. This example changes the tag characters to ((( and `)))` (yes, multiple characters are allowed).
"<tag:(((:)))>(((color:00FF00)))some green text (((tag)))<color:FF0000>some red text"
As shown above, using the tag tag with no parameters switches the characters back to < and >.
History
| Version | Status | Notes |
| 10.2 | Updated | Added strikeouts, super and subscripts, drop shadows, and vertical baseline adjustment. |
| 10.0 | New | New in this version. |