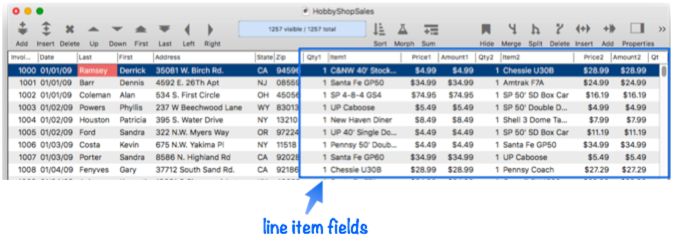
Line items are used for repeating items within a record. Line item fields always end with a numeric suffix, for example Qty1, Qty2, Qty3, etc. Here is an example of a database with line item fields for Quantity, Item, Price and Amount from 1 to 12:
Displaying & Editing Line Item Data on a Form
Line item fields are awkward to work with in the data sheet. In fact, you may just want to hide them in the data sheet so that they don’t get in the way (see Hiding Line Item Fields in the Data Sheet below). Instead, you’ll usually want to create a form that arranges the line items in a grid layout, like this:
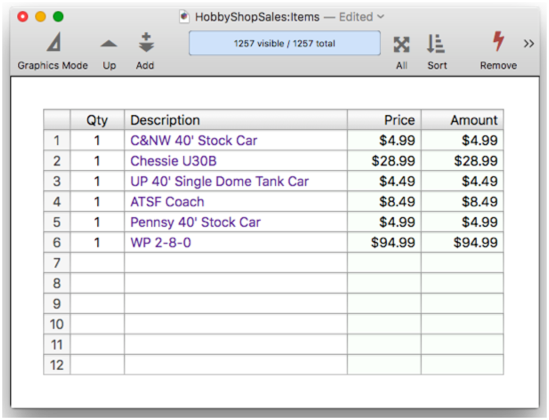
There are 65 objects in this form, so it would be quite tedious to set each one up one by one by one. Fortunately, you don’t have to do that. Panorama includes a form constructor tool that can make a complete form like this in a minute or two. See Line Item Grid Constructor to learn how it works.
Creating Line Items in a New Database
The best way to create a new database with line items is to use the File>New>New Database with Template command (see Creating a New Database). Within the template, you can specify a series of line item fields by using the <lineitems> and <endlineitems> tags. These tags must be used as a matched pair. Between this pair of tags, each line specifies a line item field name. This name is used as a root to which an incrementing suffix is added, for example Item will become Item1, Item2, Item3 etc. The first item number is 1, but the last item number must be specified in the <lineitems>, for example 6 as shown in this example.
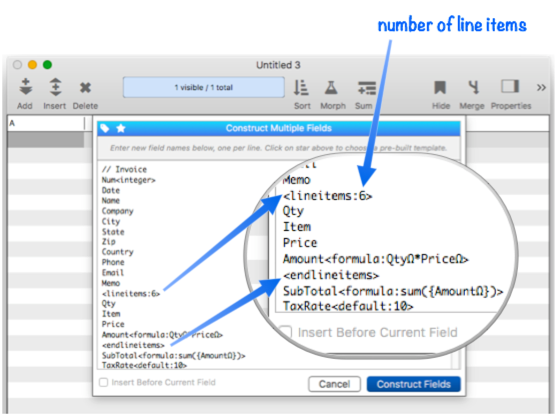
When the Construct Fields button is pressed, this template will generate 24 line item fields, six each of Qty, Item, Price and Amount.
In this example the Amount line item field will have an automatic calculation attached to it, see Automatic Line Item Field Calculations below. If you examine the properties of the generated fields you’ll see that the formula only explicitly appears in the properties for the Amount1 field, nevertheless, the formula will apply to all of the Amount fields in the database. This behavior is described in more detail below.
Once the line item fields are created you can build a form that displays and/or edits the field using the Line Item Grid Constructor.
Note: The data sheet is normally limited to 150 visible columns at a time. If you need to use more than 150 fields, see Limiting the Maximum Number of Data Sheet Columns. Another option is to hide the line item fields in the data sheet, as described below in Hiding Line Item Fields in the Data Sheet.
Adding Additional Line Items to an Existing Database
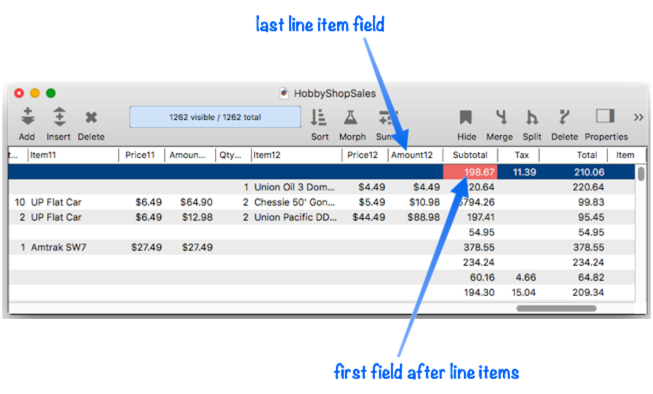
If you find you need to add more line items to an existing database, start by clicking on the first field after the existing line items.
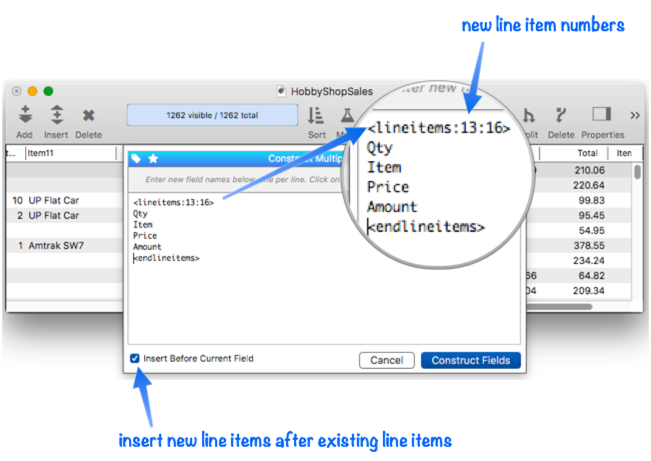
Next, choose Construct Multiple Fields from the Fields menu. This opens a dialog sheet where you can type in a template for creating the new fields. To add new line items, the template should start and end with a matched pair of <lineitems> and <endlineitems> tags, with the line item field names in between, one per line. The <lineitems> tag must also contain the starting and ending suffix numbers for the new line item fields. Since in this example the database already contains 12 line item fields, we’ll add four more line items: 13, 14, 15 and 16.
<lineitems:13:16>
Qty
Item
Price
Amount
<endlineitems>
Here’s what this template looks like in the dialog sheet. I’ve also checked the Insert before Current Field checkbox, so that the new fields are added right after the existing line items (this is why you needed to click on the first field after the existing line items before opening the dialog).
When the Construct Fields button is pressed, the new fields will be added to the database. They are ready to use immediately.
Hiding Line Item Fields in the Data Sheet
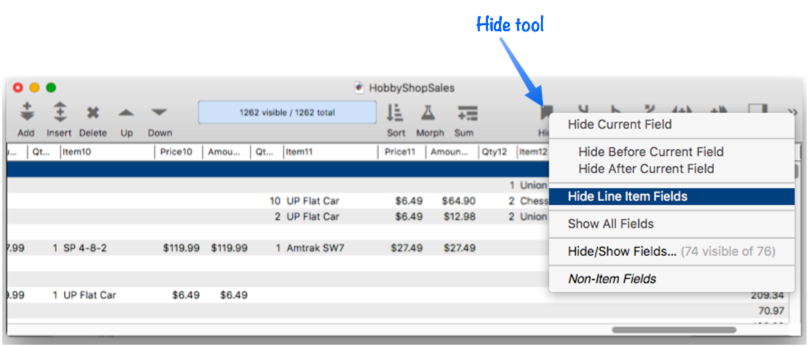
Line items work great in forms, but they tend to get in the way when viewing the data sheet. In addition to adding visual clutter, a lot of line items can actually slow down the operation of the data sheet. Fortunately, you can quickly hide all of the line item fields with a single click. Simply click on the Hide tool and choose Hide Line Item Fields from the pop-up menu (you can also choose this item from the Field menu in the menu bar).
When you want to see all of the fields again, simply choose the Show All Fields command. See Hiding and Showing Fields to learn more about temporarily hiding fields.
Using Line Items in a Formula
Line item fields can be used in formulas just like other fields, for example:
Qty3*Price3
When the current cell is a line item field, the Ω symbol (press Option-Z) can be used as an automatic numeric suffix. Panorama automatically adjusts the suffix depending on what cell is currently active. For example, consider this formula using the Ω symbol.
QtyΩ*PriceΩ
When this formula is calculated, Panorama will automatically substitute the correct line item number for each Ω symbol. For example, if you are editing, the Qty5 or Price5 fields, the formula would be translated like this:
QtyΩ*PriceΩ ☞ Qty5*Price5
If you are editing line item 12, the formula would be translated like this:
QtyΩ*PriceΩ ☞ Qty12*Price12
If a formula containing the Ω character is used when the current cell is not a line item (does not have a numeric suffix), an error will occur.
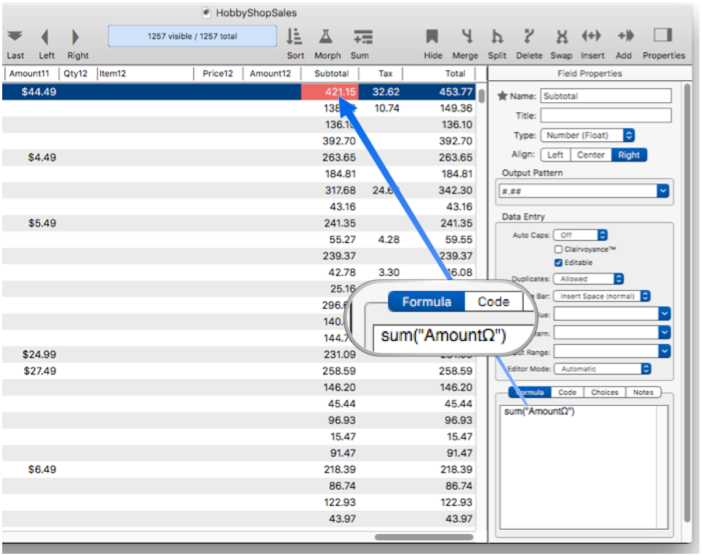
To add up a series of line items, you can use the sum( function. This formula will add up all of the Amount line item fields in a database, no matter how many there are.
Subtotal = sum("AmountΩ")
Automatic Line Item Field Calculations
Like any other field, you can set up a formula to calculate the value of a line item field (see Automatic Field Calculations. But line item fields are a bit different – you only have to set up the formula for the first set of line item fields: Qty1, Price1, etc. Panorama will automatically apply this formula to all other line item fields. This means you only have to enter the formula once, not once for every line item. It also means if the formula needs to be changed later, it only needs to be changed in one place.
For example, this order entry database includes a formula that multiplies the Qty times the Price.
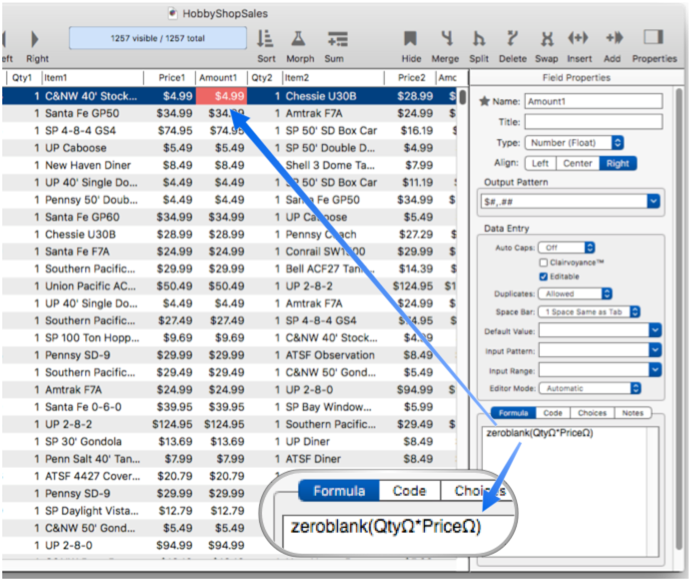
When a value is entered into the Qty1 or Price1 field, the formula is calculated and the result placed in the Amount1 field.
Now let’s look at the Amount2 field. There is no formula for this field!
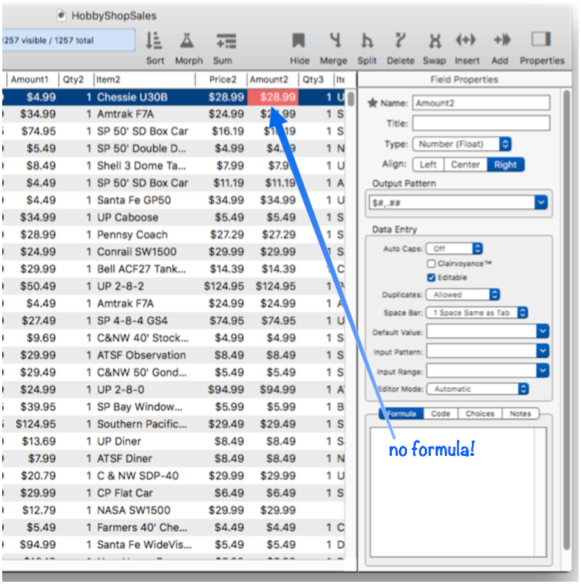
In spite of the fact that there is no formula, if a value is entered into the Qty2 or Price2 field, the multiplication is calculated and the result placed in the Amount2 field. In fact this works for any line item number – 2, 3, 4, 12, whatever. So just enter the formula once in the #1 field (and make sure to use the Ω suffix instead of hard coding field numbers).
Note: You can put different forumlas in different line numbers if you want, for example you could have a different formula for Amount2 that calculated differently than Amount1. If the formula exists, Panorama will use it. But this is almost never necessary. We recommend always leaving the Formula and Code panels empty for all but the first set of line item fields.
Automatic Line Item Sums
To calculate the sum of a series of line item fields, use the sum( function. This formula will add up Amount1, Amount2, … all the way up to Amount12. Notice that AmountΩ has to have quotes around it.
In this database, changing a Qty or Price will cause a cascade of calculations. First the line item Amount will be calculated, then the Subtotal, and finally the Total.
Database Relations Using Line Items Fields
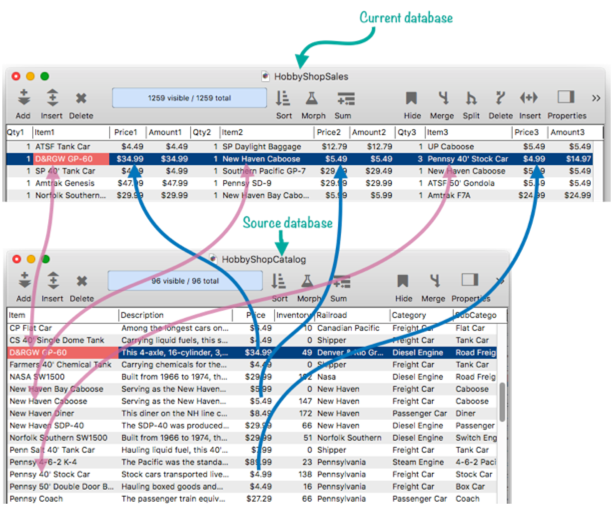
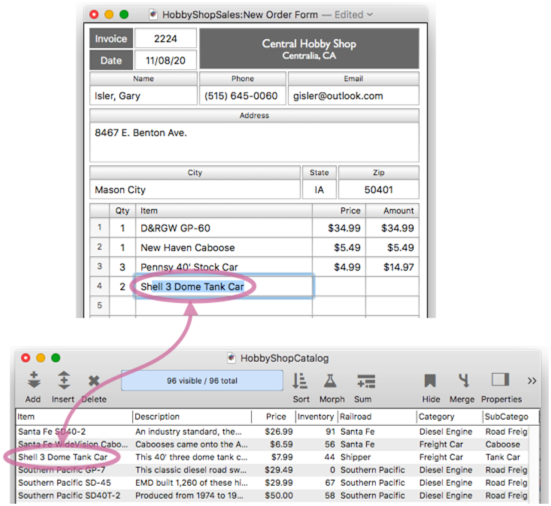
Like ordinary fields, line item fields can be used in a database relation. (See Relational Database Management if you need to refresh your memory on this topic.) In the current database, a line item field can be used as a key field or as a field that data is transferred into. (Line item fields cannot be used in a relational source database.) For regular fields, a relation is specified between an individual field in the current database and an individual field in the source database. In the case of line item fields, the relation is established between all line item fields in the current database with the same root and an individual field in the source database. For example, this illustration shows a relationship set up between the ItemΩ and PriceΩ fields in a sales database with the Item and Price fields in a catalog database. So Item1 is related to Item, but also Item2, Item3, etc.
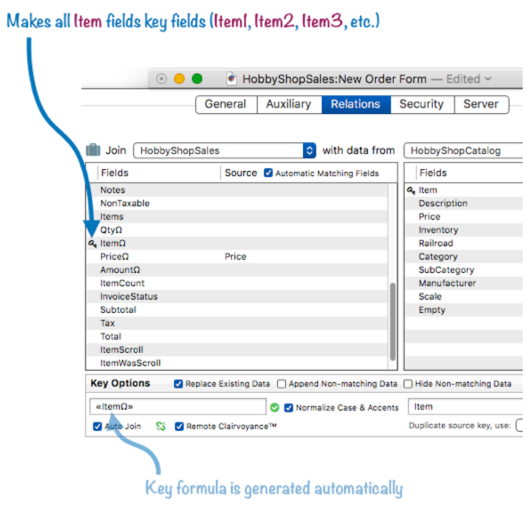
The Database Options>Relations panel doesn’t list individual line item fields. Instead, it lists the line item root names. When you make ItemΩ a key field, as shown below, you are actually make every Item field a key field: Item1, Item2, Item3, etc. Just a single click makes all of these into key fields.
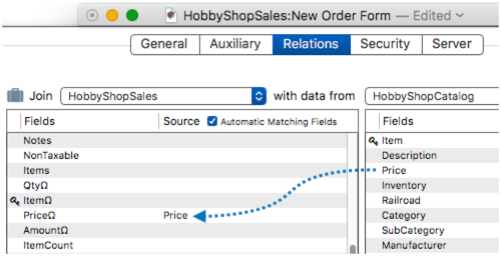
To configure data transfer from a source field to a line item field, simply drag the field over from the left.
This sales database has twelve sets of line item fields, but it only takes 3 clicks to link all of them to the catalog database. Two more clicks to enable Auto Join and Remote Clairvoyance™ and the relation is completely set up.
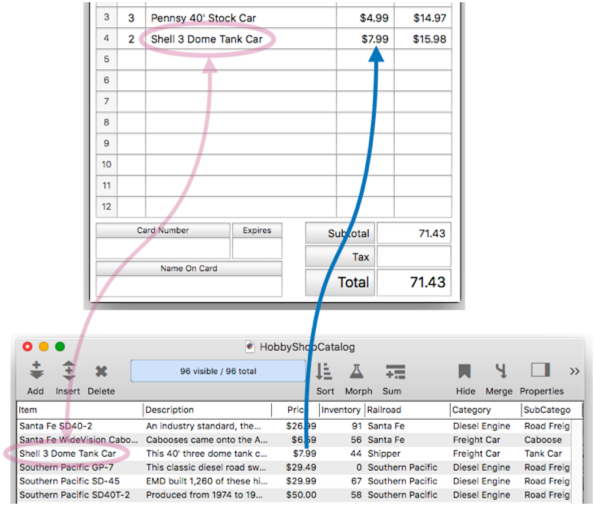
Let’s take a look at this relation in action. I’ll start typing into the Item4 field in the sales database. When I’ve typed in enough for a match, remote Clairvoyance™ kicks in and auto-completes the item for me.
When I press the Enter or Tab key, Panorama automatically transfers the price into the invoice, and updates the subtotals and totals.
Since the relation works for all line item fields, the data entry can be continued for Item5, Item6, Item7 etc.
One thing to keep in mind is that a relation that uses line item fields only works if the currently active field is a line item field. That’s how Panorama knows which suffix number to use in the relation (1, 2, 3, etc.). For Auto Join during data entry this is perfect – the field you are typing into is always the current field, so everything works. But if you are using a join statement, you must be careful to make sure that the current field is on a line item field before performing the join (if not, the join won’t work). If the current field is Item1, then the relation will deal with only line item fields ending in 1. If you want line item fields in 2 to join also, you’ll have to move the current field and run the join again – once for each set of line item fields.
Automatic Line Item Field Code
Using the Code property in the Field Properties Panel, you can set up a short program that will run when data is entered into the field (see Automatic Field Code. Like the formula panel, you can set up code for the first line item field and it will automatically be used for every corresponding line item field. So for example if you set up code for the Qty1 field, that code will also be triggered when data is entered in Qty2, Qty3, etc. Just make sure you always use the Ω suffix when referencing any line item fields, don’t ever hard code the line item number.
Getting Information about Line Item Fields
If you are writing a formula or procedure that needs to be aware of line item fields, there are two dbinfo( options that can help.
The
dbinfo("lineitemfields",database)option returns a list of all line item fields in the specified database, one field per line. This function returns a complete list of line item fields, including the suffixes.The
dbinfo("lineitemroots",database)option returns a list of the root names for line items in the specified database, one per line. This function does not include the numeric suffixes, only the root name, so this function will usually return far fewer lines than the"lineitemfields"option.
Finding an Empty Field
To locate the next empty line item field you can use either the emptylineitemnumber( function or the emptyfield statement. This example uses this function to fill the next empty line item in the current record with 1 Widget for $10.00.
let nextItemNumber = emptylineitemnumber("Qty")
set "Qty"+nextItemNumber,1
set "Item"+nextItemNumber,"Widget"
set "Price"+nextItemNumber,10.00
set "Amount"+nextItemNumber,10.00
To make the next empty field active, use the emptyfield statement.
See Also
- Automatic Field Calculations -- performing formulas automatically when data is entered into a field.
- Automatic Field Code -- running a short program when data is entered into a field.
- count( -- counts all non-empty instances of a line item field in the current record.
- emptylineitemnumber( -- returns the numeric suffix of the first matching line item field that is empty (if any).
- Line Item Grid Constructor -- creates a grid of form elements for displaying and editing line item fields.
- Relational Database Management -- linking together multiple databases based on common data.
- sum( -- adds up all instances of a line item field in the current record.
History
| Version | Status | Notes |
| 10.2 | Updated | Documentation now goes into much more detail on how automatic formulas and code work with line items, and links to the new line item form constructor tool. |
| 10.0 | Updated | Carried over from Panorama 6.0, but no longer requires omega symbol at end of field name when using the sum( function. |