The File>Import>Join Panorama Database with Current Database command is used to join two databases together (this can also be done in code with the join statement). This operation joins data from another database (called the Source Database) into the current database. The source database must be open before the join statement is used (see opendatabase and Auxiliary Databases). The data is joined by matching a key in the current database with a key in the source database. The keys can be fields, or can be a more complicated formula. These keys define the relationship between the two databases (this operation is sometimes called a relational join).
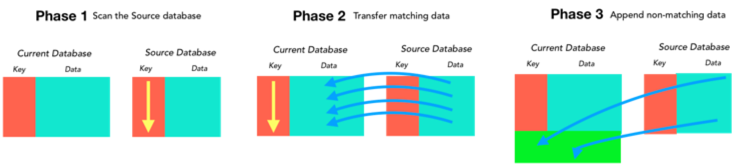
The join statement operates in two phases. In the first phase, it scans the source database and builds a list of all key values in that database. In the second phase, it scans the current database and checks for matches with the list of key values built in the first phase. When it finds a match, the data associated with that key in the source database is copied to the corresponding record in the current database. At the end, there is an optional third phase which appends the data associated with any leftover keys to the end of the current database. If you are familiar with SQL, this is similar to an Outer Join.
Prerequisites
Before joining can happen, two prerequisites must be satisfied. First, the source database must be open. You can open the database manually (either using the File menu or by double clicking on it) or you can use the Auxiliary Databases database options panel so that the database will open automatically.
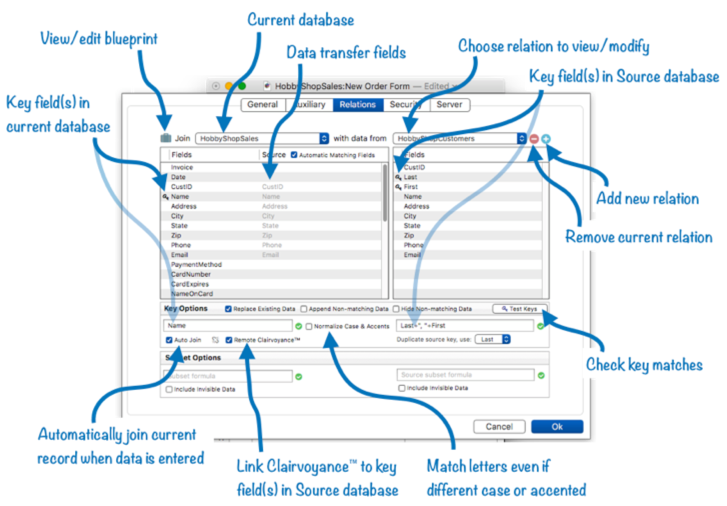
The second prerequisite is that you must set up a relational link between the databases you want to join. This is done with the Relations panel of the Database Options dialog. This panel allows you to specify how the fields in the two databases are related to each other.
If you haven’t already learned about this panel, please read Relational Database Management before continuing with this page.
The Join Database Dialog
When you want to join an open database into the current database, choose File>Import>Join Panorama Database with Current Database. This will open the Join Database dialog.
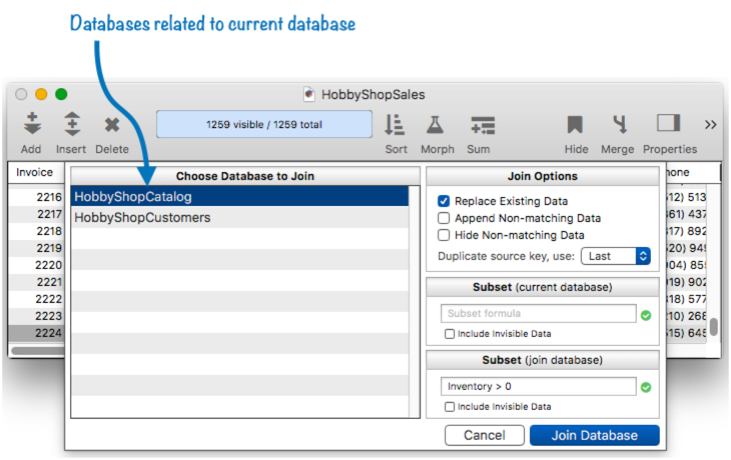
The left section of this dialog lists all of the open databases that are related to the current database. If you don’t see the database you want to join, you must open the File>Database Options>Relations dialog panel to set up the relation to that database, as described in Relational Database Management.
If you want to join the databases using the exact options set up with the Database Options>Relations dialog panel, simply press the Join Database button. Panorama will scan both databases and transfer data in matching records from the source database into the current database (optionally it can also append non-matching data as well).
Join Options
When you click on a related database, the default join options you have set up for that relation will appear in the right hand section of the dialog. This diagram shows how the options in the Join Dialog correspond to the options in the File>Database Options>Relations dialog panel*
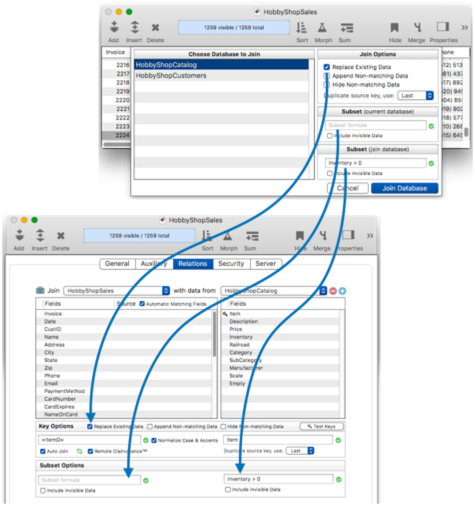
The dialog gives you the opportunity to customize these options before performing joining the databases. (The Join Dialog does not allow you to customize the key fields or data transfer fields. If you need to customize these, you must go back to the Database Options>Relations panel.
Appending Non-Matched Data From the Source Database
The join operation normally just looks for matching with the existing data in the current database. If there is extra data in the source database that doesn’t match anything in the current database, it is usually ignored. If instead you’d like to append this extra data to the current database, enable the Append Non-matching Data option.
To illustrate this, suppose the current database is Customer List, and has fields for first and last name, address, city, state, zip and phone number. You also have an Orders database that has the same fields. If you set up the options as shown below, the join will update the contact information in the customer list with information from the Orders database, and will also add any new customers that are in the Orders database but haven’t yet been added to the Customer List database.
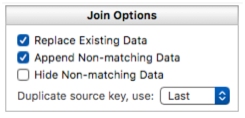
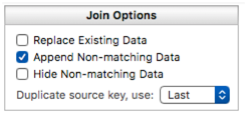
You might want to add new customers to the list but leave existing customers alone – perhaps the Customer List database already has the most up-to-date information. To do that, uncheck the Replace Existing Data option. This will leave all of the current data in the Customer List database alone, but adds any new customers that are in the Orders database but not already in the customer list.
Duplicate Keys in the Source Database
The first phase of the join operation is to scan the source database and build a list of keys, along with a pointer to the data associated with each key. But what if a key is duplicated? In other words, what if the same key is associated with more than one record in the source database? You can control the behavior of the join in this situation with the DuplicateSourceKey option. The options are to associate the key with the first matching record, the last matching record (this is the default), or to treat this situation as an error.
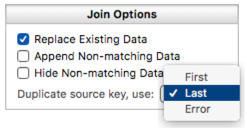
For example, consider our previous example of updating the current Customer List database with contact information from an “Orders” database (for this example we will suppose that both databases contain fields for first and last name, address, city, state, zip and phone number). Assuming that the Orders database is sorted chronologically, choosing Last will update each customer’s contact information in the customer list with information from that customers most recent order.
In some situations there is really no way to know which duplicate record is correct. In that case you should choose the Error option. When this option is chosen, Panorama will abort the join and leave the current database untouched.
Hide Non Matches in Current Database
The join operation normally doesn’t change what records are selected in the current database. Whatever records were selected before the join will still be selected after the join. However, if you enable the Hide Non-Matching Data option, the join operation will deselect any records in the current database that don’t match any records in the source database. This is similar to SQL’s “inner join” operation.
Suppose the current database contains support incidents, with fields for Customer ID and contact information (name, address, etc.). In addition, you also have a separate Customer List database that also has the same fields. Enabling the Hide Non-Matching Data option will join the names from the customer list database into the support incident database, while also making invisible any support incidents from customers not in the customer list. If you then wanted to permanently remove these non-matching records, you would use the Records>Delete Unselected Records menu command.
If no records match, the result will be that all records in the current database will be selected (since Panorama doesn’t allow a database to have zero selected records). In that case, no data will actually be joined with the current database.
Simulating SQL Inner Join, Left Join, and Outer Join
The join operation can be configured to work similarly to sql join operations.
- Inner Join – The result only includes records that match in both the current and source databases.

- Left Join – The result includes all records in the current database, plus all matching records in the source database. This is the default for the join statement.

- Full/Outer Join – The result includes all records in both the current database and the source database.

To do a right join, swap the current database and the source database and do a left join. In other words, make the source database the current database, and use the previously current database as the source database.
Including Invisible Records in the Join
The join operation normally ignores invisible records (records that aren’t selected) - they are skipped in both the current and source databases. If you want to include invisible records in the current database in the join, set the JoinInvisible option to Yes (please note that this could result in modifications to records that you can’t currently see.) If you want to include invisible records in the join, check the Include Invisible Data option for either the current database, the source database, or both.
Specifying a Subset
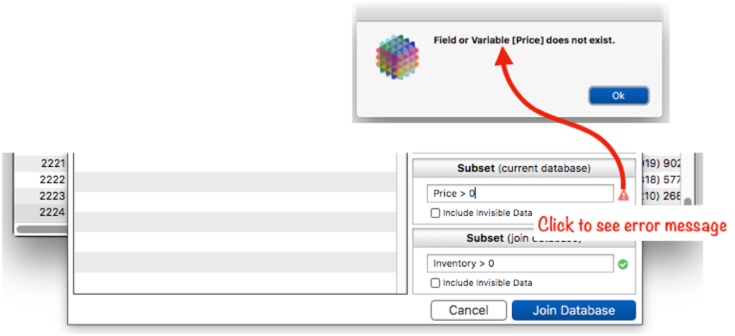
The join operation normally includes all visible records in the operation. To restrict the join to a subset of the data, fill in one or both of the Subset options. To specify a subset, you need to type in a formula that specifies what data to include. This illustration shows how to join only with items that are currentlly in stock (in other words, the Inventory field is greater than zero.
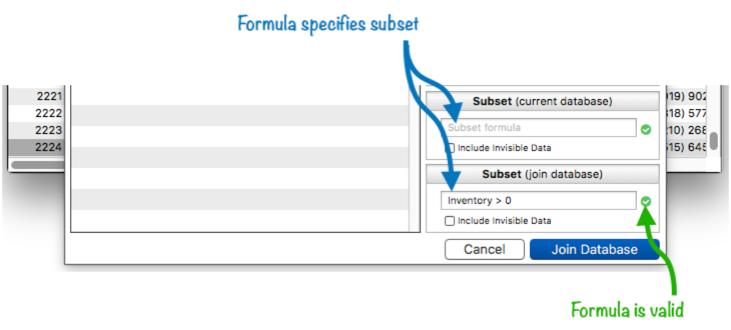
As you type each character into the formula, Panorama will check if the formula is valid. If the formula is not valid, the green check next to the formula will turn into a red alert triangle. Clicking on the triangle will display the error message.
This example updates the current database, assumed to be a customer list, with phone numbers from the Orders database. However, only orders that occured in the last 90 days will be included, any earlier orders will be ignored by the join statement.
join "database","Orders",
    "key",{First+" "+Last},
    "source subset",{Date>today()-90)}
This example updates only customers in California. In this case you could actually get the same effect by just using only the Subset option, or only the SourceSubset option. But using both at the same time is faster, because it reduces the intermediate data that the join statement needs to process.
join "database","Orders",
    "key",{First+" "+Last},
    "subset",{State="CA"},
    "source subset",{State="CA")}
Note: The subset options can be combined with the invisble options if you want to include invisible data in a subset.
Undo Join
Like any other Panorama operation, the Join operation is undo-able. Simply choose Undo>Join Database with Database Name to reverse the effect of the join.
Using Join with a Shared Database
If the current database is shared, you cannot use the join operation. Since joining usually modifies most if not all of the records in a database, it’s not compatible with multi-user operation. If you want to join the current database, follow the steps in Changing the Design of a Shared Database to create a new sharing generation. While the database is temporarily disconnected from the server you can perform the join operation. Once the join is complete, you can complete the sharing generation process to upload the joined data back to the server.
If you just want to use the join for analysis, and don’t need to permanently keep the changes made by the join, another approach is to make a single user database with the same fields. When you want to perform the join, import the shared database into the single user database (see Import Database), then perform the join on the single user database. Of course this can all be automated with a procedure.
Unlike the current database, no special techniques are needed to use a shared database as the source database for a join. You may, however, wish to synchronize the source database immediately before the join, to make sure that the local copy of the database has the most recent data possible.
Automating the Join Operation
Like most data operations, a join can be fully automated by using the join statement. See the documentation for that statement to learn how to code a join.
Alternatively, you can also write the code for a join by using the Procedure Recorder. Simply start the recorder and perform the join – the recorder will write the code for you.
See Also
- addrelatedrecord -- adds a new record to the related database corresponding to the current database.
- arrayfilter( -- processes each element of a text array or a data array with a formula (see Text Arrays and Data Arrays).
- csvtotsv( -- converts comma separated text into tab separated text.
- findrelated -- finds information that matches the current record in a related database.
- Import Database -- importing another database into the current database.
- import( -- returns a line or element of imported data. This function works in conjunction with repetitive operations like importtext, arrayfilter(, characterfilter( etc.
- importcell( -- returns one cell of imported data.
- importdatabase -- imports data from another database into the current database.
- importjson -- imports a JSON array into the current database.
- importjsonline -- imports a JSON record into the current record.
- importline -- imports a line of text into the current record.
- importrawdata -- imports raw binary data into an existing database.
- importtext -- imports text into an existing database.
- join -- joins data from another database into the current database.
- joindialog -- opens the standard Join Database dialog.
- joinonerecord -- joins matching data from another database into the current record.
- Linking with Another Database -- techniques for relating multiple database files so that they work together.
- newdatabasewithtextfieldnames -- creates a new database from a text file. The text file must contain the field names in the first line.
- newdatabasewithtextfile -- creates a new database from a plain text file. The fields will be named A, B, C, etc.
- partialdatabaseupdate -- updates one or more components of an existing database.
- posttorelated -- posts data in the current record to the corresponding record in a related database.
- related( -- searches for a record in a related database that matches the current record in the current database based on a relational specification (based on one or more key fields or formulas in each database), then uses a formula to return other information from the same record. This is similar to the lookup( function, but instead of using an individual field for the key, a relation is used (see Relational Database Management).
- relatedarray( -- builds an Text Array by scanning a database and creating an array element for every record that matches a relational specification (based on one or more key fields or formulas). This is similar to the arraybuild( function, but instead of using an individual field for the key, a relation is used (see Relational Database Management).
- relatedrecordid( -- returns the record id of a record in a related database that matches the current record in the current database based on a relational specification.
- Relational Database Management -- linking together multiple databases based on common data.
- Relational Workshop -- tool that assists in composing relational lookup(, superlookup(, lookupall( and arraybuild( functions.
- selectrecordsrelatedto -- selects records in the current database that are related to any record in another database.
- selectrelated -- selects information that matches the current record in a related database.
- seq( -- returns sequential numbers (1, 2, 3, etc.).
- Text Import -- importing text into an existing database.
- tsvtocsv( -- converts tab separated text into comma separated text.
- tsvtojson( -- converts tab separated text into JSON formatted text.
History
| Version | Status | Notes |
| 10.2 | New | New in this version. |