The Relational Workshop is a tool that assists in composing relational lookup(, superlookup( and arraybuild( functions. Of course you can write these by hand, but this workshop helps automate the process, and makes it easier to avoid mistakes. (Note: To learn more about the theory and technical details of relational links, see the Linking with Another Database page.)
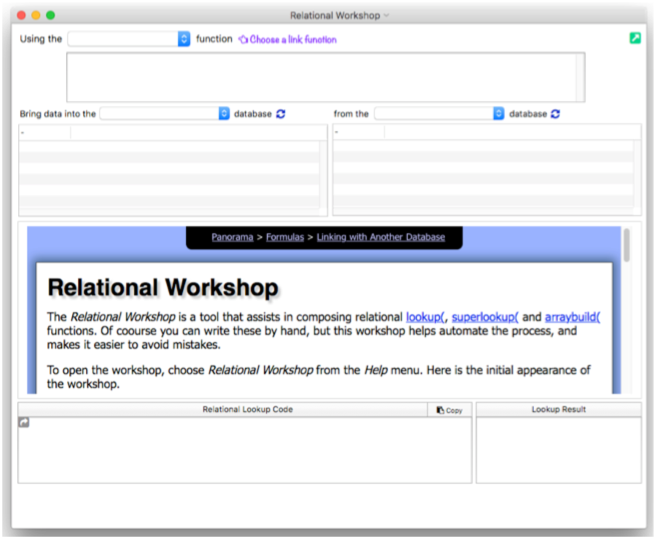
To open the workshop, choose Relational Workshop from the Help menu. Here is the initial appearance of the workshop.
Choosing the Relational Link Function
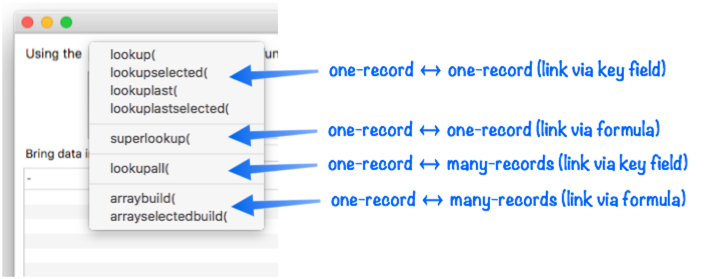
The first step is to use the pop-up menu to choose the relational link function you want to use. As shown below, this menu is divided into four sections, depending on the type of link you want to set up.
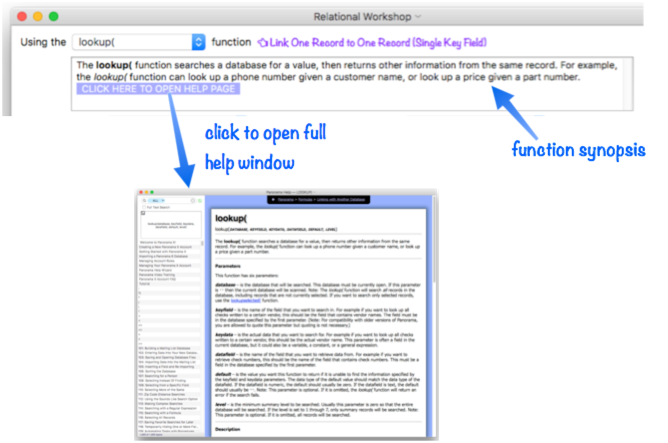
When you select a function, the workshop displays a short synopsis of the operation of that function. If you want more detailed help, click anywhere in the synopsis area to open the help page for that function.
Choosing the Recipient and Target Databases
The purpose of this workshop is to configure a link between two databases, so this is where you specify the two databases involved. A database must be open before you can use it in a link, usually you’ll open them before opening the workshop, but you can do it at any time.
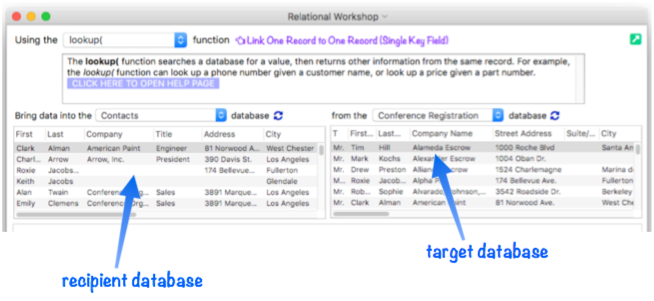
The database on the left is the recipient database. This is the database that you will be bringing information into. The database on the right is the target database, the information from which data will be searched for and extracted. Use the pop-up menus to select these two databases. Once selected, a mini-preview of each database will appear.
Relational Link Options
The middle section of the workshop contains options that are specific to the link function you have selected. As you fill in these options, the workshop will automatically construct the correct formula at the bottom of the workshop.
Link One Record to One Record (Single Key Field)
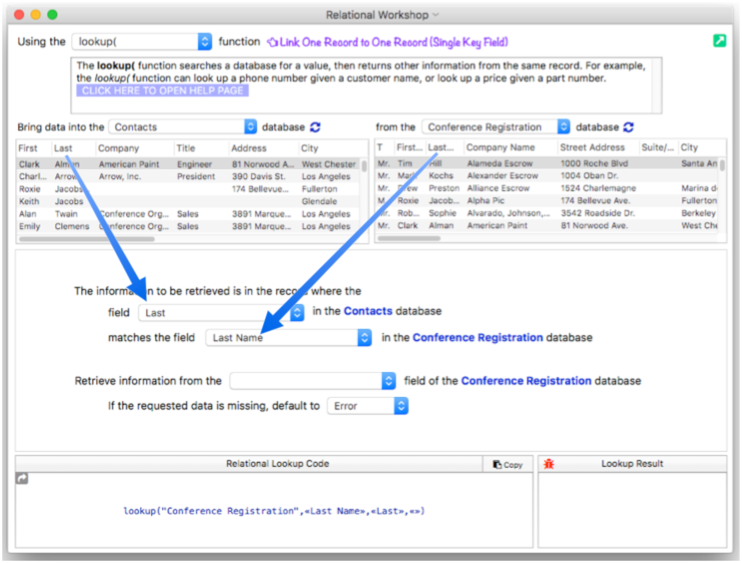
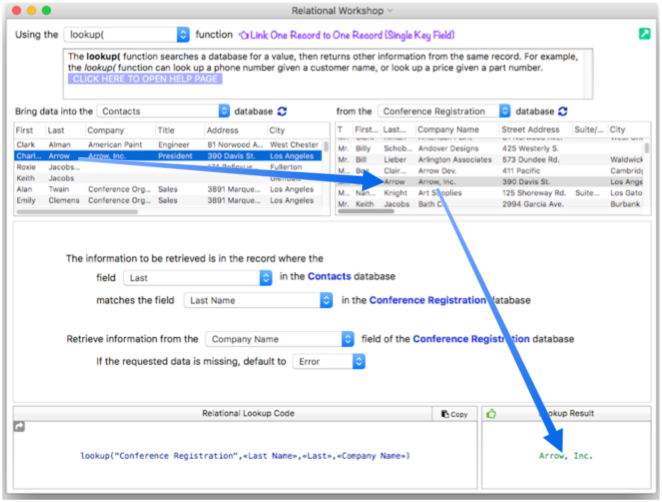
The most basic type of relation links a key field in the recipient record with a key field in the target database. Use the pop-up menus to select the key fields. In this case the Last field in the Contacts database is linked to the Last Name field in the Conference Registration database.
At the bottom right of the window there is a red “bug” in the Lookup Result section. This indicates that there is a problem with the lookup formula. You can click on the bug to see what the problem is.
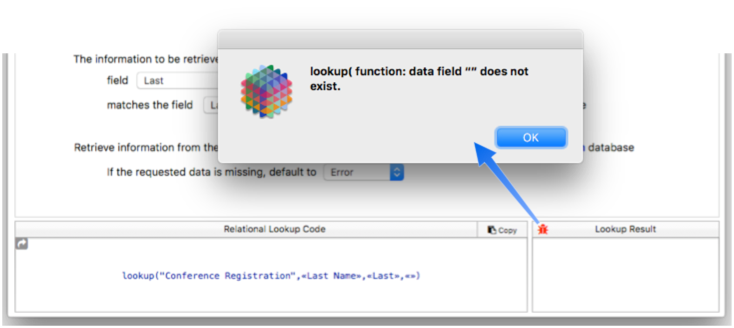
In this case the error is telling us what we already know – we haven’t finished setting up the link. The final step is to specify the field in the target database that the data should be retrieved from, in this case Company Name.
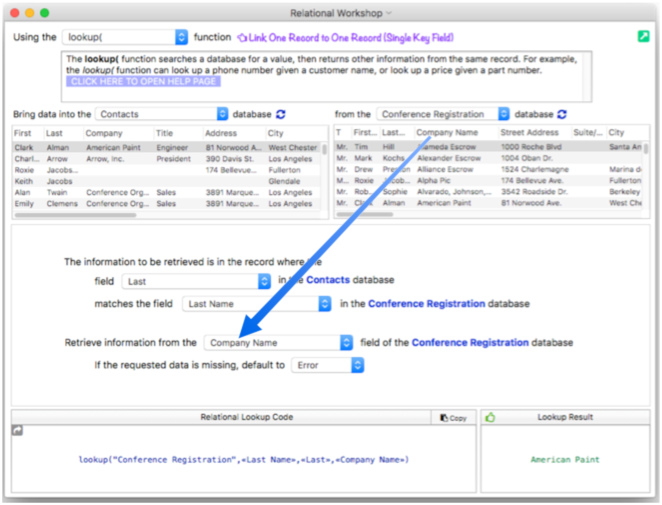
To confirm that you’ve set up the link correctly, the link result area shows a thumbs up symbol and the lookup result for the current record in the recipient database.
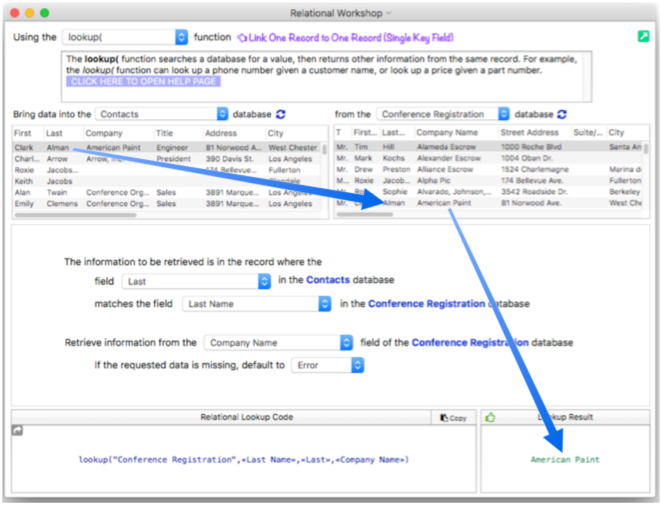
You can click on different records in the recipient database to see the results. (Please note that the workshop does not automatically scroll the preview of the target database to show the linked record — I had to manually scroll this list to bring the record for Charles Arrow into view.)
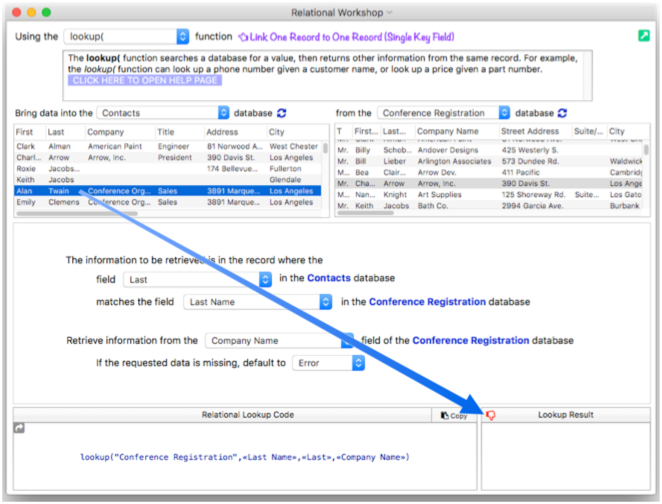
Of course some (or all) data in your recipient database may not contain a corresponding match in the target database. In this example, there is no one named Twain signed up for the conference. To indicate this, a red thumbs down icon appears in the Lookup Result area.
Normally the lookup( function will generate an error if there is no match. Use the pop-up menu to switch to a default value instead. With the default set to empty text, the thumb turns up and turns green, even though there is still no match.
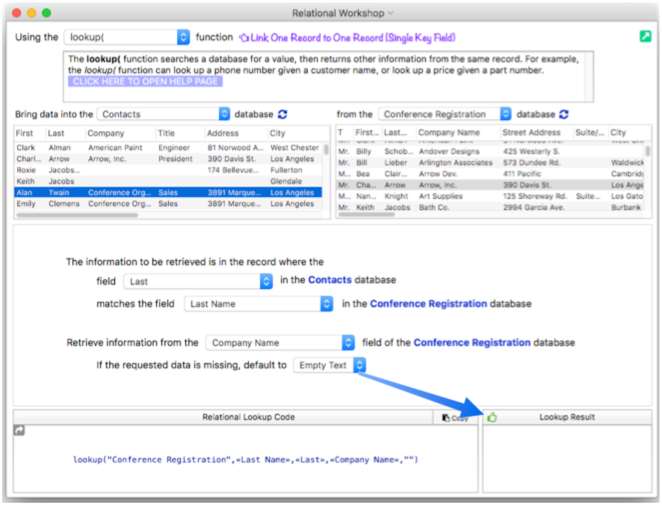
The pop-up menu only allows a default of empty text, but if you want a non-empty default you can edit the value later, after you’ve copied the formula to wherever you are going to use it (see below).
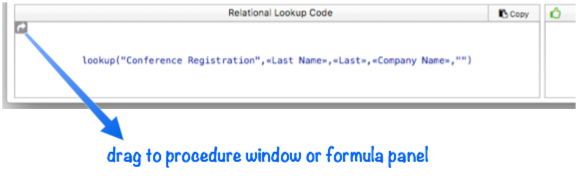
Using the Relational Lookup Formula
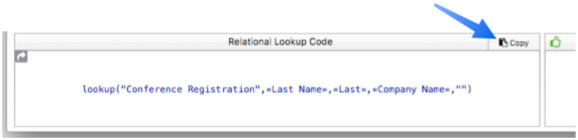
Once everything is complete, you’ll need to copy the finished code to the procedure or object where it will be used. There are several ways you can do this.
Press the Copy button, then paste into your actual code.
You can click on the text itself, drag over it to select the text, and press Command-C to copy it, then paste into your code.
Or you can click on the curved arrow in the left corner and drag the text to the window you want.
One way a lookup( formula can be used is to automatically bring in data as fields are entered, using Panorama’s Automatic Field Calculations feature. I’ve taken the formula constructed above and pasted it into the field calculation area for the Company field.
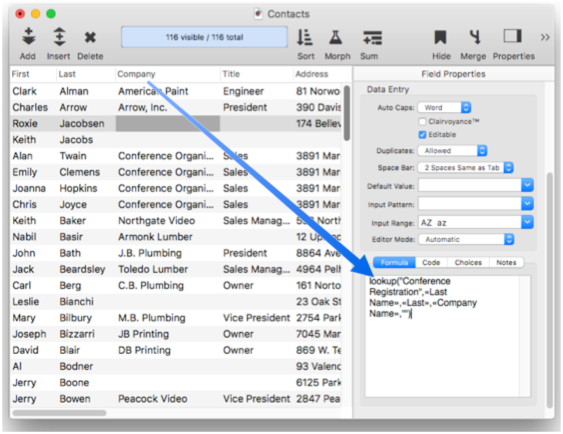
With this formula set up, the company name will be automatically entered when a person’s last name is entered into the Contacts database (assuming that the person is listed in the Conference Registration database, and the Conference Registration database is open).
Link One Record to One Record (Key Formula)
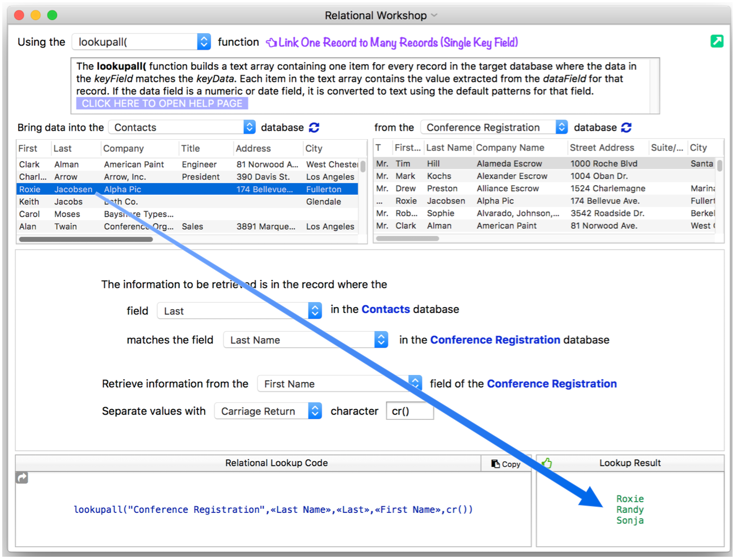
The lookup( function and its variations is limited to a single key field that links the recipient and target database, and to retrieving a single data field. In many applications this works fine, but there are also many situations where a more complex key is required, or more data needs to be retrieved. For example, in the last example the two databases were linked by the last name field, but what if there are multiple people with the same last name? In fact, if I switch to the lookupall( function I can see that there are three conference attendees with the last name of Jacobsen — Roxie, Randy and Sonja.
So for a more accurate link, really both the first and last names should be used as the key. This can be done by specifying a formula based key with the superlookup( function. When I switch to the superlookup( function, the workshop automatically sets up the Query Formula and Data Formula to match the lookup( formula that was set up already.
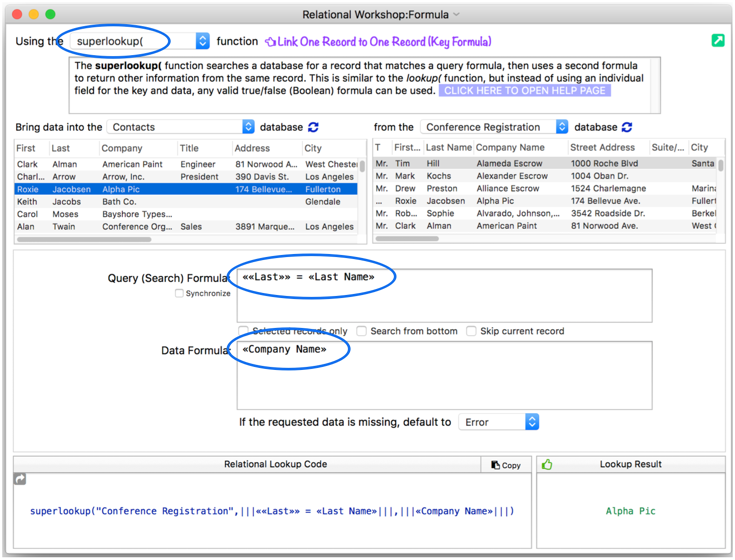
This Query Formula uses the last name as the key, just like the lookup( function did. To use both the first and last names, the formula needs to be changed to:
««Last»» = «Last Name» and ««First»» = «First Name»
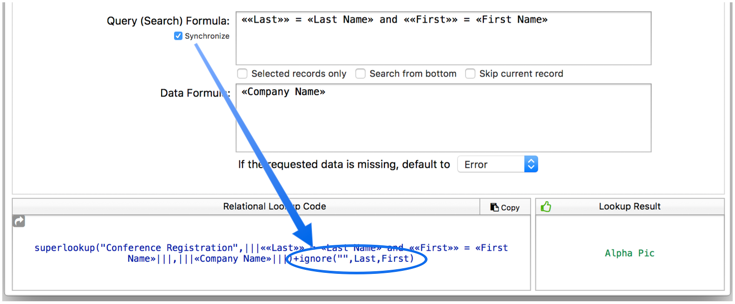
You could simply type in this formula, but the wizard can help you enter the field names accurately, and with the double chevrons needed for fields in the Recipient database (see the superlookup( function to learn about double chevron usage). To insert a field name, right click on the field name and choose which formula you want to insert it into, as shown in this movie. The and and = were typed with the keyboard, the old fashioned way. When the updated formula is complete, the Enter key was pressed to update the relational formula (you can also simply click anywhere outside of the formula editing area).
If the formula is going to be used in ordinary procedure code where it runs on command, you are ready to go – just copy the formula into place in your code. However, if this link will be used somewhere it needs to update when data changes, check the Synchronize option. For example, this option should be checked if the formula will be used in Automatic Field Calculations or in a Text Display Object. Checking this option adds special code (the ignore( function) that forces the formula to update when either of the key fields changes (for example if you edit one of these fields or move to a different record).
I’ll take this revised formula, copy it, then paste it into Formula area of the Company field properties.
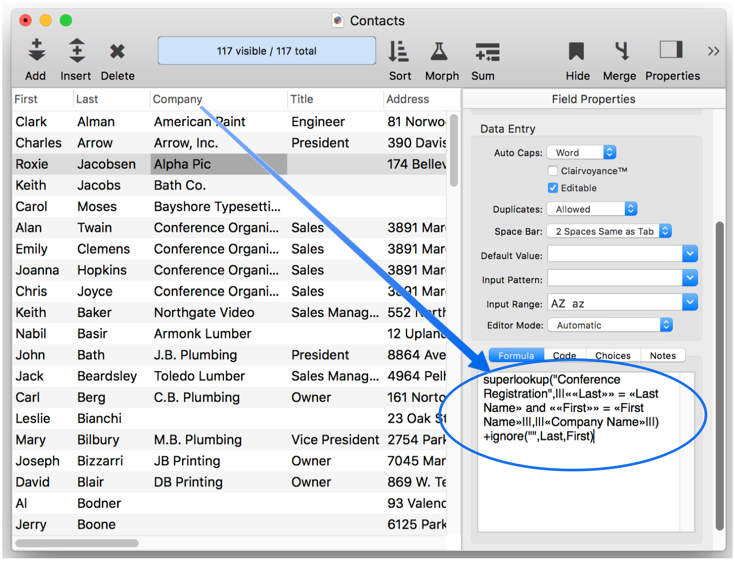
Now the company name is looked up based on both the first and last names, not just the last name.
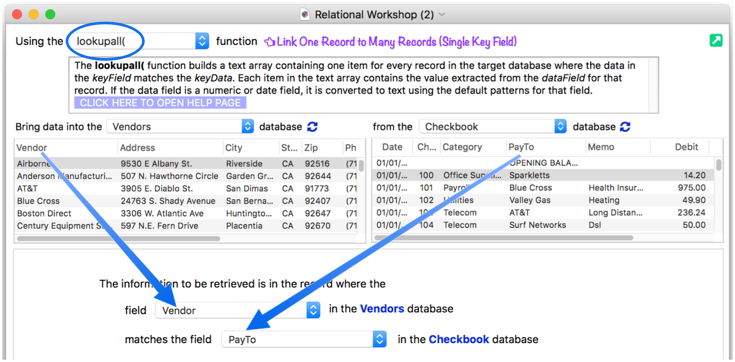
Link One Record to Many Records (Single Key Field)
For simple applications that require linking a single record to many records, use the lookupall( function. I’ll illustrate this with typical Vendors and Checkbook databases. These two databases are linked by the Vendor field and the Pay To field.
The lookupall( function can display the amounts of all of the checks written to the selected vendor, in this case Airborne.
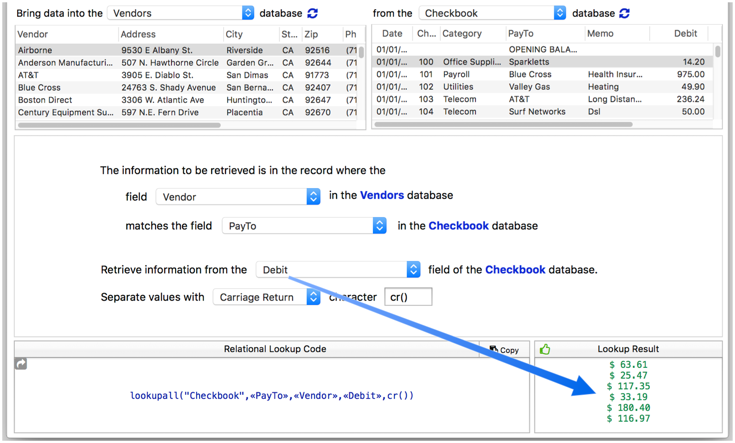
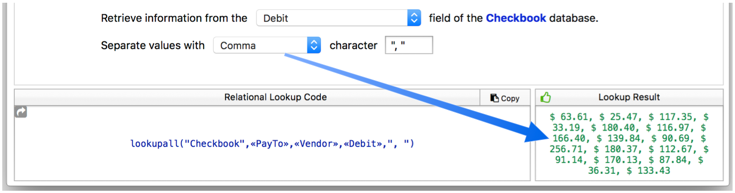
Normally each value is separated by a carriage return, but you can use the pop-up menu to select a different separator. (You can also edit the separator value on the right to customize it, in this case I have added a space after the comma.)
You can change the value that is displayed, but the lookupall( function only allows one field to be retrieved at a time. (See the next section to learn how to retrieve multiple fields at a time.) Here I’ve switched to display check dates.
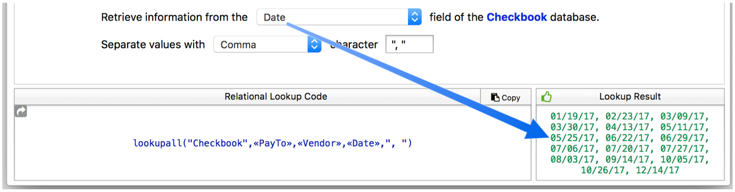
And here are check numbers.

Link One Record to Many Records (Key Formula)
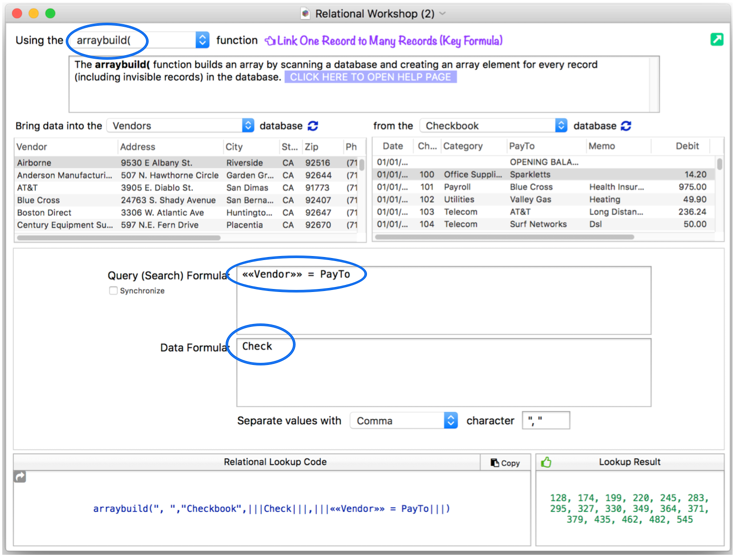
The lookupall( function is limited to a single key field that links the recipient and target database, and to retrieving a single data field. In many applications this works fine, but there are also many situations where a more complex key is required, or more data needs to be retrieved. For example, in the last example it would be quite nice to display the date, check number, and amount all at one time. This can be done with the arraybuild( function, which allows a formula to be used both for specifying the key relationship between the databases, and for retrieving the data from the target database. When I switch to the arraybuild( function, the workshop automatically sets up the Query Formula and Data Formula to match the lookupall( formula that was set up already.
I can modify the Data Formula as needed to include additional information, either by typing, or by right clicking on field names in the target database to add more fields.
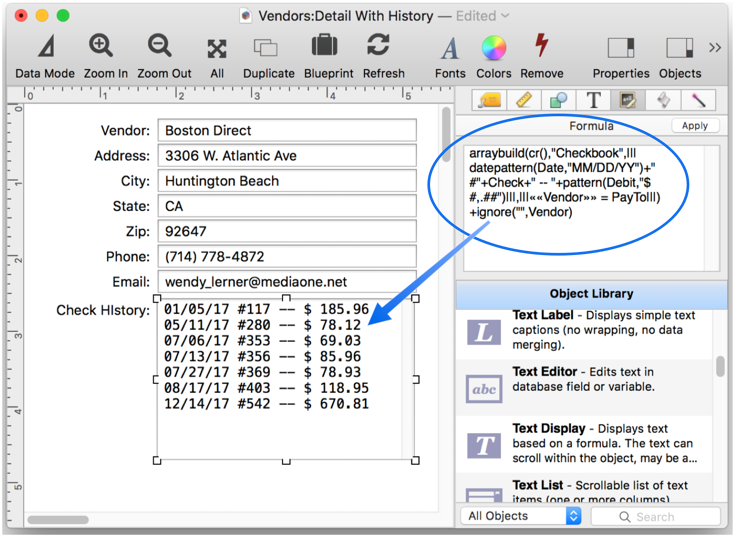
Here is the finished Data Formula:
datepattern(Date,"MM/DD/YY")+" #"+Check+" -- "+pattern(Debit,"$ #,.##")
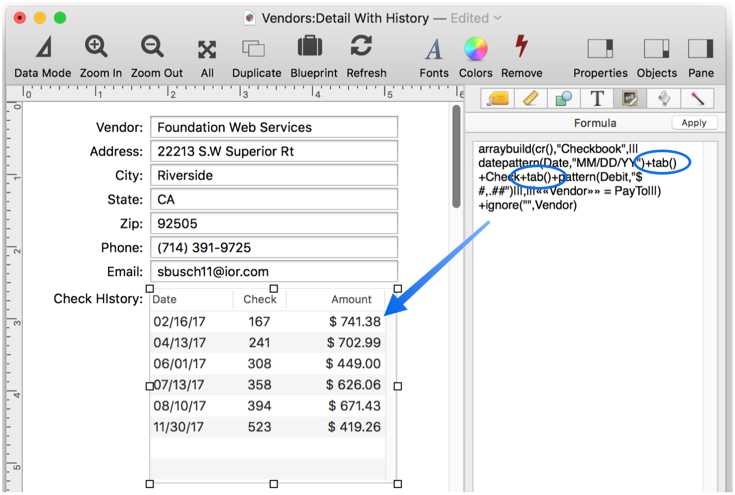
The complete arraybuild( formula can be transferred to a Text Display Object and used to display the check history of the current vendor on a form.
If you checked the Synchronize option in the Relational Workshop, the check history display will automatically update as you navigate from record to record.
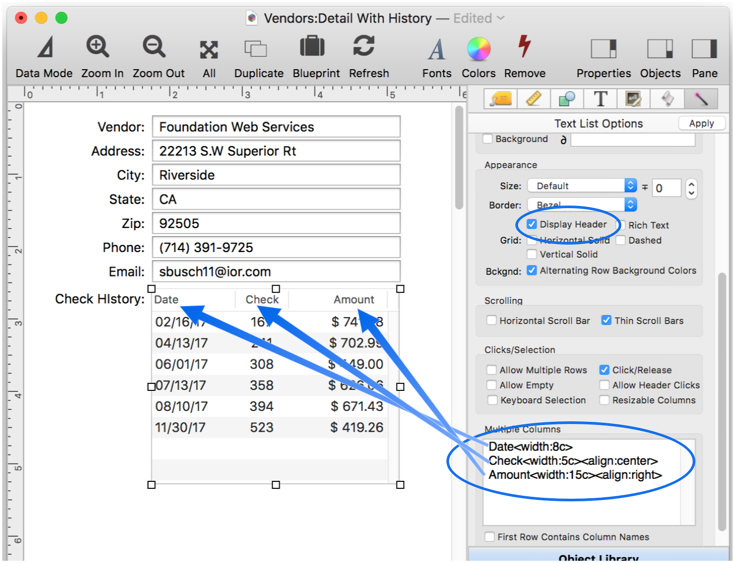
With a little bit more work you can use almost exactly the same formula in a Text List Object for a nicer look. The only difference in the formula is that the tab( function is used in between each data item to separate the columns.
See Text List Multiple Columns to learn how to set up multiple columns in a Text List Object.
See Also
- addrelatedrecord -- adds a new record to the related database corresponding to the current database.
- fieldvalue( -- grabs the contents of a field in the current record of a database. You can grab data from the current database, or from another database.
- findrelated -- finds information that matches the current record in a related database.
- formulavalue( -- calculates the result of a formula based on data in the current record of any open database. This is similar to the fieldvalue( function, but allows any formula to be used, rather than just a single field.
- globaldictionarybuild -- builds a global dictionary by scanning a database.
- join -- joins data from another database into the current database.
- Join Databases -- joining another database into the current database (relational join).
- joinonerecord -- joins matching data from another database into the current record.
- lastlookupdatabase( -- returns the name of the database referenced in the most recent lookup.
- Linking with Another Database -- techniques for relating multiple database files so that they work together.
- lookup( -- searches a database for a value, then returns other information from the same record. For example, the *lookup(* function can look up a phone number given a customer name, or look up a price given a part number.
- lookupall( -- builds a text array containing one item for every record in the target database where the data in the keyField matches the keyData. Each item in the text array contains the value extracted from the dataField for that record. If the data field is a numeric or date field, it is converted to text using the default patterns for that field.
- lookupalldouble( -- is similar to the lookupall( function, but it returns two fields from the target database instead of just one.
- lookupalloctet( -- is similar to the lookupall( function, but it returns eight fields from the target database instead of just one.
- lookupallquadruple( -- is similar to the lookupall( function, but it returns four fields from the target database instead of just one.
- lookupallquintuplet( -- is similar to the lookupall( function, but it returns five fields from the target database instead of just one.
- lookupallseptuplet( -- is similar to the lookupall( function, but it returns seven fields from the target database instead of just one.
- lookupallsextet( -- is similar to the lookupall( function, but it returns six fields from the target database instead of just one.
- lookupalltriple( -- is similar to the lookupall( function, but it returns three fields from the target database instead of just one.
- lookuplast( -- searches the selected records in a database for a value, then returns other information from the same record. For example, the *lookuplast(* function can look up a phone number given a customer name, or look up a price given a part number. Unlike the lookup( function which searches from the top of the database, the *lookuplast(* function searches backwards from the bottom.
- lookuplastselected( -- searches the selected records in a database for a value, then returns other information from the same record. For example, the *lookuplastselected(* function can look up a phone number given a customer name, or look up a price given a part number. Unlike the lookupselected( function which searches from the top of the database, the *lookuplastselected(* function searches backwards from the bottom.
- lookupmoredata( -- looks up an additional data field based on the previous lookup.
- lookupmoreformula( -- looks up additional data based on a previous lookup.
- lookupselected( -- searches the selected records in a database for a value, then returns other information from the same record. For example, the *lookupselected(* function can look up a phone number given a customer name, or look up a price given a part number.
- posttorelated -- posts data in the current record to the corresponding record in a related database.
- related( -- searches a database for a record in a related database that matches the current record in the current database based a relational specification (based on one or more key fields or formulas in each database), then uses a formula to return other information from the same record. This is similar to the lookup( function, but instead of using an individual field for the key, a relation is used (see Relational Database Management).
- relatedarray( -- builds an Text Array by scanning a database and creating an array element for every record that matches a relational specification (based on one or more key fields or formulas). This is similar to the arraybuild( function, but instead of using an individual field for the key, a relation is used (see Relational Database Management).
- relatedrecordid( -- returns the record id of a record in a related database that matches the current record in the current database based on a relational specification.
- Relational Database Management -- linking together multiple databases based on common data.
- selectrecordsrelatedto -- selects records in the current database that are related to any record in another database.
- selectrelated -- selects information that matches the current record in a related database.
- serverlookup( -- searches a shared database for a value, then returns other information from the same record. Similar to the lookup( function, but the search is performed on the server instead in the local computer's memory.
- superlookup( -- searches a database for a record that matches a query formula, then uses a second formula to return other information from the same record. This is similar to the lookup( function, but instead of using an individual field for the key and data, any valid true/false (Boolean) formula can be used.
- table( -- searches a database for a value, then returns other information from the same record. Unlike the lookup( function, the *table(* function does not require an exact match. If it does not find an exact match the *table(* function will use the closest match. For example, the *table(* function can look up a tax rate given an income amount, or look up a shipping price given a zip code and weight.
History
| Version | Status | Notes |
| 10.1.1 | New | New in this version. |