A Text List Object may display hundreds or even thousands of items of data. To make the list more manageable, Panorama makes it super easy to add a search feature to any list, like this:
The search feature is very easy to set up – there is not even any programming required. This page explains how the search feature works, and shows how to set it up manually. But there is an even easier way – the Text List Constructor can do it all for you simply by adding the keyword <search> to a template. See Text List Constructor for the details (though there aren’t many), but continue reading here if you are interested in the technical details.
Important: This page explains how to set up searching for a Text List object that is linked to an array. If your Text List is linked to a database, please see the Text List Database Integration page to learn how searching is set up in that scenario.
Adding Search to a Text List Object
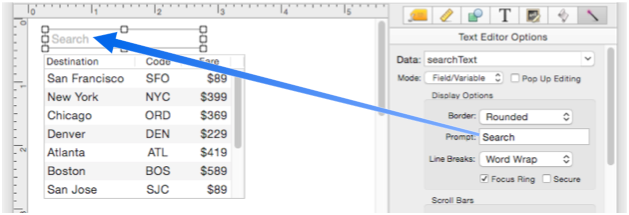
The first step in adding search is to create a Text Editor Object that will be used to type in the searches. Three changes must be made to this new Text Editor object to get it ready for searching, as shown in this illustration:

First, you must specify the variable that will be associated with this Text Editor. This variable can have any name you want. For this example, it will be called searchText. (Of course you should not pick a field name).
Second, the border is changed to Rounded. This isn’t strictly necessary, but usually rounded corners are associated with searching in recent versions of macOS.
Finally, the Update Variable Every Key option must be checked.
That’s it. There is no need to set up any procedure code – there is no programming involved in the search.
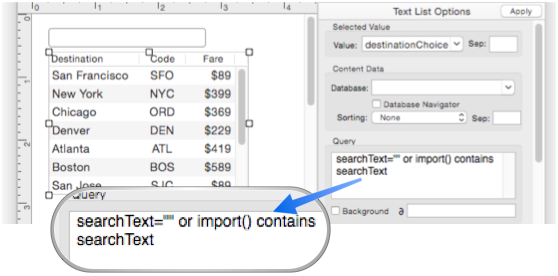
There is one adjustment that must be made to the Text List Object – a simple formula must be typed into the Query option.
searchText="" or import() contains searchText
You’ll notice that this formula uses the searchText variable linked to the Text Editor Object. The variable name must match between these two objects. This formula will be explained in more detail in a moment.
The Text List Object is now ready for searching – just switch the form to Data Mode to try it out.

How Text List Searching Works
Here’s how it works. Each time you press a key in the search editor, the Text List object scans the array from top to bottom. For each array item, it sets the import( function to the value of the item and calculates the query formula to see if it is true or false. If it is false, that item becomes invisible, if true, the item remains visible.

So let’s go back and take a closer look at our search formula. The first part of the formula simply insures that if nothing is typed into searchText, all of the items in the list will be visible, because if searchText is empty, the formula is always true.

The second part of the formula does the actual searching. If the item contains searchText anywhere within it, it will be visible, otherwise, it will be invisible.

This basic formula:
var="" or import() contains var
is usually all you’ll need for Text List searching – just make sure you plug in the name of the actual variable you are using for the Text Editor object.
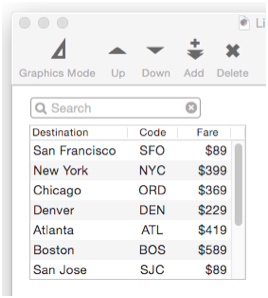
Complex Searches
Usually a simple contains search (as shown above) is sufficient, but you can set up more complex searches with multiple terms. In this example, I’ve added a Slider Object and Text Editor Object to control a fileglobal variable named maxFare. The slider has been configured to allow maxFare to be adjusted from between 0 to 1000. The search formula has been adjusted so that only fares below the maximum will be displayed. You can still search for the destination as well.
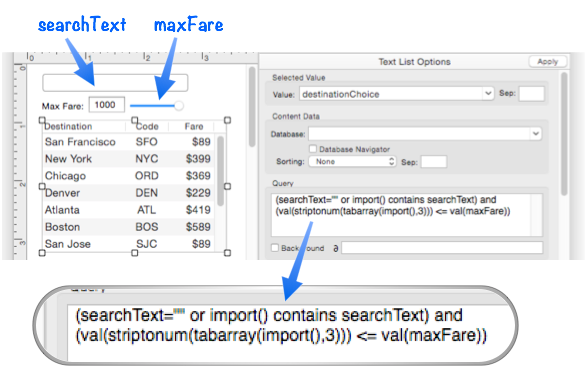
Even with this more complex search, there is still no programming involved, just the Query formula. By adjusting the slider, the list will show only fares under the specified amount.
The regular search still works, so I can find all fares under $300 that contain r, or just all destinations containing r at any price.
Updating the Search
A few paragraphs ago it was stated that the Text List would scan the array whenever you typed a character in the Text Editor, but that was really an over simplification of what actually happens. The way it really works is that the array will be scanned whenever ANY field or variable referenced in the query formula changes. When you type in a character, the Text Editor changes the value of the searchText variable, so the scan is triggered. (That is why you had to check the Text Editor object’s Update Variable Every Key option.) In the previous example, dragging the slider also updates a variable that causes the Text List to scan the array. You can keep adding to the query formula to make as complicated of a selection as you want.
Customizing the Search Editor Appearance
The search editors in the previous examples were rather plain. This section will explain how to add prompts and buttons. Keep in mind, however, that if you create the Text List with the Text List Constructor dialog, all of these niceties are automatically created for you.
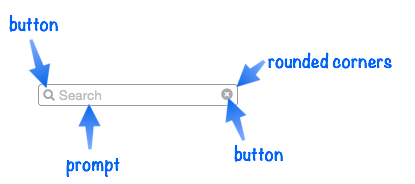
To set up the prompt, simply type whatever you want into the Prompt option of the Text Editor object. This prompt will appear when the search editor is empty, it will disappear as soon as the first key is pressed.
You may have noticed that this Text Editor object is kind of unusual – somehow it has an extra margin on the left and right to leave space for the icons.

How did that happen? There is no property for left and right margins in the property inspector panel on the right. The answer is in the blueprint (see Form Object Blueprint) – where there are 4 margin values that can only be set from the blueprint, not from the normal property inspector.
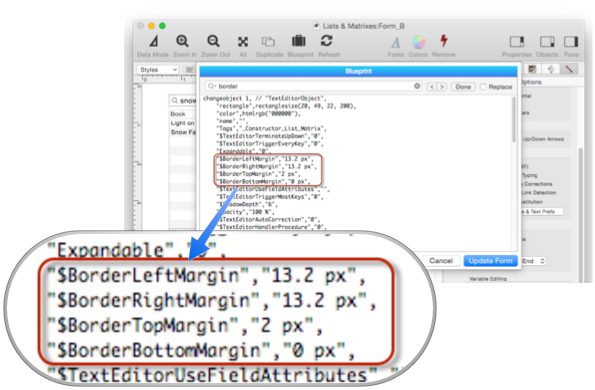
Using the blueprint, the left and right margins can be increased to leave space for the buttons.
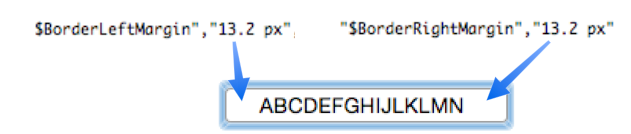
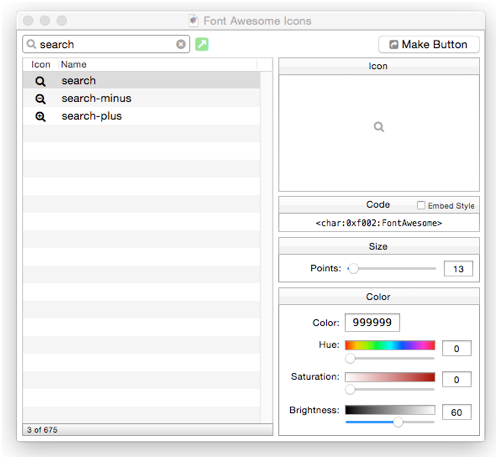
Use the Font Awesome Icons wizard (in the Help menu) to create the cancel button. The standard size for this button is 13 points, in lite gray (999999).

After using the wizard to create the button, drag it into position and add the code. The code simply clears the value of the search variable and forces the variable to be displayed.

When the button is pressed, the Text List will notice that it has changed and refresh the list display.
The final step (optional) is to add the magnifying glass search button.
Here is the finished result:
Remember that if you create the Text List with the Text List Constructor dialog, a fancy search widget like this will be automatically created for you simply by adding the <search> tag to the template.
Background Searching
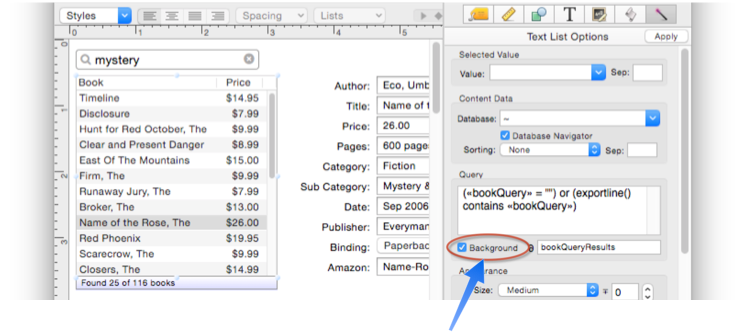
The examples shown so far have been quite small, at most dozens of rows to search. With this small number of rows, searches will be pretty much instantaneous. But if a Text List is linked to a database that contains tens or hundreds of thousands of records (see Text List Database Integration, a complete search could take a few seconds. In that case, you will probably want to check the Background option. With this option checked, searches occur in the background, and don’t prevent you from additional typing, clicking on buttons, etc. All you have to do is click this checkbox. (By the way, background searching works on both database searches and fixed array searches, though of course most arrays won’t be big enough for this option to matter.)
Displaying Search Progress
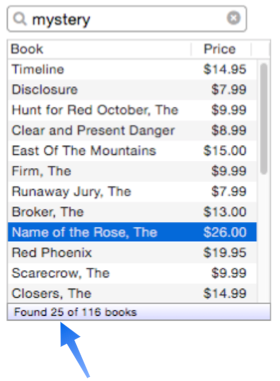
If a search may turn up a large number of matches, it can be nice to display the actual count, like this:
This count is displayed with a Text Display Object via variables generated and updated by the Text List Object. The Text List Object will generate these variables when you fill in the ∂ option.
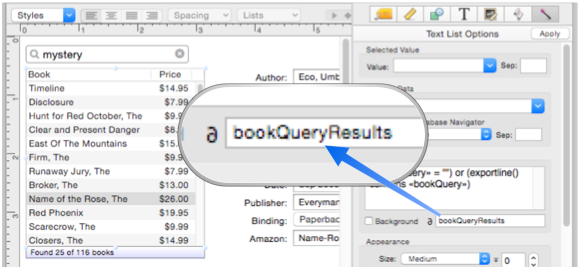
If you put anything in the progress (∂) option, the Text List object will automatically create and update three fileglobal variables using the progress option as the root for the variable names.

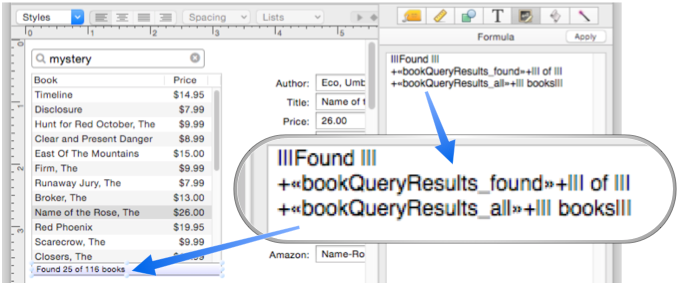
The bookQueryResults_found variable will contain the number of items that have matched the query result so far – in other words, the number of items currently displayed in the Text List. If the Background option is enabled, this value will be periodically updated as the background search makes progress.

The bookQueryResults_all variable will contain the maximum possible number of items. If the Text List is searching a database, this value is the same as the value returned by the info(“records”) function, and you could use that instead if you wanted. Where this is really handy is when the Text List is searching a fixed array generated by a formula – this saves you from having to do a separate generation of the array just to count how many elements it has.

The bookQueryResults_complete variable is only useful if you’ve enabled the Background option. This variable will be either true or false depending on whether the background search is complete yet. For example, you could use this variable to display the progress numbers in gray while the search is in progress, then in black or perhaps green when complete (use rich text to do this). Note: If the Background option is not enabled, this variable will always be true.

A Text Display Object can be used to display the progress variables generated by the Text List object, bookQueryResults_found and bookQueryResults_all.
Another way that the search progress can be displayed is by using a Progress Indicator Object, like this:
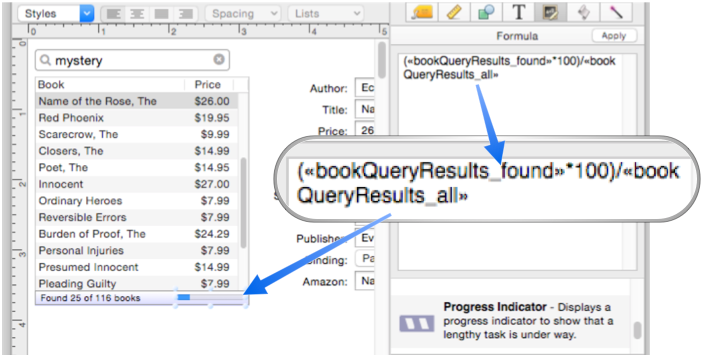
Here is the finished search progress display in action. As each key is pressed, the progress indicator shows how many matches were found.
In this example, the progress display was placed at the bottom of the list, but it is an independent object and can be placed wherever you want. (If you use the Text List Constructor dialog to create the list, a progress display like this will be automatically created for you simply by adding the <search> tag to the template.)
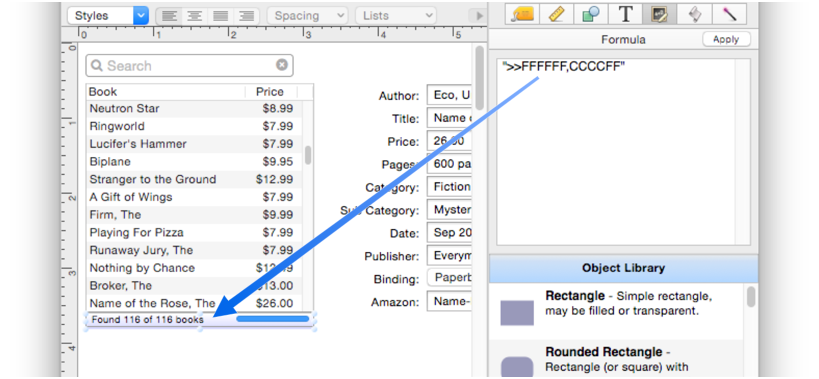
By the way, the blue/white gradient behind the progress display in this example is being automatically generated with an Image Display Object with a gradient generated by a formula. See Image Display Colors and Gradients to learn how this is done and how to customize the effect.
See Also
- Displaying Data in a Grid -- fundamentals of displaying data in a grid (Text List/Matrix).
- Matrix Clicking -- handling clicks in a Matrix Object.
- Matrix Constructor -- quickly creating a Matrix Object from a template.
- Matrix Database Integration -- synchronizing a Matrix Object with a database.
- Matrix Geometry -- customizing the size and geometry of Matrix Object elements.
- Matrix Header and Horizontal Scrolling -- setting up a custom header for a Matrix Object grid.
- Matrix Object -- displaying a grid of items with a custom arrangement.
- Matrix Object Frame -- setting up the arrangement of items within a Matrix Object.
- Matrix Programming -- programming a Matrix object.
- Text List Appearance -- customizing the appearance of a Text List Object.
- Text List Constructor -- quickly creating a Text List Object from a template.
- Text List Database Integration -- synchronizing a Text List Object with a database.
- Text List Multiple Columns -- displaying multiple columns in a Text List Object
- Text List Object -- displaying a grid of text.
- Text List Programming -- programming a Text List Object.
- Text List Selection -- selecting items in a Text List Object.
History
| Version | Status | Notes |
| 10.0 | New | New in this version. |