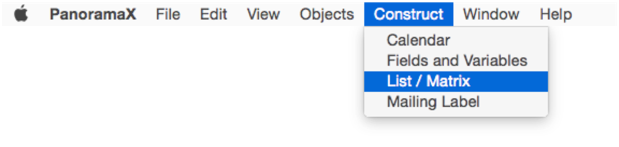
It’s pretty easy to set up a Text List Object manually, but why bother? The List/Matrix constructor can do most (or even all) of the work for you. Start with an empty form in Graphics Mode, and choose List/Matrix from the Construct menu.
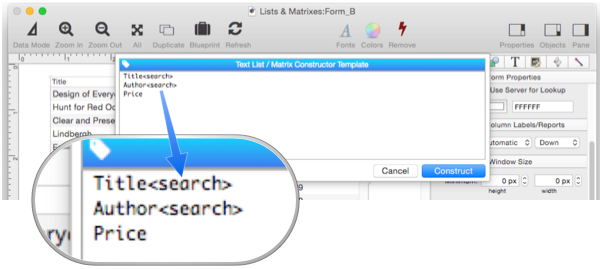
This opens the Text List / Matrix Constructor Template dialog. (If you would prefer to edit the template in a separate window, hold down the Option key when choosing from the Construct menu.) The template starts out as a list of all the field names in the current database.
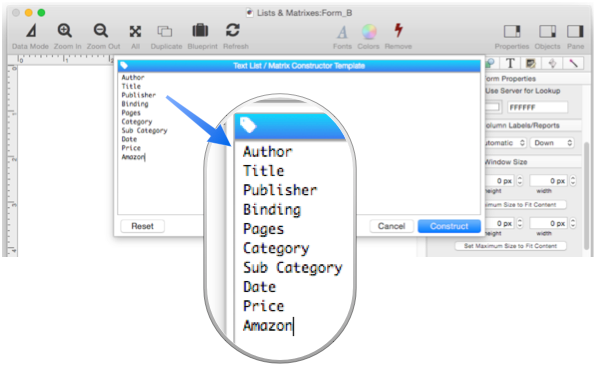
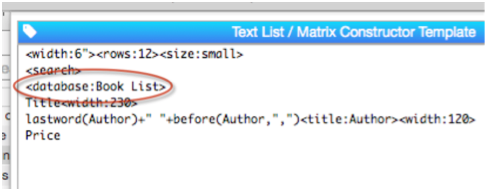
Edit the list to include just the fields you want to appear in the Text List Object. In this example, I want three fields: Title, Author and Price.
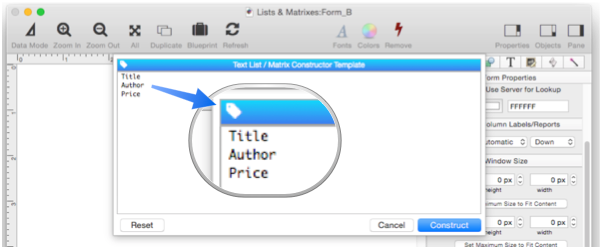
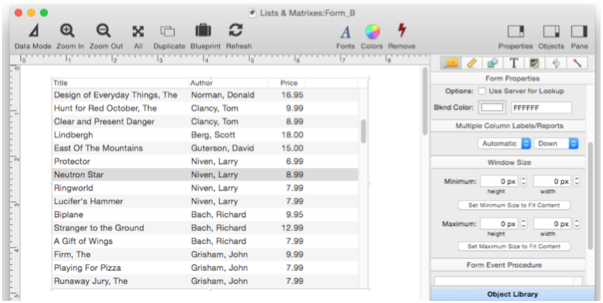
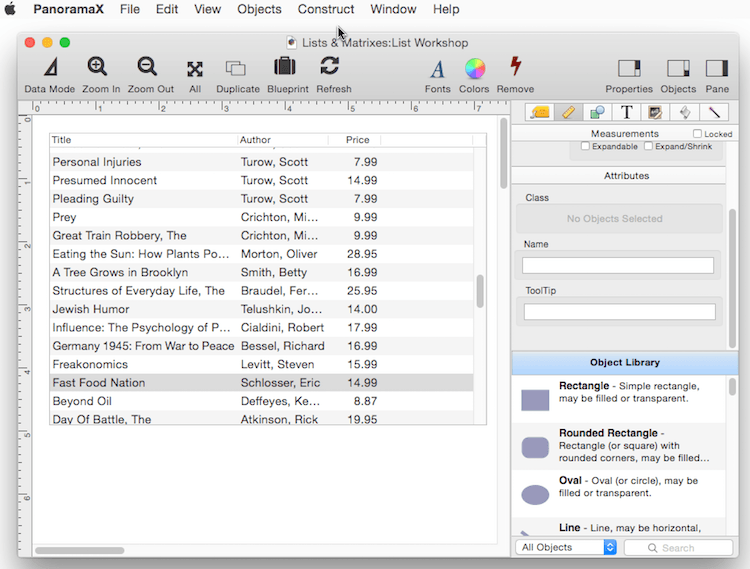
Now just press the Construct button, and BAM – a Text List Object, ready to go.
If that seemed pretty easy, it was. Here’s a movie showing just how easy it is.
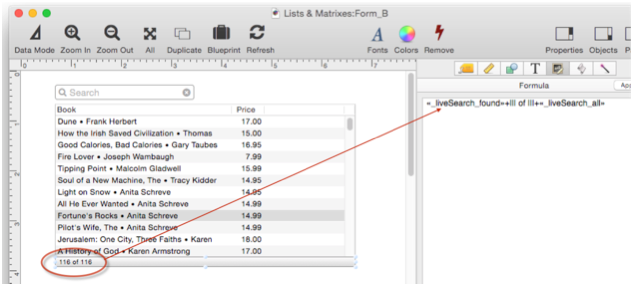
When I go to data mode and click on different items, I can see that this list is already linked to the database, so Panorama jumps to the item I click on (see Text List Database Integration).
Making the List Searchable
To make the list searchable by the Title and Author fields, re-open the dialog and add the <search> tag to those two fields.
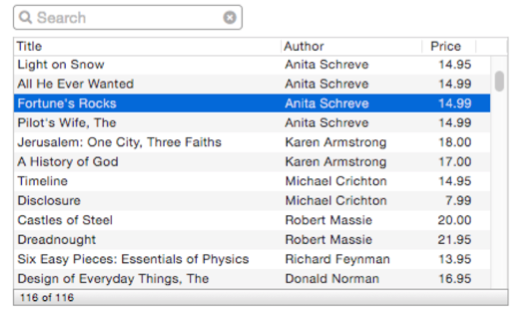
Voila! The list is searchable!
I can go into data mode, search by book or author, then click to jump directly to that book (see Text List Searching). Also notice that at the bottom it shows how many items were found, and the total number of items.
As you can see, it’s easy to go back and change the template to revise the Text List. I’d like to change it so that all fields are searched, not just the Title and Author.
To do that I move the <search> tag onto a separate line, not associated with any field.
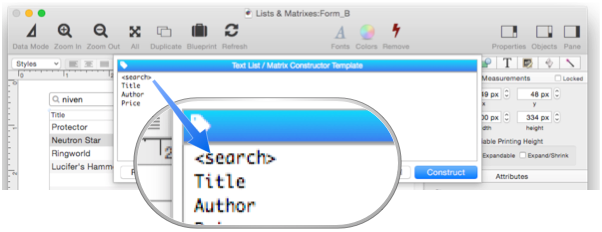
Now all fields are searched, including ones not visible in the list.

As you can see, for the most common applications I can create a very nice and functional new list in less than a minute. Everything is automatically set up. Of course you can go into Graphics Mode and customize if necessary.
Template Tags
There are over two dozen tags available for customizing the generated Text List. To see a menu listing of all of these tags, click on the tag icon in the upper left hand corner of the menu. To insert a tag into the template, simply choose it from the menu.
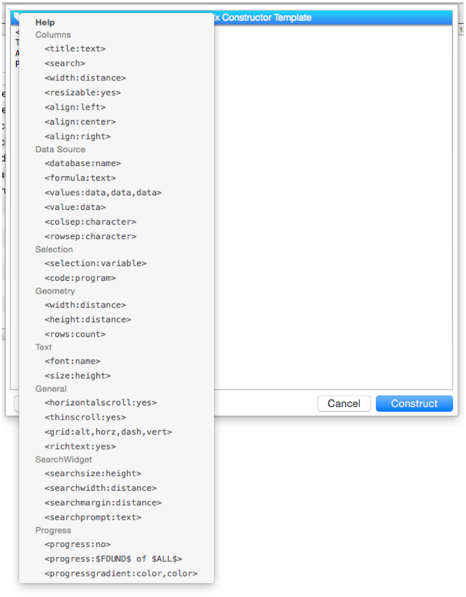
For a detailed description of all of these tags, see constructlistmatrix.
List Geometry
The <width>, <rows> and <size> tags control the dimensions and geometry of the list.
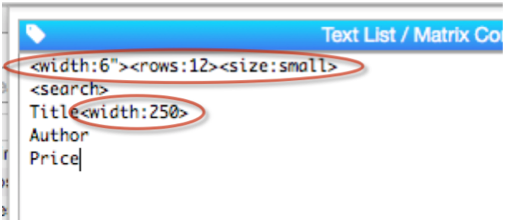
In the example above, 4 customizations have been made to this template.
<width:6> – If the <width> tag is used on a line with just tags (no field name), it controls the overall width of the list. In this example, the width of the list is 6 inches. This can also be specified in points or centimeters.
<rows:12> – This tag specifies the height of the list. Panorama automatically figures out the actual height for the font size you are using. If you want to specify a specific height instead of rows, use the <height> tag.
<size:small> – The size can be regular (13), small (11), mini (10) or any numeric size.
<width:250> – If the <width> tag is used on a line that starts with a column name, the tag controls the width of that specific column. In this case, the tag customizes the width of the Title column (if not specified, the default is the width of the field in the data sheet). The column width can also be specified in characters by appending c to the number (for example <width:25c>). The alignment can also be customized with the <align> tag, for example <align:right> or <align:center>.
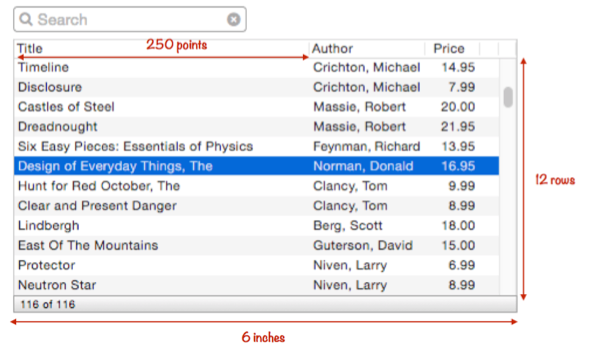
Here is what the finished Text List looks like with these custom tags:
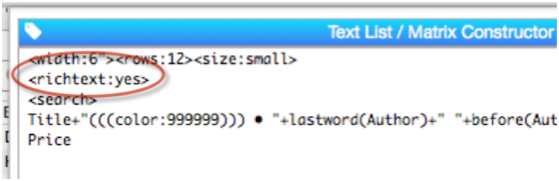
Custom Columns
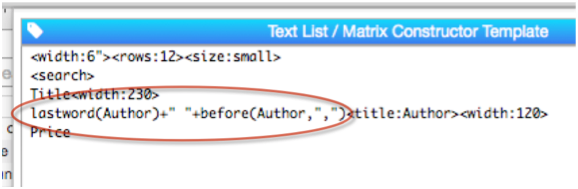
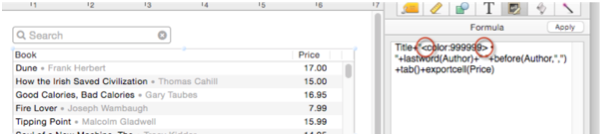
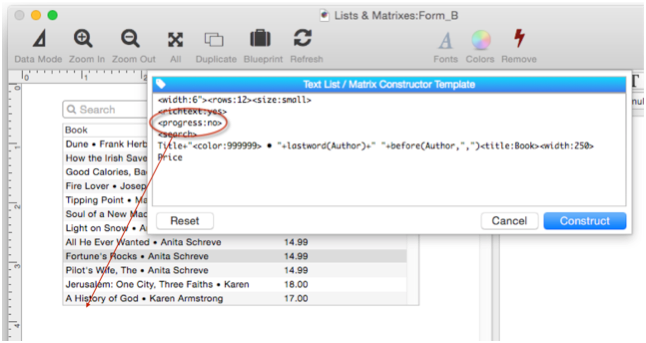
A column in the list doesn’t have to be a database field – you can create your own column on the fly with a formula. This example reverses the first and last names in the Author field. This line also uses the <title> tag (if the <title> tag was not used, the formula would be used as the title of the column.) Also, since you are not using a stock field name, Panorama can’t automatically figure out the width, hence the <width> tag is necessary (if omitted, the width will be 100 points).
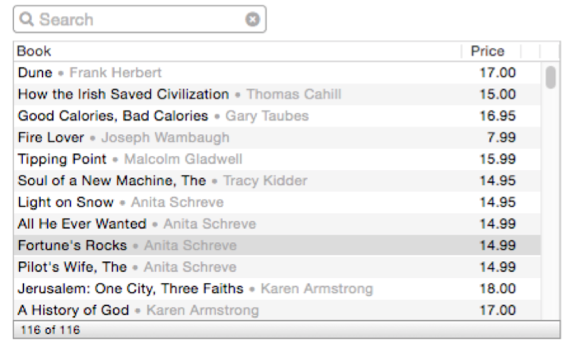
Here is the revised list, with the format of the Author names changed (in other words, Shreve, Anita now appears as Anita Shreve).
Rich Text
If you want to include styled text in the text, use the <richtext> tag.
Normally any style tags in rich text are surrounded by the < and > characters (see Rich Text). But that won’t work here, because the Constructor Template is using those characters for its own tags. So you have to use ((( and ))) instead of < and > for style tags, as shown here.

Here is the finished result.
If you ever go back and look at the actual formula in the Text List object, you’ll see that the ((( and ))) characters have been replaced with < and > characters.
However, if you go back and edit the template, you’ll see the original ((( and ))) characters.
Linking the List to Another Database
The Text List is normally linked to the current database, but with the <database> tag it can be linked to any open database.
Customizing the Progress Display
At the bottom of the Text List, the constructor automatically creates a Text Display Object that summarizes the results of the search.
If you don’t want the progress display, disable it with a <progress:no> tag.
The <progress> tag can also be used to customize the progress message. $FOUND$ and $ALL$ will be replaced with the actual numbers. (Note that these are case sensitive, they must be in all caps.)

Constructing a Non-Database Based Text List
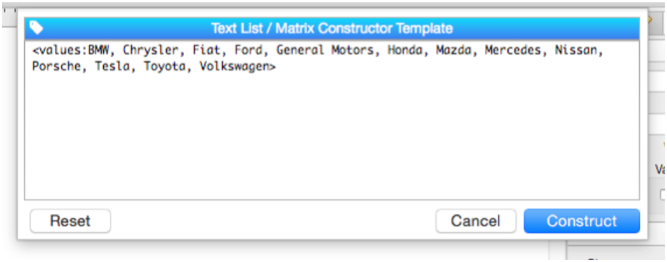
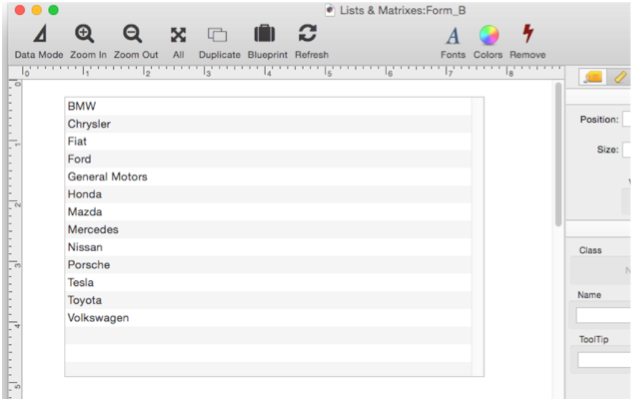
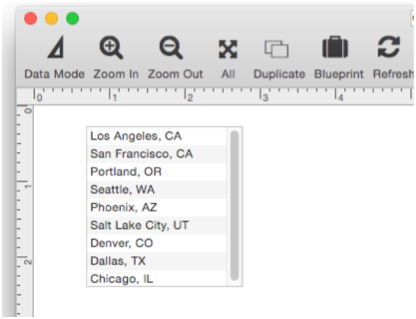
All of the examples so far have shown how to create a Text List that is based on a database, but you can also use other data sources. Here is a template that has just one tag in it – <values>. This specifies a comma separated list of values, in this case, car manufacturers.
When the Construct button is pressed, this nice list is created.
We want to be able to find out which item was clicked on. The <selection> tag specifies which field or variable should hold the selected value. In this case, it will be a fileglobal variable named vehicleBrand. I’ve also added tags on the first line to reduce the size of the list to a more appropriate size.
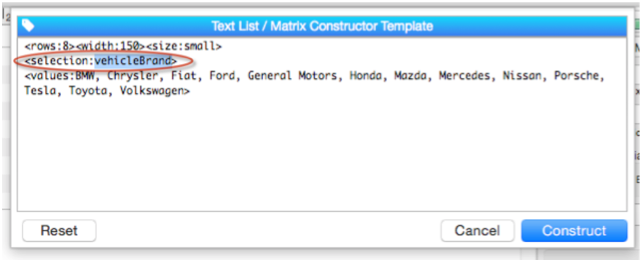
Here’s the constructed list.
If your values contain commas, you can use separate <value> tags instead of one <values> tag. This example shows the <value> tags on separate lines, but that is not necessary, they can all be on one line if you want..
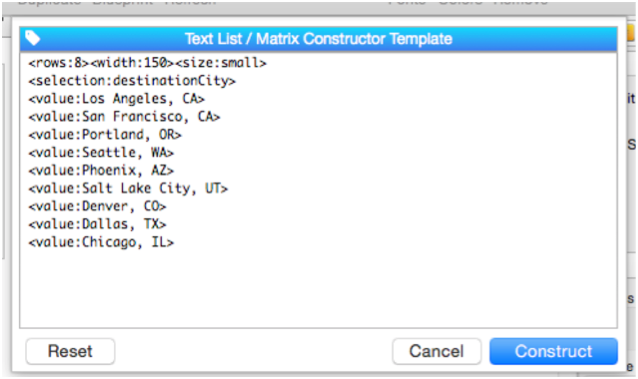
Here’s the Text List generated by this template:
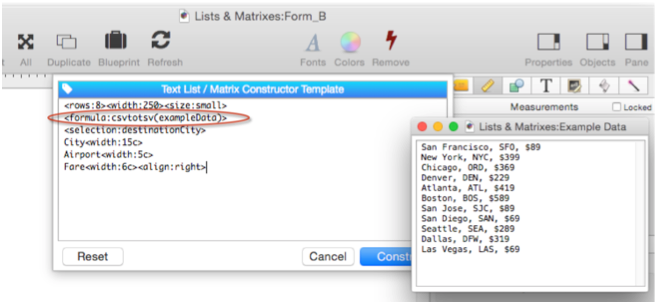
You can also specify a formula as the data source. In this example, the data is in a variable named exampleData, in comma separated format.
Changing the Query Variable
The variable used for searching is normally called _liveSearch. If you want to use a different variable name, use the <query> tag. However, this tag is a bit unusual – it must be the first tag in the template. Actually it doesn’t have to be first, but it definitely has to be before any <search> tags in the template, so putting it first is a good rule.
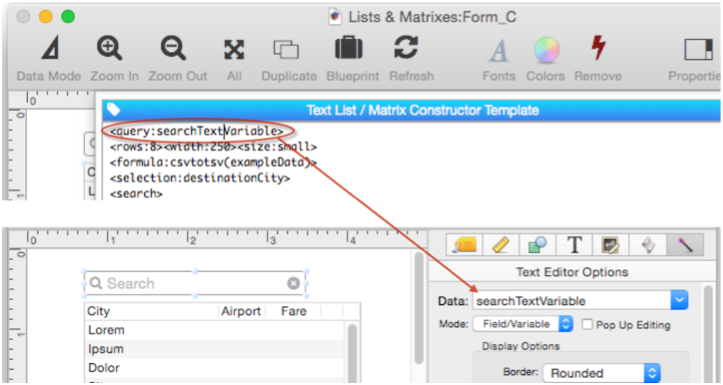
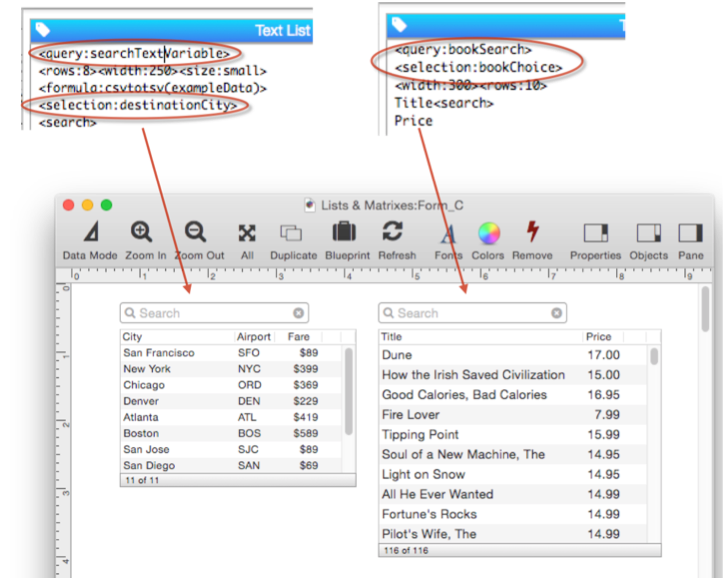
Constructing Multiple Lists on a Single Form
You might want to construct two or more lists on a form. However, the Constructor dialog doesn’t allow that. Here’s the best way to do that – create two new forms, and construct a text list in each one. Then create a third form and copy the the two lists into this third form. Don’t ever run the Constructor dialog on the third form! (If you do, Panorama will erase the lists you manually copied onto the form.) You can delete the other two forms if you want to.
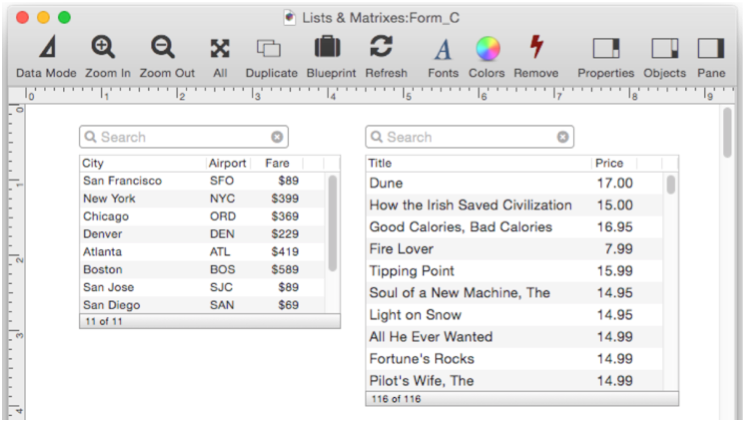
There is a bit more to it. Your two lists need to have different <query> and <selection> tags, or they will interfere with each other. (Actually the selection tag on the right will be ignored because it is linked to the database, but the query variables definitely need to be different.)
See Also
- Automatic Form Construction -- creates a column of form elements for editing data fields (or variables).
- Automatic Mailing Label Construction -- creates a mailing label.
- Automatic Report Construction -- creates a tabular report with columns of data.
- Construct Menu -- used to automatically construct complex form applications, including calendars, lists, mailing labels, and more.
- Displaying Data in a Grid -- fundamentals of displaying data in a grid (Text List/Matrix).
- Line Item Grid Constructor -- creates a grid of form elements for displaying and editing line item fields.
- Matrix Clicking -- handling clicks in a Matrix Object.
- Matrix Constructor -- quickly creating a Matrix Object from a template.
- Matrix Database Integration -- synchronizing a Matrix Object with a database.
- Matrix Geometry -- customizing the size and geometry of Matrix Object elements.
- Matrix Header and Horizontal Scrolling -- setting up a custom header for a Matrix Object grid.
- Matrix Object -- displaying a grid of items with a custom arrangement.
- Matrix Object Frame -- setting up the arrangement of items within a Matrix Object.
- Matrix Programming -- programming a Matrix object.
- Tab Panel Constructor -- quickly creating a Tab Panel Object from a template.
- Text List Appearance -- customizing the appearance of a Text List Object.
- Text List Database Integration -- synchronizing a Text List Object with a database.
- Text List Multiple Columns -- displaying multiple columns in a Text List Object
- Text List Object -- displaying a grid of text.
- Text List Programming -- programming a Text List Object.
- Text List Searching -- searching within a Text List Object.
- Text List Selection -- selecting items in a Text List Object.
History
| Version | Status | Notes |
| 10.0 | New | New in this version. |