Previous: 204: Adding Buttons to a Form
Printing mailing labels is a common task (though not as common as it used to be). Many types of peel-off labels are available commercially. Panorama already knows the dimensions of many popular labels and can do most of the work for you. The first step in setting up a mailing label is to create a form to hold the label. A form is like a sheet of paper that you can draw on (see Forms). You can place graphics, text and data on the form to create labels, invoices, statements, or virtually anything else. To create a new form select View>New Form, then give your new form a name.
To automatically create a layout for printing labels, I choose Mailing Label from the Construct menu. This opens a dialog sheet that lists all of the fields in the database.
I edit the list to arrange it into the format of a mailing label (including adding the comma between City and State), and also remove the fields I don’t want to include on the label.
When done, I simply press the Construct button.
That’s it – the form is done! You can switch to data entry mode and flip though the records to see what the labels look like:
The mailing labels are ready to print.
If you don’t want to print all of the labels, use the Find/Select command to select the addresses you do want to print, see Searching.
To learn more about labels, including how to customize the mailing labels, see Automatic Mailing Label Construction. When you’re done with the labels you can close the form window. To open it again later, use the View menu.
Custom Reports
This page only scratches the surface of Panorama’s capabilities for custom printing layout. Panorama has a very flexible system for printing custom reports, labels and forms. Here are some examples of custom printing that can be done with Panorama.
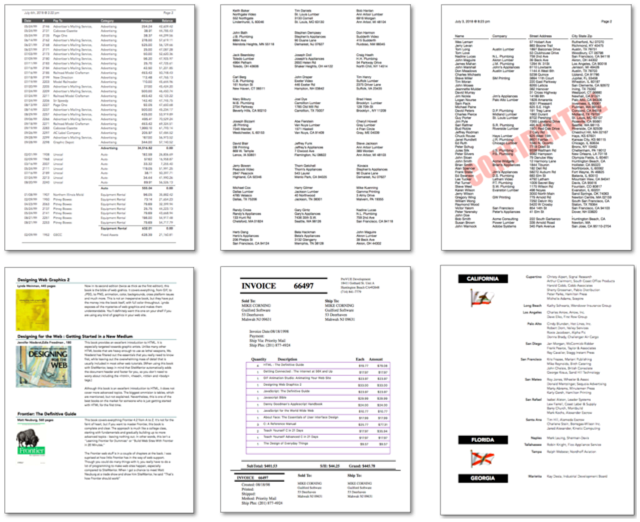
To learn more about setting up custom reports, see Reports.
Next: 206: Displaying a Map
See Also
- Automatic Mailing Label Construction -- creates a mailing label.
- Forms -- display data with a customizable graphic layout.
- Report Tile Object -- component for assembling a custom report.
- Reports -- Panorama has a very flexible system for printing custom reports, labels and forms.
- Searching -- searching a database to find or select information.
- Tiles In Action -- basic rules for using tiles to print custom reports.
- View Menu -- accessing and creating the data sheet, forms and procedures.
History
| Version | Status | Notes |
| 10.0 | Updated | Carried over from Panorama 6.0, with updates. |