Panorama has a very flexible system for printing custom reports. Panorama assembles each report page by taking pre-defined components from your form and sliding them into position on the page. Because the report components fit together like floor tiles, these components are called report tiles. Each tile in the form corresponds to a section of real estate on the printed page. (In addition to custom reports, report tiles are also used by Matrix Objects and View-as-List Forms.)
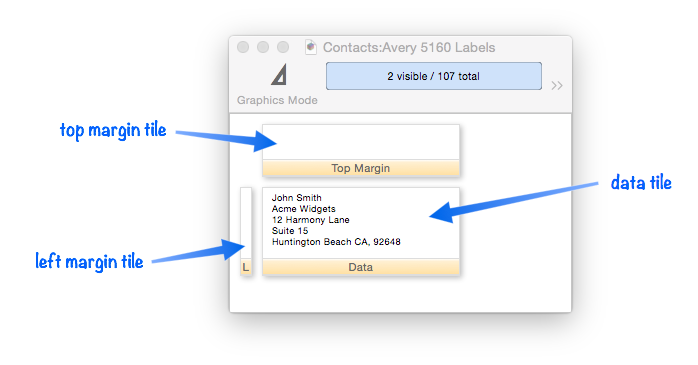
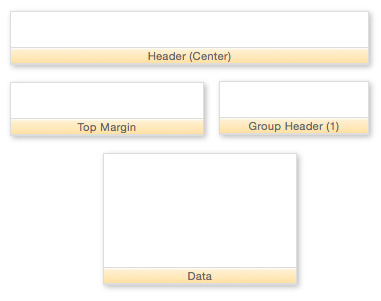
A form for generating a report may contain only a single report tile, or it may contain dozens of tiles. Panorama checks for the presence of each type of tile as it is building the report, and if found, uses the tile to build one section of the report. The size and shape of the tiles determines the overall layout of the report. Report tiles are graphic objects that are part of a form. Here is an example of a typical form that contains three report tiles: 1) top margin tile, 2) left margin tile, and 3) data tile. (This form also contains a Text Display Object that has been placed on top of the data tile — more on that later.)
Working with Report Tile Objects
You can manipulate report tiles just as you would any other graphic object — drag, nudge, copy, etc. To manually create a new Report Tile Object, drag one from the Object Library. Once the object is created, you can adjust its position and size.
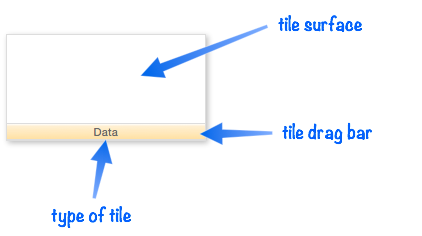
On the screen, a tile looks sort of like an upside down window. Tiles are divided into two parts: the surface and the drag bar. The surface is the actual printed area of the tile.
Unlike other graphic objects that can be manipulated by clicking anywhere in the object, a tile is only sensitive to clicks on its drag bar. If you click and/or drag on the surface of a tile, the object is not selected and does not move. Instead, a selection marquee appears, just as if you had dragged on an empty spot in the form.
To move a tile, press the mouse on the drag bar and drag the tile to the new position.
To select a tile, click on the drag bar. When the tile is selected, four handles appear around the corners of the tile, and four around the edges. You can use these handles to change the size of the tile, again, just like any other kind of object.
As mentioned above, the surface of the tile is not sensitive to the mouse. In other words, clicking on the surface area does not select the tile, and you cannot move the tile by dragging on the surface. However, you can place objects on top of the tile and move or select them.
In fact, as you will see later, most tiles must have other objects placed on top of them to build a complete report.
Report Tile Types
There are dozens of different types of report tiles — data tiles, margin tiles, header tiles, etc. Each tile displays its type in the drag bar area.
To change the type of a tile, first select it (by clicking on the drag bar) and then choose the magic panel inspector.
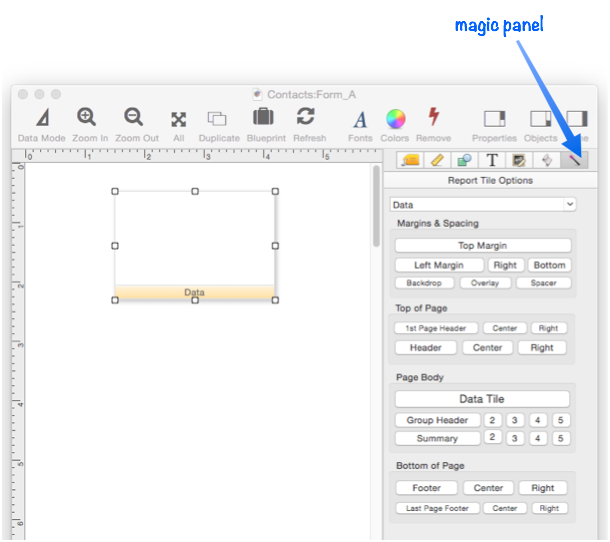
The inspector shows about two dozen buttons with the most common types of tiles. You can change the tile’s type by clicking on one of these push buttons.
You can also use the keyboard to type in a new report type. Panorama will auto-complete for you.
Finally, you can use the pop-up menu to select the type. As you can see, there are are nearly 60 types of tiles. For the details about how different types of tiles are used, see these other topics.
- Automatic Mailing Label Construction -- creates a mailing label.
- Automatic Report Construction -- creates a tabular report with columns of data.
- Custom Report Headers and Footers -- setting up custom report headers and footers.
- Custom Report Margins -- specifying the top, left, right and bottom margins of a custom report.
- Printing Multiple Column Reports -- printing reports with two, three or more columns (for example mailing labels).
- Printing Multiple Page Records -- Panorama can print up to 9 pages for each record in a custom report (for example multi page invoices, etc.)
- Printing Summary Information -- printing a database that has been organized into categories with summary records.
- Report Tile Object -- component for assembling a custom report.
- Reports -- Panorama has a very flexible system for printing custom reports, labels and forms.
- Tiles In Action -- basic rules for using tiles to print custom reports.
- Variable Height Records -- custom reports with different heights for each record.
- View-As-List Forms -- displaying a custom data layout as a continuous sheet.
Creating Additional Report Tiles
A minimum report contains at least a data tile. Many reports will contain additional tiles. To manually create additional report tiles, simply drag them from the Object Library as described above, then set the type of the new tile.
Often you’ll need another tile that has the same height or width as an existing tile. In that case, usually the easiest way to create the new tile is by duplicating an existing tile. You can either copy and paste, or hold down the Option key and drag to create a duplicate of an existing tile.

Automatically Creating Report Tiles
In addition to manually creating report tiles, Panorama also has tools to automatically create them for you. The Automatic Mailing Label Construction dialog will build a complete mailing label for you from a template.
The Automatic Report Construction dialog will build a simple columnar report from a template. The Matrix Object can also create a report tile object automatically by pressing the Create Frame Object button.
See Also
- Automatic Mailing Label Construction -- creates a mailing label.
- Automatic Report Construction -- creates a tabular report with columns of data.
- Custom Report Headers and Footers -- setting up custom report headers and footers.
- Custom Report Margins -- specifying the top, left, right and bottom margins of a custom report.
- Printing Multiple Column Reports -- printing reports with two, three or more columns (for example mailing labels).
- Printing Multiple Page Records -- Panorama can print up to 9 pages for each record in a custom report (for example multi page invoices, etc.)
- Printing Summary Information -- printing a database that has been organized into categories with summary records.
- Reports -- Panorama has a very flexible system for printing custom reports, labels and forms.
- Tiles In Action -- basic rules for using tiles to print custom reports.
- Variable Height Records -- custom reports with different heights for each record.
- View-As-List Forms -- displaying a custom data layout as a continuous sheet.
History
| Version | Status | Notes |
| 10.0 | New | New in this version. |