The Text Export Wizard can be used to export text, including HTML text, in a custom arrangement. The fundamentals of this wizard are described on the Text Export Wizard page, which you should study before moving up to HTML export, described below.
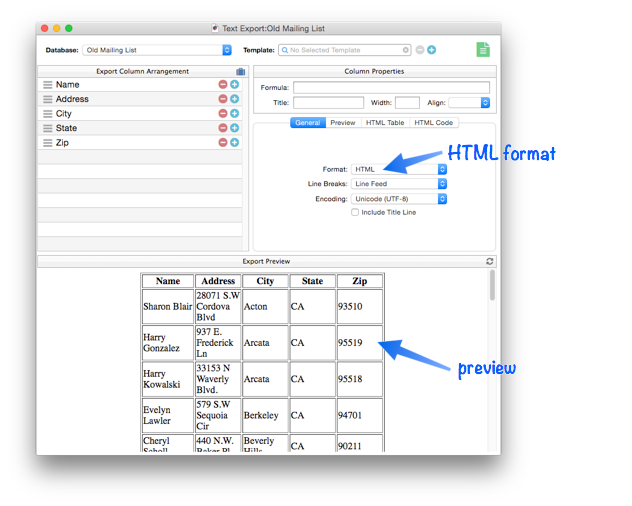
To export HTML, switch the format option to HTML. The preview will switch from text to an HTML display.
Using the Generated HTML Page
Just like any other HTML file created with a web authoring tool, a HTML text file exported from Panorama can be copied onto a web server and used as part of a web site. The Text Export Wizard creates fixed “static” pages that represent a “snapshot” of the database at a certain point in time. If you want use a Panorama database to create “dynamic” web pages (for example searching a database on the web or allowing a database to be updated via the web) you must use Panorama Server.
Column Width and Alignment
Initially all of the columns have the width set automatically, which is probably not what you want. To change the width of a column, click on it in the Export Column Arrangement section, then type in the width. The width value can either be in points (1 point = 1/72 inch), or it can be a percentage (the percentage of table width). You can also adjust the alignment (left, center or right). The preview updates as each change is made.

HTML Table Options
This options panel gives you control over many aspects of the table format, including the font, text size, colors, borders, spacing and padding.
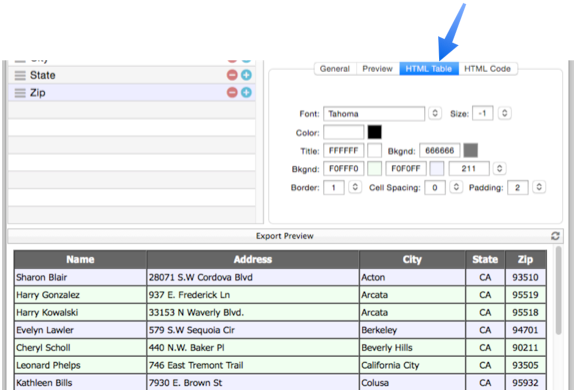
Table Font – This option specifies the font to use to display the table. (If left blank the browsers default font will be used.) You can either type in the font name or choose from a pop-up menu listing the most commonly available web fonts.
Text Size – This option specifies the size of the text to be used for the table. But take note — the size is not specified in points. Instead it is specified using a special HTML text size specification. Absolute values (1–7) specify a fixed font size from extremely small (1) to huge (7). Negative values specify sizes smaller than the text size in the rest of the page, for example -2 is two sizes smaller than normal font. Positive values specify sizes larger than the text size in the rest of the page, for example +2 is two sizes larger than normal font. You can type in the size or select from a pop-up menu of common sizes.
Text Colors – This option specifies the color of the text in the table. If left blank, the text will be black. You can either type in a web hex color, or you can click the color swatch to open a color picker dialog.
Title Color – This option specifies the color of the title text. If left blank, the text will be black. The Bkgnd option on the same line specifies the color of the title background. In the example above, the title text is white with a dark gray background.
Row Background Colors – This line controls the background colors for the rows of data.

You can specify one or two background colors (if left blank, the background will be transparent. If there are two background colors, they will alternate according to the pattern option. You can either type in the pattern or choose a pattern from the pop-up menu.

Table Border — this is a numeric value that specifies the thickness (in points) of the border around each cell in the table. If the value is set to 0 then there is no border at all.
Cell Spacing — This option controls the space between each cell in the table (in points).
Cell Padding – This option controls the space between the contents of each cell (text or image) and the edge of each cell (in points).
HTML Code Options
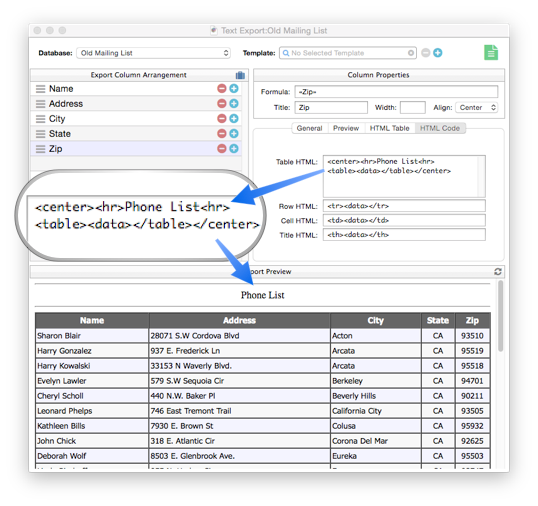
This advanced options panel gives you full control over the HTML code templates that Panorama uses to generate the table.
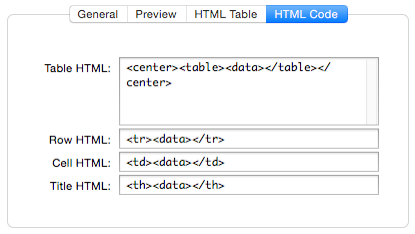
Table HTML – This is the template for the overall HTML of the body of the page. At a minimum it should include the tags:
<table><data></table>
The wizard will automatically replace the <data> tag with the body of table generated from the database. This example shows how a modified template can be used to add a title to the HTML table.
Row HTML – This is the template for each line in the table. At a minimum it should include the tags:
<tr><data></tr>
The wizard will automatically replace the <data> tag with the body of the line (which has been built up from individual cells, see Cell HTML below).
Cell HTML – This is the template for each cell in the table. At a minimum it should include the tags:
<td><data></td>
The wizard will automatically replace the <data> tag with the data (an individual cell) from the database. As it does so the wizard will automatically prepare the data for HTML display, for example, converting special characters to the appropriate HTML entity wherever possible.
Title HTML – This is the template for each title in the table. At a minimum it should include the tags
<th><data></th>
or
<td><data></td>
The wizard will automatically replace the <data> tag with the column title as specified in the wizard.
See Also
- csvexportline( -- generates a comma delimited line of data containing all the fields in the current record.
- csvexportlinevisiblecells( -- generates a comma delimited line of data containing all the visible (non hidden) fields in the current record.
- csvquoted( -- adds quotes if necessary for CSV text (RFC 4180).
- databaseexportcsv -- exports selected records in the current database in CSV format (comma separated) to a text file.
- databaseexporttsv -- exports selected records in the current database in TSV format (tab separated) to a text file.
- databaseexportusingformula -- exports selected records in the current database to a text file, using a formula.
- downloadpartialdatabase -- downloads specified components of the current database from the server. The current database must be shared.
- export -- exports the selected rows in the current database into a text file.
- htmlarraytable -- generates an HTML table from an arrray.
- htmldatamerge -- uses a template to generate HTML you want from a database.
- htmldatatable -- generates an HTML table from selected data in the current database.
- htmlextractimages -- extracts the image URLs from an HTML page.
- htmlextractlinks -- extracts the links from an HTML page.
- htmlformitemnames -- returns a list of form input elements (*INPUT* tags, etc.) within an HTML page.
- htmltablecell( -- extracts the data from a cell in an HTML table.
- htmltablecellexists( -- returns true if an HTML table contains the specified cell, false if it doesn't.
- htmltablecellraw( -- extracts the data from a cell in an HTML table (including tags, if any).
- htmltableheight( -- calculates the height (number of rows) in an HTML table.
- htmltablerow( -- extracts the data from a row in an HTML table.
- htmltablerowraw( -- extracts the raw data (including tags, if any) from a row in an HTML table.
- htmltabletoarray -- converts an HTML table into a text array.
- htmltablewidth( -- calculates the width (number of columns) in an HTML table.
- savepartialdatabase -- saves specified components of the current database, leaving other components out.
- Text Export -- exporting a database into a text or HTML file.
- Text Export Wizard -- custom exports into a text or HTML file.
- tsvtocsv( -- converts tab separated text into comma separated text.
- tsvtojson( -- converts tab separated text into JSON formatted text.
- xtag( -- generates an HTML/XML tag.
History
| Version | Status | Notes |
| 10.0 | New | New in this version. |