The Action menu is the simplest way to allow a procedure to be triggered. All you have to do is create the procedure, and it is automatically listed in the Action menu. The Action menu is added to the end of the standard menus, and the user can activate any procedure simply by selecting its name from the Action menu.
Of course you probably don’t want a menu item named Procedure_A. To rename a menu item, simply rename the associated procedure. The Action menu will be updated the next time you look at it.

Each time you add a new procedure, it automatically appears at the bottom of the Action menu.
Rearranging Action Menu Items
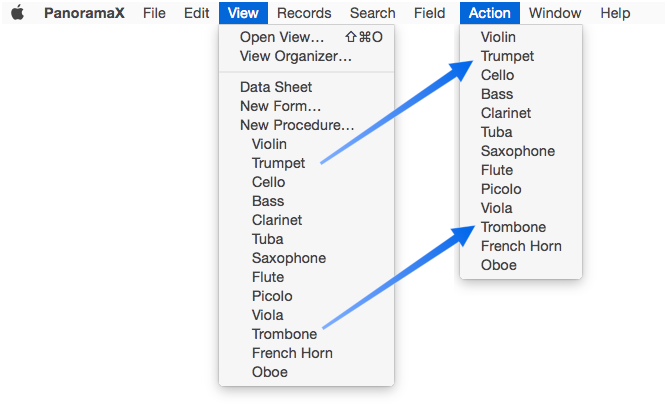
The menu items appear in the same order that procedures are listed in the View Menu (of course you can’t normally see both menus at the same time like this).
To rearrange the menu items, simply open the View Organizer and drag to rearrange the procedures.
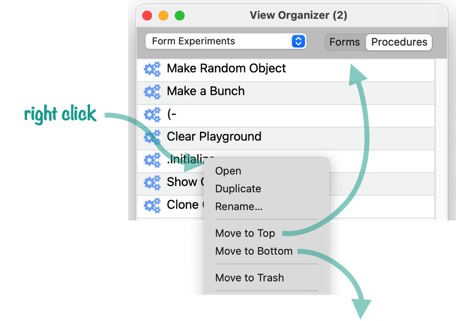
You can also move a procedure to the top or bottom of the list by right clicking on it and choosing Move to Top or Move to Bottom from the pop-up menu.
If there is a very long list of procedures, you can open a second organizer window and drag between them. See View Organizer to learn more.
Action Menu Options
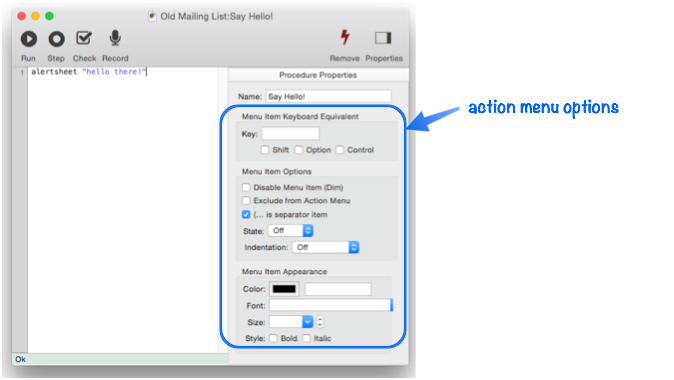
The following sections describe variations from the basic one-size-fits-all Action menu. You can give the Action menu a different name, or even split the Action menu into multiple menus. You can also exempt some procedures so that they are not listed in the Action menu (a procedure that is not listed can only be triggered some other way, for example by a button). Many of these options are set up using the inspector panel in the Procedure Editor.
The Action menu does have some significant limitations. The Action menu can only add to the standard menus, you cannot replace the standard menus. The Action menu cannot have any submenus. The Action menu cannot change when the user switches from form to form—it always contains the same items (unless you switch to a different database). In addition, there must be a separate procedure for each menu item in the Action menu. It is not possible to have multiple menu items handled by a single procedure. With these restrictions in mind, the Action menu is by far the easiest way to set up your own menus in a Panorama database. (However, these restrictions don’t apply if you use Panorama’s more powerful Custom Menus system, which gives you complete control of the entire menu bar.)
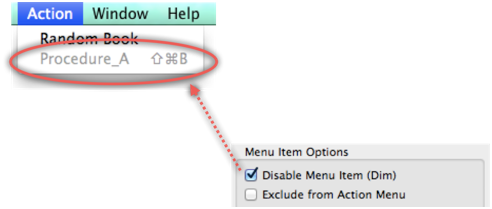
Disabling a Menu Item
Check this option in the inspector panel to disable a menu item. The item will still be in the menu, but it can’t be used.
Of course you probably wouldn’t bother to include a menu item that is permanently disabled. However, you can also turn this option (or any other) on and off in program code. This example disables the menu item for destroying the universe:
setprocedureoptions "","Destroy Universe","MENUDISABLED","Yes"
To learn more, see the setprocedureoptions statement. You can also create menus that dynamically enable/disable by using Custom Menus.
Excluding a Procedure from the Action Menu
If you want to completely exclude a procedure from the action menu, check the Exclude from Action Menu option in the inspector panel. For example, you might do this if the procedure is now obsolete but you don’t want to delete it yet. Or the procedure might be triggered some other way, for example it could be called as a subroutine from another procedure, or from a graphics object.
Any procedure with a name that starts with a period is always excluded from the Action menu, whether or not the Exclude from Action Menu option is checked. For example, none of these procedures would appear in the menu.
.Initialize
.SecretStuff
.ModifyRecord
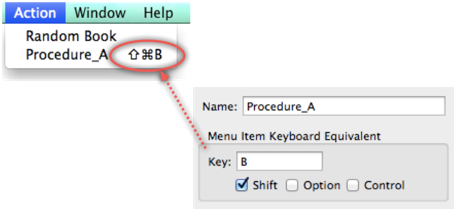
Command Key Equivalents
You can set up a command key equivalent in the inspector panel for any item in the Action menu. In this example, Command-Shift-B is set up to trigger Procedure_A.
Keep in mind, however, that you cannot override the command key equivalents for Panorama’s standard menu items. For example, you can’t define Command-O as the command key equivalent for a procedure, because that is already used for Open Database. If you do set up a command key equivalent that conflicts with an existing standard menu item, it will simply be ignored. (You can change or remove the command key equivalents for standard menu items by setting up your own Custom Menus.
Separator Lines in a Menu
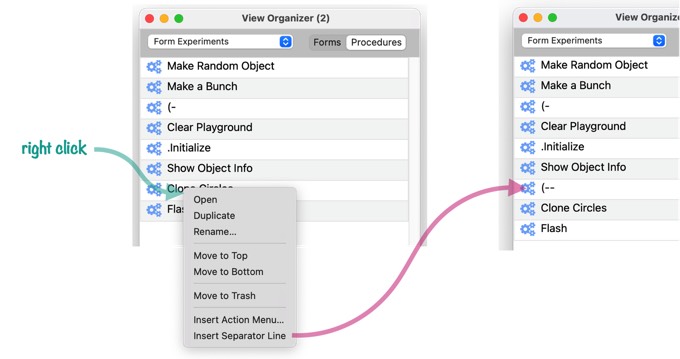
Many menus contain one or more gray lines separating different sections in the menu. To add a separator line to the Action menu, create a procedure with a name that start with (-. To add a second separator line to the menu, create a procedure named (--. The third separator line should be named (---, the fourth (----, etc. (Each procedure name must contain a different number of dashes because Panorama does not allow duplicate procedure names.) Here’s an example of an Action menu divided into several sections.
The View Organizer provides a shortcut to make creating separator lines easy and quick. Simply right-click where you want the separator line to appear, then choose Insert Separator Line from the pop-up menu. Panorama will automatically create a new (empty) procedure that will display as a separator.
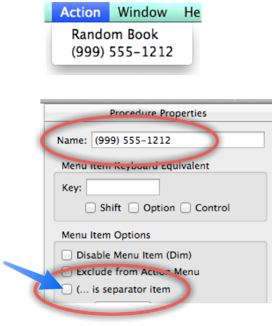
Using Leading ( in a Menu Item A leading ( normally indicates a separator line, but what if you wanted to include a leading ( in the menu item, for example a phone number? To make this work you must un-check the (… is a separator item option, as shown here:
Renaming the Action Menu
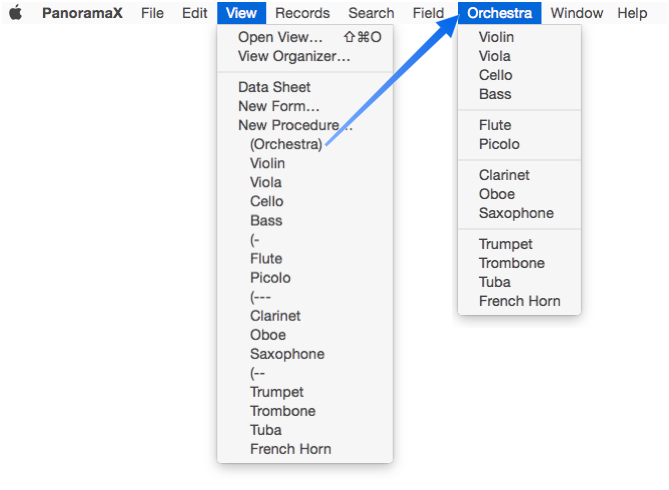
To give the Action menu a different name, insert an empty procedure with a name that begins and ends with a parenthesis as the very first procedure in the database. For example, inserting a procedure named (Orchestra) before the first procedure causes the Action menu to become the Orchestra menu. (Normally, of course, you cannot see both the View and Action menu at the same time.)
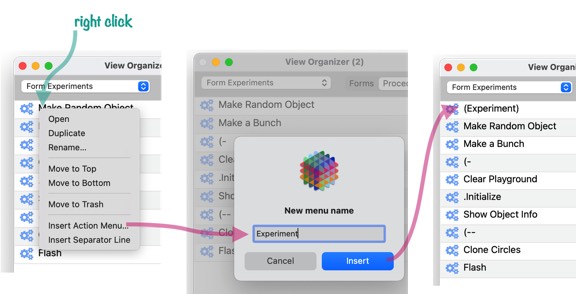
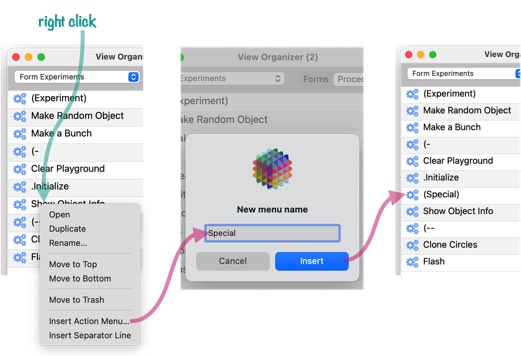
The View Organizer provides a shortcut to quickly rename the Action menu. First right-click on the top procedure, then choose Insert Action Menu from the pop-up menu. Type in a name for a new procedure, then press the Insert button. This automatically adds a new procedure at the top of the list with the procedure name surrounded by ( and ) for you.
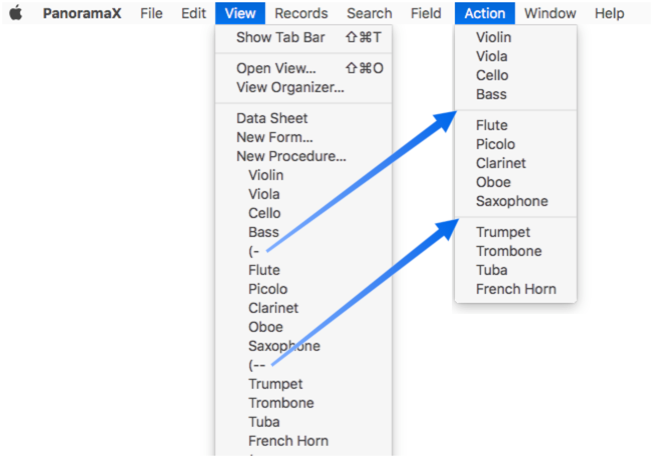
Dividing the Action Menu into Multiple Menus
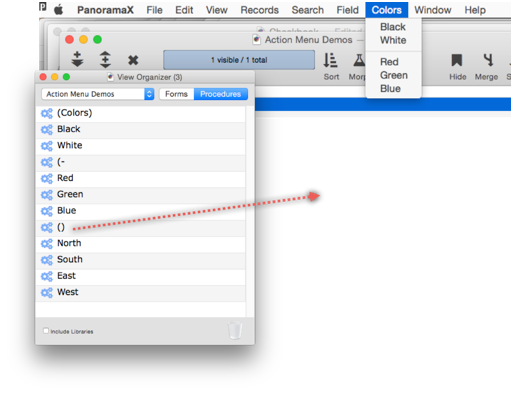
If your database contains lots of procedures you may want to split the Action menu into two or more separate menus. To split the Action menu into separate pieces, insert an empty procedure with a name that begins and ends with parentheses. For example, to start a new menu named People, add a new procedure named (People). All of the procedures below this point will be listed in the People menu. The example below shows an action menu split into four different menus.

The View Organizer provides a shortcut to quickly add new menus to the Action menu. First right-click on the top procedure, then choose Insert Action Menu from the pop-up menu. Type in a name for a new procedure, then press the Insert button. This automatically inserts a new procedure with the procedure name surrounded by ( and ) for you.
Unlisting Trailing Procedures
To keep an entire group of procedures out of the menu insert a procedure named (). Any procedure below a procedure named () will not appear in any menu.
You can also use the View Organizer to create this procedure for you. Right click on the spot where you want it to be inserted, then choose Insert Action Menu from the pop-up menu. Leave the procedure name empty, then press the Insert button. This automatically inserts a new procedure named () for you.
Note: Using Custom Menus, you can also disable the Action menu completely.
Menu Item State
Setting the menu state to On in the inspector panel adds a check mark to the menu. Setting it to Mixed adds a hypen.

To change the state on the fly, use the setprocedureoptions statement, or forget about the Action menu and use Custom Menus.
Menu Indentation
Menu items can be indented from 1 to 8 spaces.
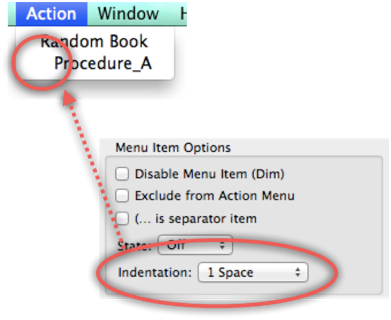
Indenting a menu item doesn’t change the procedure name — there is no space in front of the procedure name. This means that you can change the indentation without worrying about changing any call statements that use the procedure as a subroutine.
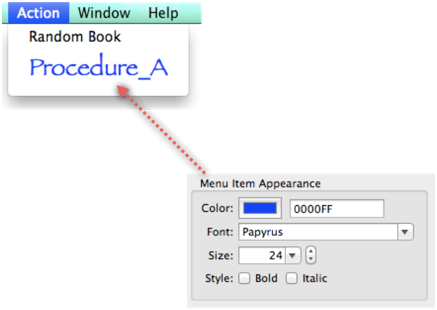
Menu Font, Style & Color
Each menu item can have its own separate font, style and color.
Tip: If you use Custom Menus you can mix multiple fonts, styles and colors within a single menu item, and even add Font Awesome Icons!
See Also
- Accessing the Clipboard -- reading from and writing to the system's clipboard.
- Alerts -- displaying a variety of standard modal alerts.
- Automatic Field Code -- running a short program when data is entered into a field.
- Channels -- provide a standard way to interface with external resources (email servers, phones, web sites etc.)
- Code -- basics of programming code.
- Coding with Debug Instrumentation -- modifying your code to generate debug instrumentation output.
- Control Flow -- making decisions about what code should be executed in response to changing conditions.
- copyindentedcode -- copies the selected code with 4 space indent (for pasting into the Panorama forum).
- Crash Proof Debug Instrumentation Monitoring -- real time crash-proof instrumentation monitoring
- Custom Dialogs -- creating custom dialogs using forms.
- Custom Menus -- creating custom menus, menu bars and pop-up menus (and customizing standard menus).
- Custom Statements -- creating your own custom statements that can be used in your code.
- Customizing Debug Instrumentation Coverage -- specifying what code is being debugged at the moment.
- Database Navigation & Editing -- using program code to navigate within a database, and to add and remove database records.
- Debug Instrumentation -- conditional logging of the internal state of Panorama program code.
- Debug Instrumentation Log Window -- dynamically monitor debug instrumentation output as your program runs.
- Debug Instrumentation Monitoring using an External Program -- monitoring debug instrumentation with an external program (Terminal.app, BBEdit.app).
- Debug Instrumentation Text File -- configuring and accessing the debug instrumentation log (text) file.
- Drag and Drop -- dragging data to and from a Panorama form.
- Generating & Analyzing HTML -- generating HTML code from data, and extracting data from structured HTML.
- Internet Access -- accessing information from web servers.
- Procedure Editor -- editing named procedures.
- Procedure Recorder -- recording database actions as code.
- Procedures -- basics of procedures for automation.
- Program Access to Databases -- using a program to create, open, import or export databases.
- Program Error Handling -- handling errors and exceptions that occur when a program is running.
- Programmable Database Administration -- using a program to access and/or modify the structure of a database.
- Programmable Form Management -- using a program to work with forms.
- Programmable Graphics -- using program code to create and modify graphic objects in a form.
- Programmable Outlines -- using a program to create and manipulate data outlines.
- Programmable Printing -- using program code to print reports, mailing labels, etc.
- Programmable Searching -- using program code to search and select data.
- Programmable Sorting -- using program code to sort a database.
- Programmable Text Export -- using a program to export text from a database.
- Programmable Window Management -- using a program to arrange windows.
- Programming Database Fields -- using a program to add and remove database fields.
- Recompiling Code -- recompiling code & formulas
- Recording Code Triggers in Debug Instrumentation -- the code triggers option automatically tracks whenever any code is triggered, whether from a menu, a button, or implicitly (for example when data is entered).
- Recording Control Flow in Debug Instrumentation -- configure debug instrumentation to automatically log when control flow is non-linear, for example a call, return, goto, etc.
- Scripting -- embedding scripting languages (AppleScript, shell scripts, Python, Ruby, PHP, Perl, etc.) into Panorama program code.
- Speech Programming -- using program code to convert data to speech (voice).
- standardwizardsmenu( -- generates a Custom Menu specification for Panorama's standard Wizards menu.
- Statements -- index of all statements available for use in Panorama procedures.
- Subroutines -- writing code that can be called from other code.
- Suppressing Display -- temporarily disabling display of changes in a program (to reduce "flickering" and increase performance).
- Timer Workshop -- provides a tool for monitoring timers and testing timer configurations.
- Timers -- executing recurring periodic background code at fixed intervals.
- Transforming Data -- using program code to modify data in bulk.
- Triggers -- finding out what event triggered the execution of program code.
- View Organizer -- rearranging, copying and deleting views.
History
| Version | Status | Notes |
| 10.2 | Updated | Right clicking on a procedure in the View Organizer window now provides options for adding separator lines to the Action menu, as well as splitting the Action menu into multiple menus. |
| 10.0 | Updated | Carried over from Panorama 6.0, but options are now specified in inspector panel instead of embedded into the name. |