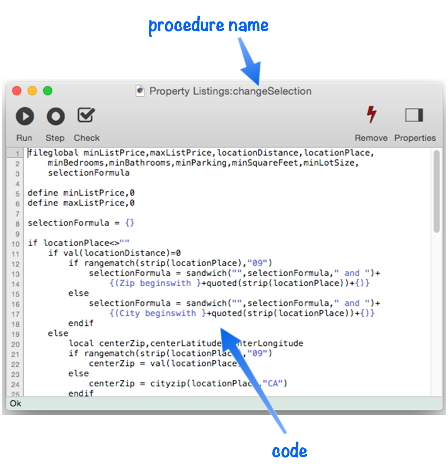
The Procedure Editor window is used to edit named procedures. (To review, a named procedure is a self contained entity that can be included in menus, and called as a subroutine from other procedures (see Procedures).
To open a named procedures in this editor window, or to create a new named procedure, use the View Menu. To create a new named procedure in a specific spot, use the View Organizer (right click on the spot where you want the new procedure to appear and choose Insert New Procedure from the pop-up menu).
Procedure Properties
To view or modify the properties of a procedure, including the procedure name, click on the Properties tool to open the properties panel.

The top item in the panel is the name of the procedure. If you need to change the name, simply type in the new name and press the Return key.
The rest of the properties control how (and whether) the procedure is included in the Action menu. See Action Menu to learn more about these properties.
Recording Code
Panorama includes a built-in “tape recorder” that can record your actions as you work. In other words, Panorama automatically can write your code for you! How easy is that? Most commands and tools that affect data can be recorded, including editing, sorting, searching, analyzing, morphing, import/export, and printing. The recorder works in any Procedure Editor window. Simply click the recorder tool, then go to a data sheet or form window and perform the actions you want to record. If the procedure window is active, you’ll see each line of code appear as each step is recorded.
To learn more, see Procedure Recorder.
Entering Code Manually
To add code to any procedure, just type it in to the main section of the window. Only plain text can be used, no styles are allowed. Panorama will automatically color code comments and string constants. Note: Unlike Panorama 6 and earlier, there is no limit on the amount of text that can be used in a single procedure.
If a line of code is longer than the width of the window, it will automatically wrap to display next line. It’s easy to tell when this has happened because there will be no line number in the gutter on the left.

Indentation
You don’t have to indent your code, but indentation can help make the structure of your code easier to follow. Panorama doesn’t allow tabs in the code, but it does assist if you want to indent your code by 4 spaces. In fact, pressing the Tab key will insert 4 spaces into the code.
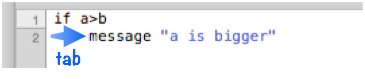
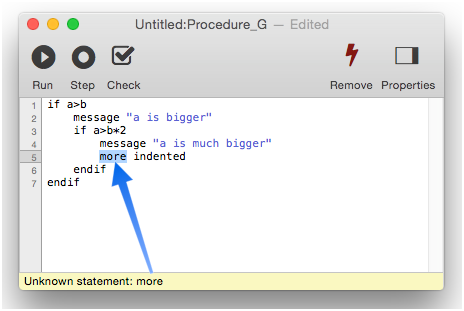
When you press the Return key to start a new line, Panorama will automatically indent the next line to match the indentation of the current line. If you want to increase the indentation, press the Tab key (as shown when line 4 is added below). If you want to decrease the indentation, press delete 4 times (as shown when lines 6 and 7 are added below).
If you want to change the indentation of a section of text later, use the Shift Selection commands in the Source menu.
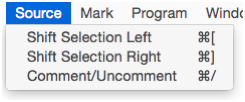
Simply select the text you want to shift, then shift it.
If you do this a lot, it helps to memorize the keyboard shortcuts, Command-[* and *Command-].
Syntax Errors
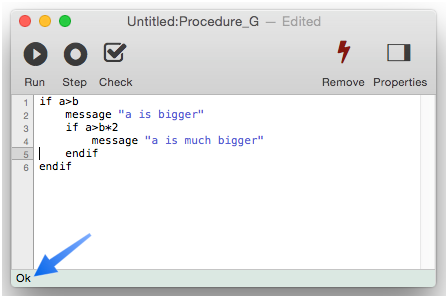
The status bar at the bottom of the window will show you if there are any syntax errors in your code. The code is checked when you press the Check tool, when you switch to another window, or when you pause typing for a few seconds.

In a short procedure like this, it’s easy to see where the error is just by looking. But if the procedure is longer, it may be difficult for you to locate the error. To pinpoint the error, click on the error message in the status bar. Panorama will highlight the point of the error.
If there are multiple errors, only the first one is shown. To see the next error, correct the first error and then press the Check tool.
Repeat this process until all of the errors are corrected.
Some types of errors confuse Panorama, and it displays the wrong location for the error. This typically happens when one item of a pair is missing. In this example, a closing quote is missing.

Othe errors that can cause this sort of problem are mismatched parentheses, and mismatched if/endif or loop/endloop statements. Unfortunately, Panorama won’t be able to help you pinpoint this type of error, you’ll have to figure out where the error is yourself.
Find & Replace
Use the Edit>Find>Find command (Command-F) to search for text within the code. After typing in the text to search for, you can press Return to find the first occurrence, or you can click on the arrows as shown below. To find additional occurrences, click on the arrows, or press Command-G. When you you’re finished searching, press the Done button to dismiss the search panel.
To search and replace text, open the search panel and then check the Replace option. You can use the Replace button to individually approve each replacement, as shown here.
You can also live dangerously and do a “mass” replace all at once, like this:
When you’re done, press the Done button to close the search panel.
In addition to searching for text within the current window, you can also search all procedures in the database, or even all open databases. See Open View to learn how to perform this type of wide ranging search.
Programming Context Menu
When you right click on the code (or double finger click on a trackpad), a special pop-up menu appears that is chock full of programming goodies. The exact contents of the menu will vary depending on the database and the current selection, but it will generally look something like this:
This menu has six sub-menus, which are described in the following sections.
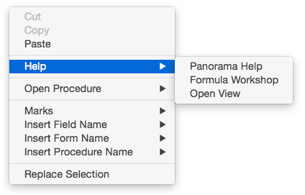
Help Menu
This menu allows you to access various forms of programming help. Simply select the type of help you need at the moment. See Panorama Help Wizard, Formula Workshop, and Open View.
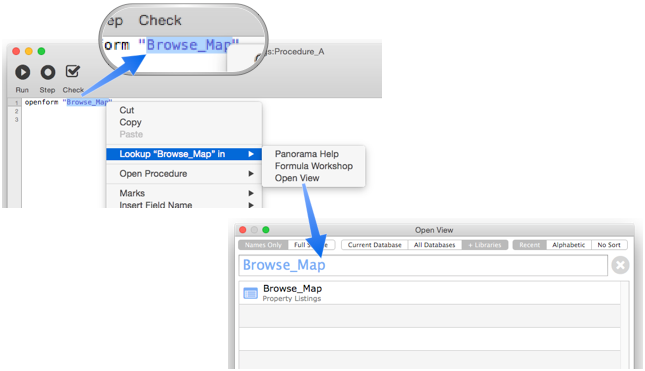
If text is selected, the menu name changes from Help to Lookup … in. This allows you to quickly open the help entry for the selected item.
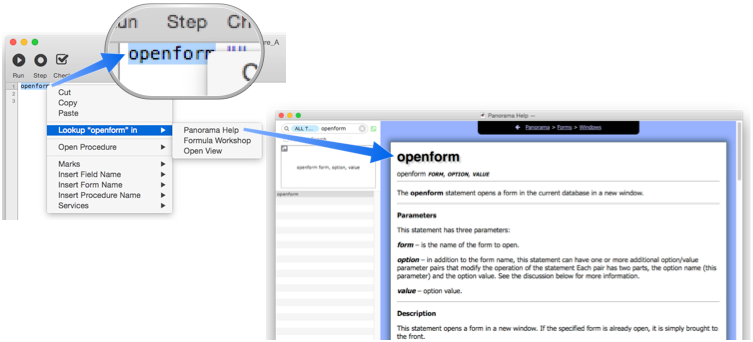
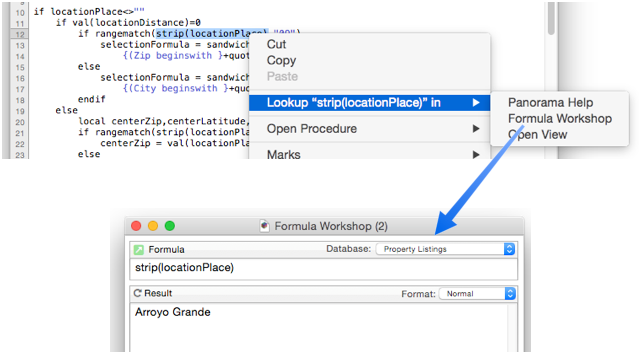
If the selection is a formula, you can quickly open the Formula Workshop to experiment with the formula.
If the selection is a form or named procedure, you can quickly locate it using the Open View dialog.
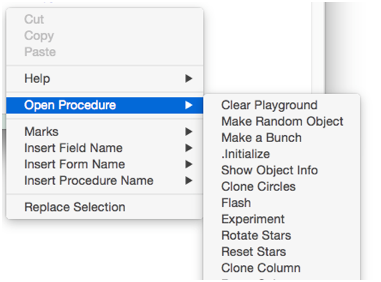
Open Procedure Menu
This submenu usually contains a list of all of the named procedures in the same database, you can open any procedure just as you would from the View Menu.
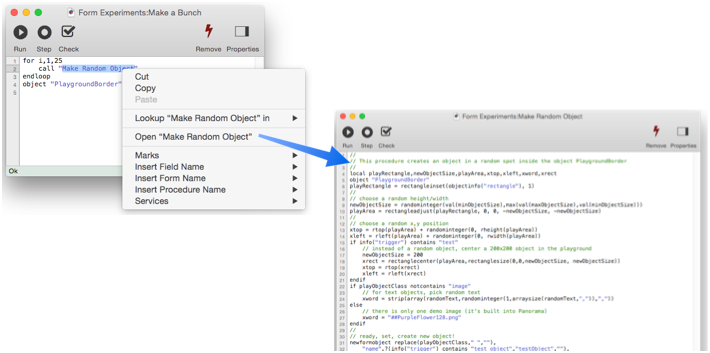
If you’ve already selected the name of a procedure, you can directly jump to it:
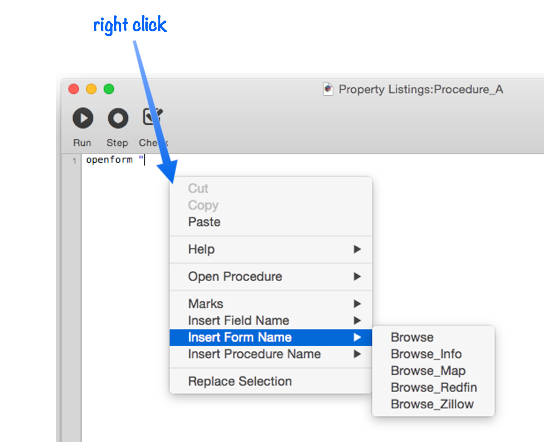
Insert Field/Form/Procedure Name
These menus make it easy and quick to accurately type in a field name, form name, or procedure name.
When a fieldname is inserted into the procedure, Panorama will automatically adjust it as necessary for the situation. For example when a multi-word field name or a field name with punctuation is inserted, the necessary chevrons will be added automatically (for example «Tracking Number» or «P/E Ratio»). However, if the field name is being inserted in between quotes, the chevrons won’t be added (for example “Tracking Number” or “P/E Ratio”). The quotes have to be put in first for this feature to work.
Organizing Large Procedures (The Mark Menu)
When a procedure grows to multiple pages, it can be difficult to navigate within the procedure itself. The Mark menu allows you to create “bookmarks” within the procedure, which are listed in the menu.
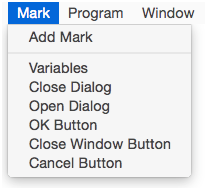
Choosing an item from this menu causes the editor to jump to the location in the procedure text corresponding to the mark.
As you can see in the illustration above, a mark is simply a special comment (see Comments) that looks like this:
//[--Mark Name--]
You can simply type in a mark yourself, or you can use the Add Mark command in the Mark menu. This command inserts a new mark into the code at the current location, which you can then rename to whatever you want. The new mark is immediately listed in the Mark menu.
You can also access the Mark menu from the pop-up context menu.
See Also
- Accessing the Clipboard -- reading from and writing to the system's clipboard.
- Action Menu -- simple way to create your own menu items.
- Alerts -- displaying a variety of standard modal alerts.
- Automatic Field Code -- running a short program when data is entered into a field.
- Channels -- provide a standard way to interface with external resources (email servers, phones, web sites etc.)
- Code -- basics of programming code.
- Coding with Debug Instrumentation -- modifying your code to generate debug instrumentation output.
- Control Flow -- making decisions about what code should be executed in response to changing conditions.
- copyindentedcode -- copies the selected code with 4 space indent (for pasting into the Panorama forum).
- Crash Proof Debug Instrumentation Monitoring -- real time crash-proof instrumentation monitoring
- Custom Dialogs -- creating custom dialogs using forms.
- Custom Menus -- creating custom menus, menu bars and pop-up menus (and customizing standard menus).
- Custom Statements -- creating your own custom statements that can be used in your code.
- Customizing Debug Instrumentation Coverage -- specifying what code is being debugged at the moment.
- Database Navigation & Editing -- using program code to navigate within a database, and to add and remove database records.
- Debug Instrumentation -- conditional logging of the internal state of Panorama program code.
- Debug Instrumentation Log Window -- dynamically monitor debug instrumentation output as your program runs.
- Debug Instrumentation Monitoring using an External Program -- monitoring debug instrumentation with an external program (Terminal.app, BBEdit.app).
- Debug Instrumentation Text File -- configuring and accessing the debug instrumentation log (text) file.
- Drag and Drop -- dragging data to and from a Panorama form.
- Generating & Analyzing HTML -- generating HTML code from data, and extracting data from structured HTML.
- Internet Access -- accessing information from web servers.
- Procedure Recorder -- recording database actions as code.
- Procedures -- basics of procedures for automation.
- Program Access to Databases -- using a program to create, open, import or export databases.
- Program Error Handling -- handling errors and exceptions that occur when a program is running.
- Programmable Database Administration -- using a program to access and/or modify the structure of a database.
- Programmable Form Management -- using a program to work with forms.
- Programmable Graphics -- using program code to create and modify graphic objects in a form.
- Programmable Outlines -- using a program to create and manipulate data outlines.
- Programmable Printing -- using program code to print reports, mailing labels, etc.
- Programmable Searching -- using program code to search and select data.
- Programmable Sorting -- using program code to sort a database.
- Programmable Text Export -- using a program to export text from a database.
- Programmable Window Management -- using a program to arrange windows.
- Programming Database Fields -- using a program to add and remove database fields.
- Recompiling Code -- recompiling code & formulas
- Recording Code Triggers in Debug Instrumentation -- the code triggers option automatically tracks whenever any code is triggered, whether from a menu, a button, or implicitly (for example when data is entered).
- Recording Control Flow in Debug Instrumentation -- configure debug instrumentation to automatically log when control flow is non-linear, for example a call, return, goto, etc.
- Scripting -- embedding scripting languages (AppleScript, shell scripts, Python, Ruby, PHP, Perl, etc.) into Panorama program code.
- Speech Programming -- using program code to convert data to speech (voice).
- Statements -- index of all statements available for use in Panorama procedures.
- Subroutines -- writing code that can be called from other code.
- Suppressing Display -- temporarily disabling display of changes in a program (to reduce "flickering" and increase performance).
- Timer Workshop -- provides a tool for monitoring timers and testing timer configurations.
- Timers -- executing recurring periodic background code at fixed intervals.
- Transforming Data -- using program code to modify data in bulk.
- Triggers -- finding out what event triggered the execution of program code.
History
| Version | Status | Notes |
| 10.0 | Updated | Carried over from Panorama 6.0, new modern editor. |