If you need to create a bunch of fields in a hurry, the fastest way is to use the Construct Multiple Fields dialog. This dialog can be accessed from the Field>Construct Multiple Fields menu item, and also from the File>New>New Database from Template command. Just open the dialog and type in the list of fields you want to create, then BAM – Panorama creates the fields for you.
If the field name is one of the hundred or so that Panorama knows about (all of these are), Panorama will automatically set up the width, type, and other attributes for you – your fields are ready to go. Otherwise you can customize the fields after they are created using the Field Properties Panel. You can also add tags to the field names to customize them as they are created, as described below on this page.
Note: The data sheet is normally limited to 150 visible columns at a time. If you need to use more than 150 fields, see Limiting the Maximum Number of Data Sheet Columns.
Inserting Multiple Fields
If the database already contains existing fields, you can use this dialog to insert multiple fields instead of adding them on the end. Simply check the Insert Before Current Field checkbox. (In this example, I am right-clicking on the field name to access the Field menu, instead of accessing it from the menu bar.)
Field Property Tags
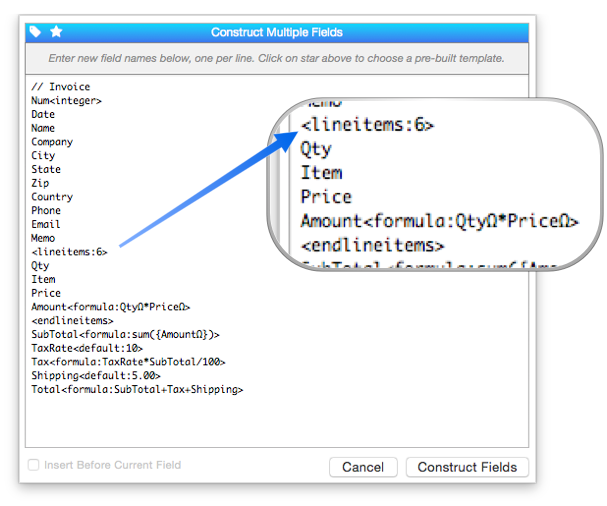
Each field can be customized with one or more tags. Each tag begins with < and ends with >. Most tags are followed with a colon and a value, for example <width:25>. Here is an example that will construct six customized fields.
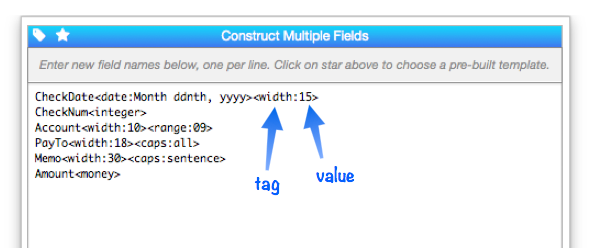
Remember, you don’t have to customize the fields with tags, you can do so after the fact with the Field Properties Panel. Also, Panorama tries to be smart about constructing fields, so for example it assumes that an Amount field is for money even if you don’t explicitly tell it.
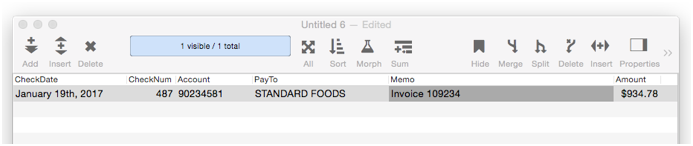
Here is the database created by the template above.
There are over a dozen different tags available. You can type them in manually, but there is also a pop-up menu to assist. Simply click on the tag icon in the upper left, then choose the tag you want and it will be inserted into the current spot.
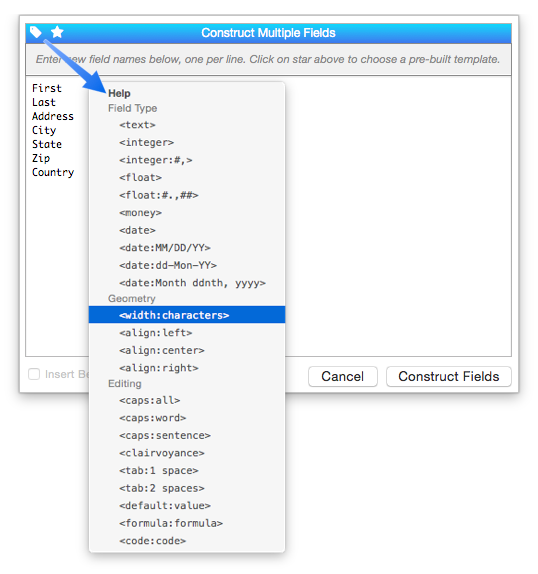
Field Type Tags
There are five tags for setting the field type: <text>, <integer>, <float>, <money> and <date>.
The <text> tag is almost always unneccessary, because Panorama defaults to this type for most field names.
The <integer> tag specifies that this should be a numeric field containing integers (see Numeric Data). This tag can optionally include an output pattern, for example <integer:#°> for a temperature field (see Numeric Patterns). Note: Panorama will automatically construct the following field names as integers: Age, Check, Count, Days, Duration, Hours, Minutes, Months, Num, Number, Population, Qty, Quantity, Quarters, Score, Seconds, Years.
The <float> tag specifies that this should be a numeric field containing real numbers (see Numeric Data). This tag can optionally include an output pattern, for example <float:#.###e#> for a scientific value. Note: Panorama will automatically construct the following field names as floating point numbers: Angle, Average, Bearing, Depth, Deviation, Distance, Height, Latitude, Length, Longitude, Mass, Max, Maximum, Min, Minimum, Rate, TaxRate, Temp, Temperature, Variance, Weight, Width.
The <money> tag specifies that this should be a floating point numeric field formatted as numeric values (preceded by a currency symbol and with two significant digits after the decimal point). Note: Panorama will automatically construct the following field names as money fields: Amount, Balance, Cost, Credit, Debit, Money, Price, Shipping, SubTotal, Tax, Total, Value.
The <date> tag specifies that this should be a date field (see Dates). This tag can optionally include an output pattern, for example <date:Month dd, yyyy> (see Date Patterns). Note: Panorama will automatically construct the following field names as dates: Arrival, Birthday, Date, Departure, Due, Expires, Purchased, Sold.
Field Geometry Tags
There are two tags for adjusting the geometry of the field: <width:characters> and <align:left/center/right>.
The <width:characters> tag specifies the width of the field in the data sheet. This width is specified in characters, not an absolute dimension like points or inches. If you specify a width of 12, there will be approximately enough space to display 12 characters (some characters are wider than others, so this is not exact). The absolute width depends on the font size being used.
If you don’t include a <width> tag, the default width is 10 characters for text fields, 3 characters for integer fields, and 6 characters for date and floating point fields. Panorama also has a list of default widths for about a hundred common fields, for example a City field defaults to 12 characters while a State field defaults to 3 characters. Of course it’s easy to adjust the width later, so in most cases it may not be worth bothering with an explicit width tag.
The <align> tag specifies the alignment of the field. If the field being constructed is numeric (see above), the alignment is automatically set to right, so you rarely need to use this tag.
Data Editing Tags
These tags customize how the field behaves when being edited.
The <caps> tag controls automatic capitalization. The options are all (everything capitalized), word (first letter of each word is capitalized) and sentence (first letter of each sentence is capitalized). Note: Panorama will automatically set the capitalization option for the following common field names, though you can override with an explicit <caps> tag if necessary: COUNTY Account, Address, Agency, Apartment, City, Company, Country, Department, First, Gender, Item, Last, Middle, Name, Office, Organization, Pay, Payee, PayTo, Position, PostalCode, Prefix, Province, Room, School, Spouse, State, Street, Suffix, Suite, Title, Zip.
The <clairvoyance> tag enables Panorama’s auto-complete Clairvoyance® feature (see Field Properties). There’s no value for this tag, just leave the tag off if you don’t want Clairvoyance enabled. Note: Panorama will automatically enable Clairvoyance for the following common field names: Account, Agency, City, Company, Country, Department, First, Gender, Item, Last, Middle, Name, Office, Organization, Pay, Payee, PayTo, Position, Prefix, School, Spouse, Suffix, Title.
The <tab> tag enables Panorama’s Space Bar Tab feature (see Field Properties), which allows the space bar to be used to tab to the next field. The value should start with 1 (pressing the space bar once is the same as pressing tab) or 2 (pressing the space bar twice is the same as pressing tab). Note: Panorama will automatically enable the Space Bar Tab feature (requiring two space bar actions) for the following common field names: Account, Address, Age, Agency, Amount, Apartment, Arrival, Balance, Birthday, Check, City, Company, Cost, Count, Country, Credit, Date, Days, Department, Departure, Due, Duration, Email, Expires, First, Gender, Hours, Item, Last, Middle, Minutes, Money, Months, Name, Num, Number, Office, Organization, Pay, Payee, PayTo, Population, Position, Prefix, Price, Province, Purchased, Qty, Quantity, Quarters, Room, School, Score, Seconds, Sold, State, Street, Suffix, Suite, Title, Years, Zip.
The <default:value> tag sets the default value for the field when a new record is created. For example, for a shipping field you might say <default:UPS Ground>.
The <formula:formula> tag sets up a formula that will calculate the value of this field when other fields change, for example <formula:Quantity*Price>. The <code:code> tag is used to define a program that will run when the field is modified. To learn more about these features, see Automatic Field Calculations and Automatic Field Code.
Repeating Line Item Fields
Use the <lineitem:count> and <endlineitem> tags to define one or more fields that should repeat with a numeric suffix. In this example, the four lines Qty, Item, Price and Amount will actually generate 24 fields – Qty1, Item1, Price1, Amount1, Qty2, Item2, Price2, Amount2, etc.
See Line Item Fields for more information on this feature.
Complete Database Templates
Click the star icon for a list of templates for constructing complete databases.
You can use the template as-is or modify it as necessary.
See Also
- addfield -- adds a new field to the current database (on the end).
- Adding New Fields -- adding one or more fields to a database.
- autoallfieldwidths -- automatically sets the width of all fields based on the data in each field.
- autofieldwidth -- automatically sets the width of the current field based on the data in it.
- Automatic Field Calculations -- performing formulas automatically when data is entered into a field.
- Automatic Field Code -- running a short program when data is entered into a field.
- automaticfieldchoices -- updates the current field's Choice list with actual data in the database.
- automaticfieldname( -- returns an available field name.
- cell -- enters a value into the currently active field (i.e. cell).
- checkdesignlock -- checks if field structure can be changed, if not, returns an error.
- commonfieldspopup -- pops up a list of common fields, and changes the current field specifications when a field is chosen from this menu.
- constructfields -- creates one or more new fields based on a template.
- databaseconsoledump -- dumps the raw contents of the specified database to the console in comma delimited format.
- Date Patterns -- control how dates are displayed or converted to text.
- Dates -- working with dates.
- dbinfo( -- gets information about a database: what forms it contains, what fields, what flash art pictures, etc.
- deletefield -- deletes the current field from the database.
- Deleting Fields -- deleting fields from the database.
- Disable Editing of Individual Fields -- disable editing of inidividual database fields in the data sheet and/or forms.
- disablefieldediting -- disables editing for a specified list of database fields (all others are enabled).
- editfield -- begins editing of the specified field.
- editfieldname -- opens the data sheet window's field properties inspector and selects the field name.
- Field Blueprint Dialog -- examining and modifying the raw specification of a field.
- Field Properties -- available field attributes.
- Field Properties Panel -- examining and modifying field attributes.
- Field Width -- adjusting the width of a field in the data sheet.
- fieldalignment( -- returns the alignment of a database field.
- fieldformula( -- returns the formula associated with a database field.
- fieldname -- changes the name of the current field.
- fieldnumber( -- returns the number of a database field (starting with 1).
- fieldpattern( -- returns the output pattern associated with a database field.
- Fields -- introduction to database fields.
- fieldtype -- changes the data type of the current field.
- fieldtypes -- returns a carriage return delimited array with list of fields and field data types.
- fieldtypes( -- returns a carriage return delimited array with a list of the fields and field data types.
- fieldwidth( -- returns the width (in the data sheet) of a database field.
- findreplacedialog -- opens the Find & Replace dialog.
- firstcolumn -- moves to the first column in the data sheet (leftmost column).
- getfieldproperties( -- returns a dictionary containing all of the properties of the specified field. (See the setfieldproperties statement if you want to change one or more field properties.)
- hiddenfields( -- returns a list of hidden fields in the curent data sheet window
- hidecurrentfield -- hides the current field in the data sheet.
- hidefieldsbetween -- shows all fields except those in between specified numbers.
- hidelineitemfields -- hides all line item fields.
- hidethesefields -- hides specific fields in the data sheet, making all others visible.
- Hiding and Showing Fields -- temporarily hiding fields in the data sheet.
- info("datatype") -- returns the data type of the current field.
- info("disabledfields") -- returns a list of disabled fields in the current database (fields that cannot be edited).
- info("enabledfields") -- returns a list of enabled fields in the current database (fields that can be edited).
- insertfield -- inserts a new field into the database in front of the current field.
- lastcolumn -- move to the last column in the data sheet (rightmost column).
- Limiting the Maximum Number of Data Sheet Columns -- adjusting the maximum number of columns displayed in data sheet windows.
- Line Item Fields -- are used for repeating items within a record
- mergefieldsdialog -- opens the standard *Merge Fields* dialog.
- Merging Adjacent Fields -- merging two fields into one.
- movefieldbefore -- moves the current field to a new position.
- newdatabasewithfields -- creates a new database with one or more fields.
- newdatabasewithtemplate -- creates a new database with a template.
- Numeric Data -- numeric data (fixed and floating point).
- Numeric Patterns -- control how a number is displayed or converted to text.
- Rearranging Field Order -- rearranging the order of fields in the data sheet.
- reorderfieldsdialog -- opens the Reorder Fields dialog.
- serverdatabaseconsoledump -- dumps the raw contents of the specified database on the server to the console in comma delimited format.
- setfieldnames -- changes the names of all database fields at once.
- setfieldproperties -- modifies one or more properties (name, data type, formula, etc.) of the current field.
- showallfields -- makes every field in the data sheet visible.
- showcolumns -- forces Panorama to display specified fields.
- showfields -- forces Panorama to display specified fields.
- showfieldsbetween -- hides all fields except those in between specified numbers.
- showhidefieldsdialog -- opens the standard Show/Hide Fields dialog (in the Fields menu).
- showthesefields -- makes specific fields in the data sheet visible, hiding all others.
- Smart Dates -- keyboard entry of dates.
- splitfielddialog -- opens the standard *Split Field* dialog.
- Splitting a Field -- splitting a field into two fields.
- tokenname( -- returns the name of a field or variable (instead of the value contained in the field or variables).
- visiblefieldnumbers( -- returns a data array of visible fields (by number) in the data sheet.
- visiblefields( -- returns a list of visible fields in the data sheet.
History
| Version | Status | Notes |
| 10.0 | New | New in this version. |