The Text Editor Object is used to edit text in a field or variable. It is one of the most commonly used type of objects.
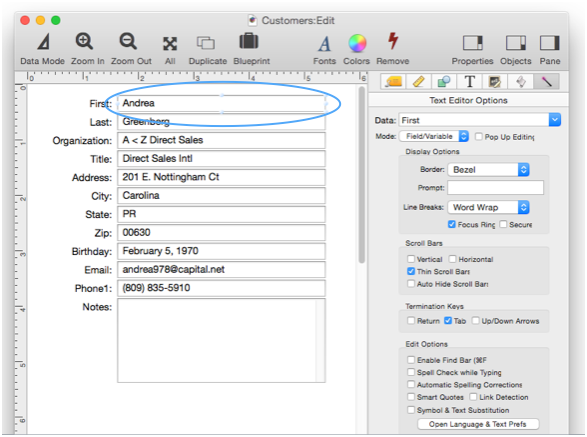
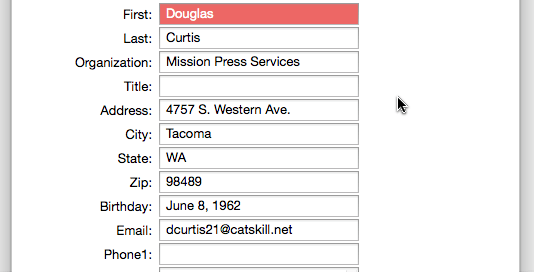
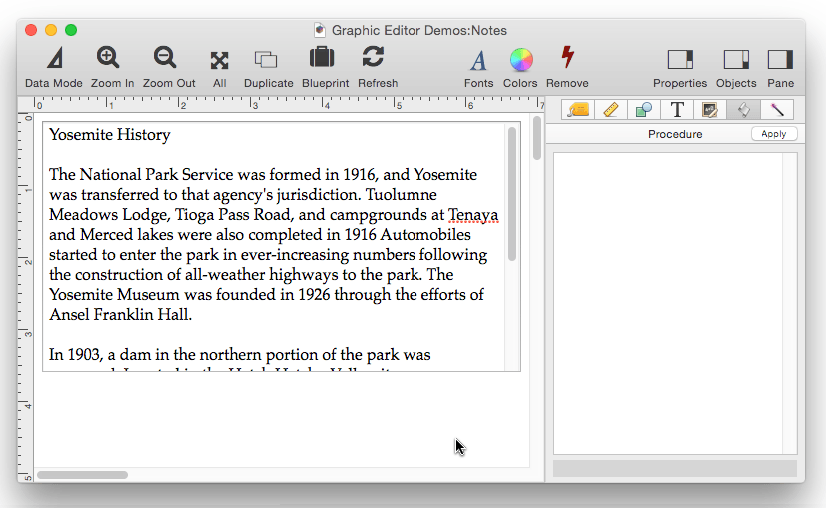
On this page you’ll learn how to create and manipulate individual Text Editor objects. Panorama can also automatically lay out multiple Text Editor objects for you. In fact, all the objects in the form displayed above were created automatically in a few seconds. See Automatic Form Construction to learn more about how this works.
Text Editor Data Source
Text Editors need to be linked to a source of data – either a database field, a variable, or a formula.
Database Field – The most common data source is a database field. To use a database field as the source, simply type in the name of the field (the name will auto-complete), or choose the field name from the pop-up menu.

Variable – You can also use a global, fileglobal, or windowglobal variable as the data source simply by typing in the name of the variable (there is no auto-complete for variable names).
If you specify a variable that has not already been created with a procedure, Panorama will automatically create a fileglobal variable with this name the first time the form is displayed. In this example, a fileglobal variable named sampleName will be created and assigned as the data source for the Text Editor.
You’ll notice that when the variable name is first typed in, an error message appears because the variable doesn’t exist yet. You can ignore this error. When the form is switched into Data Mode, the variable is created and initialized with empty text. You can immediately type a value into the variable, as is done in the example above.
Once the Text Editor is set up, you can access the variable in a procedure. For example, this code would display the variable’s value in an alert:
message sampleName
Earlier I stated that if the specified variable doesn’t already exist, Panorama will automatically create a fileglobal variable. However, that isn’t always true. The type of variable to be created can be customized in the Form Properties panel.
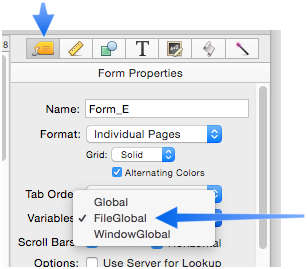
Usually FileGlobal, the default, is the correct choice. However, you should use WindowGlobal variables if you intend to open multiple windows with this form (this is called a clone window). Specifying the WindowGlobal option will cause Panorama to keep separate variables (with the same name) for each open window.
Formula – The third option is to link a formula as the data source for the Text Editor option. This advanced option is described in detail at the bottom of this page.
Pop Up Editing
Text Editor Objects have two modes for editing text. The default mode is just like any other Macintosh program – you click on the text and start editing it in place.
If you check the Pop Up Editing option, the Text Editor will work like the Data Sheet. With this option enabled, when you click on a Text Editor object it will select the field.
To edit, double click on the Text Editor Object. This causes a a pop-up editing window to appear (just like the data sheet). This pop-up window can be expanded to allow for wider and/or taller text.
Note: The Pop Up Editing option is designed to be used with database fields, not variables. If you do use this option with a variable, the object will not highlight when you click on it (there is no such thing as a “current variable”, so there is no highlighting).
Text Editor Display Options
These options control the general appearance of the Text Editor object. There are also several relevant options in the Text panel (see Fonts to learn how to modify the font and/or text size of a Text Display object, and Text Object Background Color/Gradient for backgrounds).
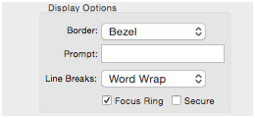
Border – This option controls the type of border (if any). The Bezel option creates a 3D border using the standard OS X border style for text editing. The Line option creates a 1 pixel border. You can also create a border using the Apperance Palette (see Object Inspection Palette).
Line Breaks – This option controls how text is wrapped within the object’s rectangle. The truncate options will display ellipsis at the end, middle or beginning of the text if it is too long to fit inside the object’s rectangle.
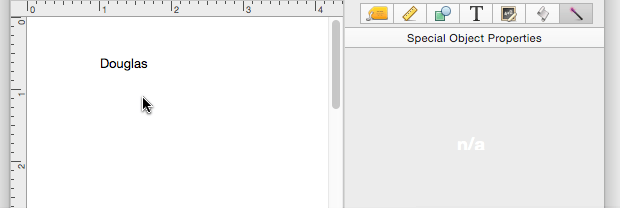
Prompt – This option specifies a prompt that will appear in light gray if there is no text.
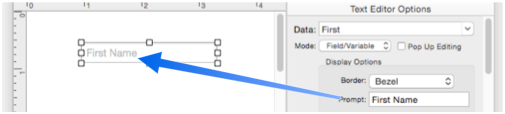
The prompt text disappears as soon as the first character is typed in.

Depending on the font and text size you are using, the prompt may not line up vertically with the edited text. If this happens, you’ll see the text “jump” as the first character is entered. In fact you can see that happening in the example above. To fix this, open the object’s blueprint (see Form Object Blueprint) and adjust the prompt vertical offset. In this example, changing the vertical offset to -2 corrects the problem.
"$TextEditorEmptyPromptVOffset","-2",
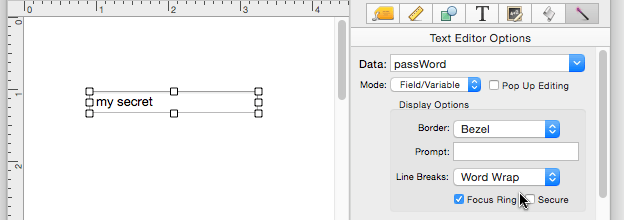
Focus Ring – If this option is checked, a blue ring will appear around the object when it is being edited (the example above shows a focus ring).
Secure Text – Use this option to prevent “shoulder surfing” as sensitive text is entered. When this option is enabled, the text is replaced with bullets.
Text Editor Scroll Bars
This section controls what scroll bars (if any) will be available when editing this text, and their appearance.
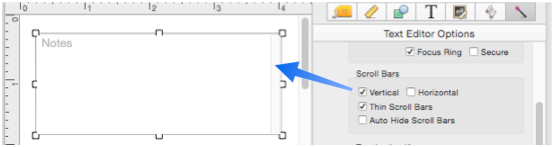
If the Auto Hide Scroll Bars option is checked, the scroll bars will only appear if the text is too large to fit within the editor object’s dimensions.
Termination Keys
These options specify what types of keys should stop text editing.
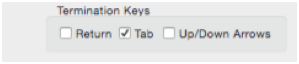
Text editing always stops when the Enter key is pressed. The checkboxes in this section allow you to designate that the Return, Tab, and/or Up/Down Arrow keys will also terminate text editing. If an option is not checked, that key can be used in editing. For instance if the Return option is not checked, you can use the Return key to add a new line to the edited text.
Editing Options
These options customize the operation of the editor.
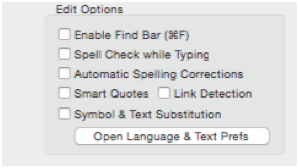
Enable Find Bar – If this option is checked, pressing Command-F when editing will bring up a find/replace bar within the text editor.
You can also find and replace a word or phrase using this panel.
Note: The Text Editor Object must be at least a half inch high to use this option, otherwise there will not be enough room for the bar.
Spell Check While Typing – If this option is checked, spelling errors will be highlighted with a squiggly red line as you type.

Automatic Spelling Correction – If this option is checked, spelling errors will be automatically corrected as you type (using the OS X spelling correction engine).

Smart Quotes – If this option is checked, straight quotes will automatically be converted to typesetter quotes as you type.

Link Detection – If this option is checked, URL’s typed into the text will automatically be highlighted with a blue underline.

Unfortunately, the underlying Apple technology for this feature is not always reliable at detecting links. When it does work, you can click on the link and that URL will be opened in Safari.
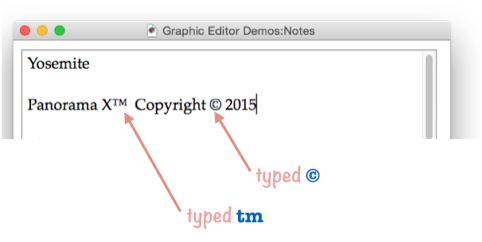
Symbol & Text Substitution – If this option is checked, special character sequences will automatically be converted into symbols. For example, (c) will be converted to a copyright symbol. (Image shows copyright symbol, not (c)
To see and edit the special character sequences, press the Open Language & Text Prefs button (which opens the System Preferences application) and choose the Text tab.
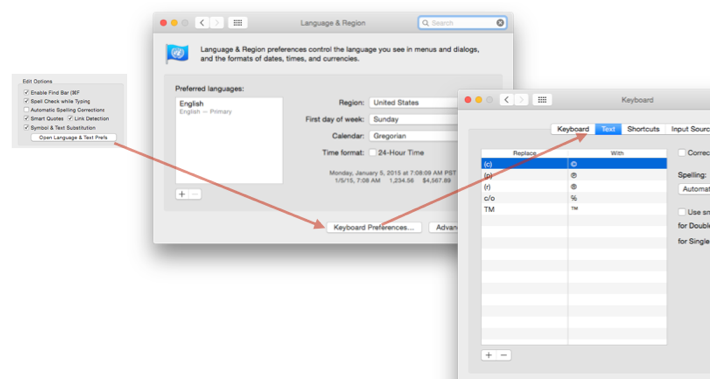
From this panel you can edit the substitutions, and even create your own substitutions.
Tab Options
These options control how the Text Editor Object interacts with the Tab key.
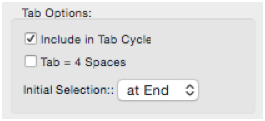
Include in Tab Cycle – If this option is not checked, this object will not be included in the tab cycle, and will be skipped over when you tab from object to object. You can still click on the object to edit the text.
Tab = 4 Spaces – If this option is checked, the Tab key will cause four spaces to be inserted into the text (instead of the tab character).
Initial Selection – This option controls how the text is initially selected when you tab into a field. The default is at End, but it can be set to at Start or All.
Variable Editing Options
These options control how the Text Editor Object operates when editing a variable. These options are ignored if the data source is a database field.
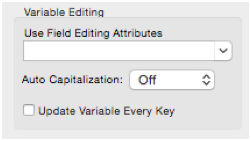
Use Field Editing Attributes – This option only applies if the Text Editor Object is associated with a variable or formula. You can use this if you would like the Text Editor Object to use the editing attributes assigned to one of the fields in your database (auto-capitalization, Clairvoyance(r), etc.. It will not use attributes that aren’t invoked as you edit (justification, output pattern.)
Auto Capitalization – This option only applies if the Text Editor Object is associated with a variable or formula. You can force the text to all upper case (ABC), word caps (Abc), or capitalization of the first letter of each sentence. If the Text Editor Object is associated with a field, the Text Editor Object will automatically use the Auto Caps setting for that field.
Update Variable Every Key – This option only applies if the Text Editor Object is associated with a variable. If this option is enabled, the Text Editor Object will update the value of the variable immediately after every key is pressed. Otherwise the variable will not be updated until editing is finished. This mode is especially useful when the Text Editor Object is set up to trigger a procedure after every key or most keys.
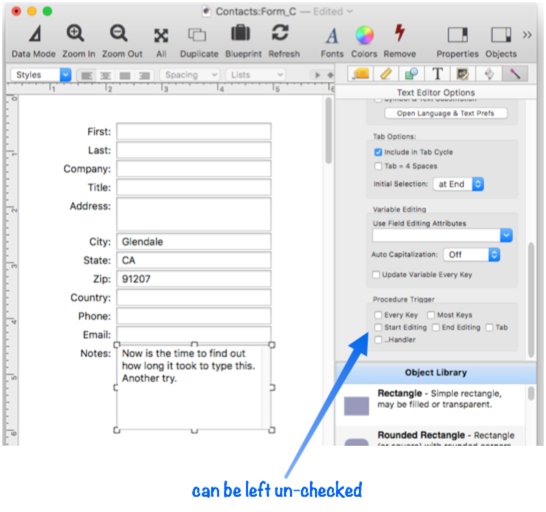
Procedure Trigger Options
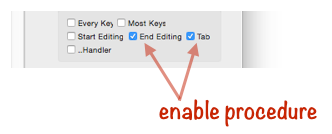
These options control when the procedure associated with the object (if any) is triggered (run). If you want the procedure to run, you must enable at least one of these options.
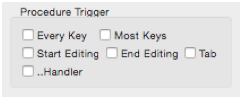
There are five choices: Start Editing, End Editing, Tab, Every Key and Most Keys. Since more than one of these options can be checked, the procedure can use the info(“texteditortrigger”) to determine what action triggered the procedure.
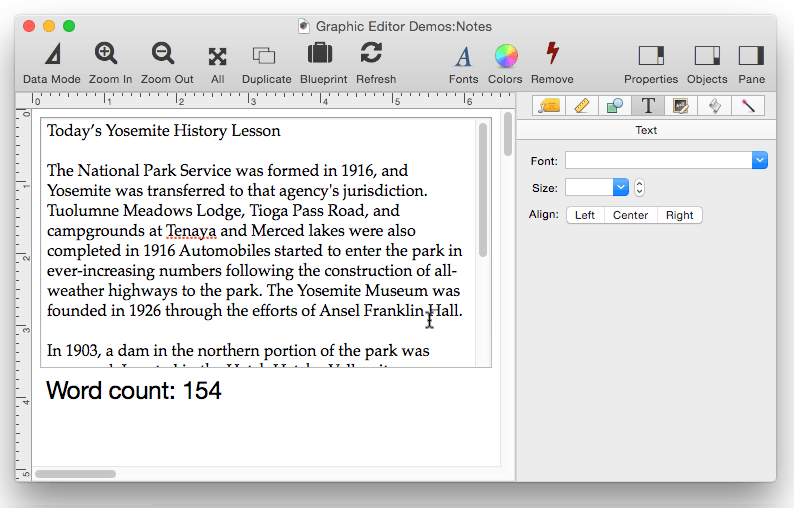
The most common option is End Editing. This will cause the procedure to be triggered when the user finishes editing (for example, presses the Enter key). This example triggers a procedure that counts and displays the number of words in the text.
If the Every Key option is checked, the procedure will be triggered every time the user presses a key. For example, you might use this option if you wanted to count the user’s key strokes.
If the Most Keys option is checked, the procedure will be triggered after every key when the user types slowly, but will not be triggered for each key when the user types several characters quickly in a row. The procedure will not be triggered until the user pauses in his or her typing. This option often works as well as the Every Key option but usually appears much smoother and faster to the user because the procedure is not being triggered as frequently while the user types. Possible applications for the Most Keys option include counting the characters or words being edited, performing a calculation (metric conversion, for example), checking spelling, etc.
If you use the Every Key or Most Keys options, you’ll probably also want to set the Update Variable Every Key option (see above). If you don’t, the procedure won’t be able to access the value being edited.
This example shows how the Most Keys option can be used to count words as text is typed. The procedure code updates a fileglobal variable named wordCount most times the text is changed. Here is the code:
fileglobal wordCount
wordCount = wordCount(Notes)
showvariables wordCount
And here is the code in action:
Multiple Trigger Options
Beginning with Panorama X 10.1, it is now possible to include multiple trigger options simultaneously. To differentiate each possible trigger, Panorama looks for a special label for each trigger:
startEditing: ☞ called when editing starts
finishEditing: ☞ called when editing finishes
everyKey: ☞ called for every key
mostKeys: ☞ called for most keys
“Most keys” means that the code will not be triggered for every key if two or more keys are pressed in quick succession. Don’t include both everyKey: and mostKeys: labels, if you do, only everyKey: will be triggered.
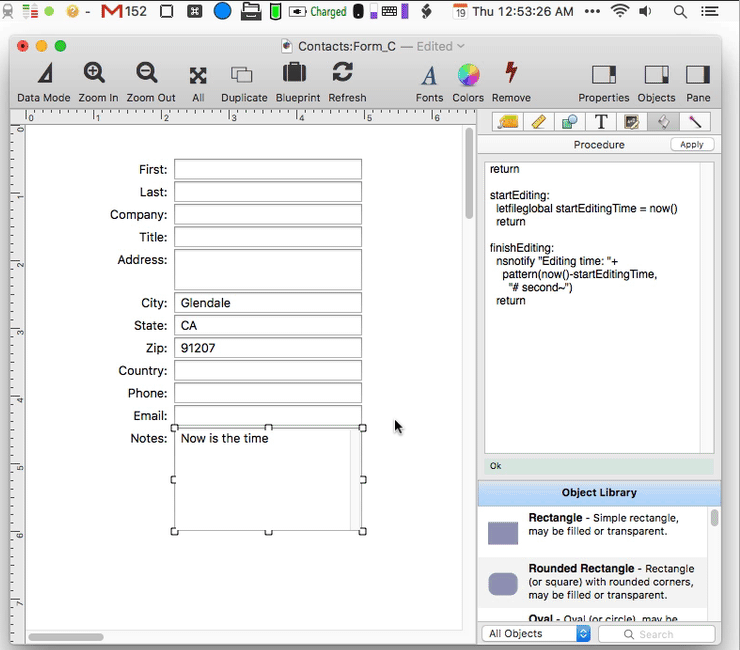
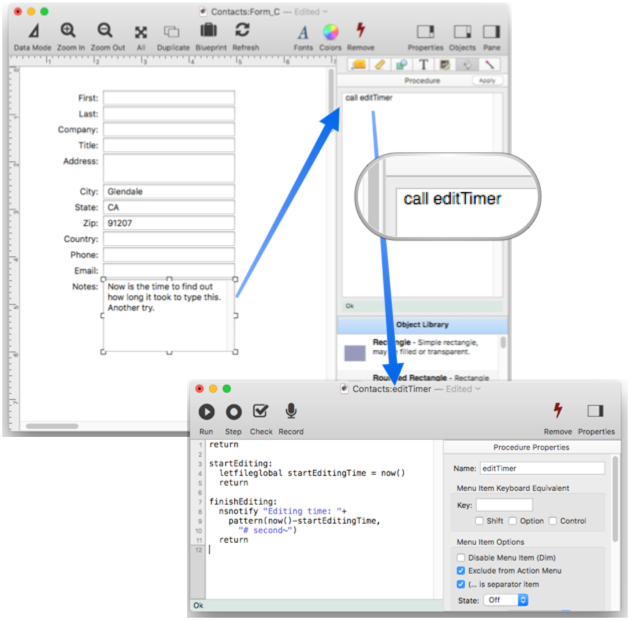
Here is an example that uses this feature to time how long the user takes to edit the text. When editing starts, Panorama calls startEditing: which sets up a fileglobal with the current time. When editing is finished, Panorama calls finishEditing: which displays a notification of the time taken to edit the data.
return

startEditing:
    letfileglobal startEditingTime = now()
    return

finishEditing:
    nsnotify "Editing time: "+pattern(now()-startEditingTime,"# second~")
    return
Here is what this code looks like in the form properties panel (see Form Object Code).
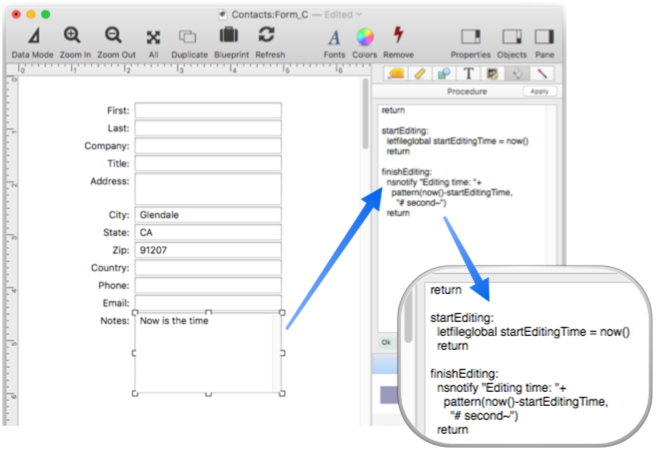
Here is this editing timer in action.
If you prefer, you can move this code to a separate named subroutine, and call it from the properties panel. This can be more convienient for editing and debugging, and also allows you to share the same code among multiple objects. If you do this, the code in the properties panel can only contain one statement – the call statement that calls the subroutine. If Panorama sees just this one statement, it will look in the subroutine for any special labels like startEditing: and finishEditing:. If there is more than one statement, the labels must be in the properties panel. Here is a revised version of the previous example with the code moved into a separate procedure named editTimer.
Note: If your code includes these labels (either in the properties panel or in a separate subroutine), it is not necessary to check the Procedure Trigger enable options. You can leave these unchecked, but Panorama will still trigger the code if the label is there (it will also trigger the code if these options are checked, basically the labels override the checkboxes).
Deferred Display of Database Changes until Code is Finished
When the code triggered from a Text Editor Object is running, Panorama automatically defers display of any database changes until the code is completely finished. Normally you won’t even notice this, but to learn more, see the showlater statement.
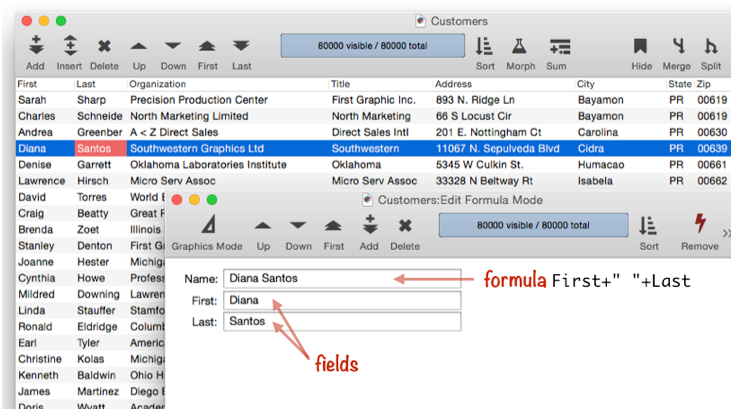
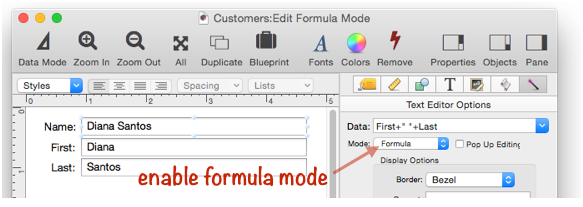
Editing Data Using a Formula
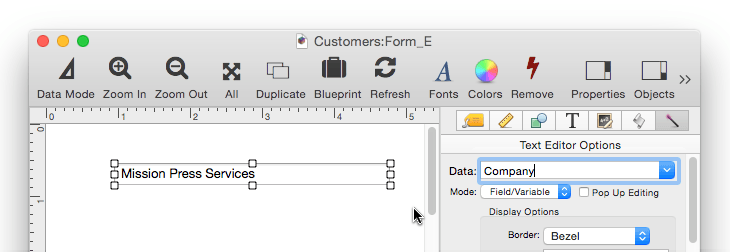
If you select formula mode the Text Editor Object is not editing a real data item, but a temporary data item created “on-the-fly” using a formula. In this mode you can type any formula you want into the Data option. For example, suppose your database has separate fields for first and last names, but you’d like to edit both names at once. This form has three Text Editor objects – one that combines both first and last names into a single object, and the other two that edit the separate fields (the normal way).
To set this up,
There’s only one problem – once editing of the combined name is finished, how does Panorama know where to put the edited text? You can’t store text back into a formula! Since it doesn’t know where else to put it, Panorama places the edited text in a variable called TextEditingResult. If you want to store this text somewhere else you’ll need to type a procedure into the Procedure Inspector Panel (see Object Inspection Panel) that takes this variable and stores the data somewhere.
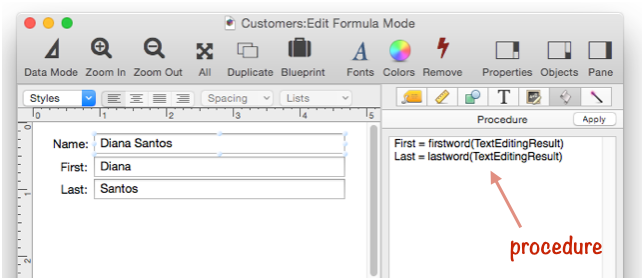
Be sure to check the Procedure Trigger End Editing and Tab options so that the procedure will be triggered and the data stored when editing is complete.
Here is the Text Editor with formula mode in action.

When the Return key is pressed, the procedure is triggered to split the name into separate First and Last name fields (you can also see the Data Sheet updating in the background).
Diagnosing Formula Problems
If your formula has a problem, you can usually immediately see the problem simply by looking at the Text Editor Object. However, if the object is small, you may not be able to see all of the text, making it difficult to determine the problem. In that situation you can use the Object Value dialog to display the entire formula result. See Diagnosing a Formula embedded in a Form Object to learn how to use this dialog.
See Also
- Adjusting Object Spacing -- adjust the spacing between multiple selected objects so that the same amount of space is in between each pair of objects.
- adjustobjectspacing -- adjusts the spacing of selected objects in a form.
- adjustobjectspacingdialog -- opens a dialog sheet to adjust the spacing of the currently selected objects.
- Aligning Objects -- so that two or more object edges are made even with each other.
- Automatic Form Construction -- creates a column of form elements for editing data fields (or variables).
- Automatic Mailing Label Construction -- creates a mailing label.
- Automatic Report Construction -- creates a tabular report with columns of data.
- Cocoa Objects -- discussion of how objects are implemented in Panorama X compared to earlier versions
- Creating a New Form Object -- with the Object Library.
- Data Button Object -- is used to create checkboxes and radio buttons.
- Diagnosing a Formula embedded in a Form Object -- diagnosing problems with formulas embedded in form objects.
- Displaying Data in a Grid -- fundamentals of displaying data in a grid (Text List/Matrix).
- Duplicating Objects -- to make copies of one or more objects.
- Fixed Image Object -- is used for fixed images (images that never change).
- Fonts -- setting the font and text size of form text objects.
- Form Object Appearance -- changing the color, fill, stroke, opacity and drop shadow attributes of selected objects.
- Form Object Blueprint -- display and edit raw object specifications
- Form Object Code -- associating programming code with an object
- Grouping Objects -- allows you to manipulate multiple objects as if they were a single object.
- Image Display Animations -- animated images.
- Image Display Colors and Gradients -- displaying pure colors and gradients
- Image Display Data Buttons -- checkboxes and radio buttons created from custom images.
- Image Display Object -- is used for dynamic images (images that change depending on the data).
- Image Display Push Buttons -- push buttons created from custom images.
- info("clickedobjectname") -- returns the name of the button that was just clicked.
- info("texteditortrigger") -- returns the reason why a Text Editor object triggered a procedure.
- Line Item Grid Constructor -- creates a grid of form elements for displaying and editing line item fields.
- Line Object -- draws a line within a form.
- Matrix Clicking -- handling clicks in a Matrix Object.
- Matrix Constructor -- quickly creating a Matrix Object from a template.
- Matrix Database Integration -- synchronizing a Matrix Object with a database.
- Matrix Geometry -- customizing the size and geometry of Matrix Object elements.
- Matrix Header and Horizontal Scrolling -- setting up a custom header for a Matrix Object grid.
- Matrix Object -- displaying a grid of items with a custom arrangement.
- Matrix Object Frame -- setting up the arrangement of items within a Matrix Object.
- Matrix Programming -- programming a Matrix object.
- Object Inspector Panel -- is used to view and modify the attributes of selected objects in a form.
- Object Library -- is used to create new objects in a form.
- Object Names -- can be used to identify an object in a program.
- Oval Object -- draws an oval or circle within a form.
- Polygon Object -- draws a polygon within a form.
- Popup Menu Button Object -- is used to create popup menus anywhere on a form.
- Progress Indicator Object -- is used to create progress indicators
- Push Button Object -- triggers a procedure when it is pushed.
- Rectangle Object -- draws a rectangle or square within a form.
- Report Tile Object -- component for assembling a custom report.
- Rounded Rectangle Object -- draws a rectangle with round corners within a form.
- Scroll Bar Object -- is used to create scroll bars.
- Segmented Button Object -- is used to created segmented buttons.
- Selecting Form Objects -- so that they can be modified.
- Slider Object -- is used to create sliders and knobs.
- Smart Resize -- adjusts the sizes and locations of the other selected objects to match the change of one object.
- Star Object -- draws a star within a form.
- Stepper Object -- is used to create numeric steppers for use with Text Editor objects.
- Tab Panel Appearance -- appearance options for a Tab Panel Object.
- Tab Panel Buttons and Selection -- button options for a Tab Panel Object.
- Tab Panel Constructor -- quickly creating a Tab Panel Object from a template.
- Tab Panel Content -- setting up the content for a Tab Panel Object.
- Tab Panel Forms -- setting up the forms for a Tab Panel Object.
- Tab Panel Object -- switchable tab panels.
- Text Display Object -- is used to display text using a formula.
- Text Label Object -- displays a short, fixed, text item within a form.
- Text List Appearance -- customizing the appearance of a Text List Object.
- Text List Constructor -- quickly creating a Text List Object from a template.
- Text List Database Integration -- synchronizing a Text List Object with a database.
- Text List Multiple Columns -- displaying multiple columns in a Text List Object
- Text List Object -- displaying a grid of text.
- Text List Programming -- programming a Text List Object.
- Text List Searching -- searching within a Text List Object.
- Text List Selection -- selecting items in a Text List Object.
- Text Object Background Color/Gradient -- text object background colors and gradients.
- Web Browser Object -- is used to display web pages from within a Panorama form.
History
| Version | Status | Notes |
| 10.2 | Updated | Now allows custom background colors and gradients. |
| 10.1 | Updated | Now allows multiple code triggers for a single form object. |
| 10.0 | Updated | Carried over from Panorama 6.0 from Text Editor SuperObjects, but with many new features. |